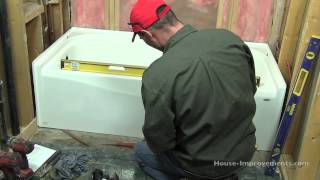
Part "1" How to install new tub, level it & connect drain and overflow plumbing DIY Atlanta GA

Vložit
- čas přidán 20. 09. 2013
- I am presenting bathtub installation instructions and new plumbing adjustment - drain and overflow connections STEP BY STEP !!!! You will see everything that needs to be done in order to connect and have new tub working perfectly !!!
____Click link to donate and support my Channel , thank you.___ www.paypal.com/cgi-bin/webscr...
This is 2 videos tutorial
You can buy exact same adjustable drain kit on my E-bay auction.
Please search for :
Remodeling Drain Kit
Thank you for watching
Michael - Tile Master Atlanta GA - Jak na to + styl


![Plumbing a bathroom explained in 4 minutes. [You CAN do it!] #diy #plumbing](/img/n.gif)
There are very few contractors/handymen as good as this. Very thorough and comprehensive, and covers every little detail that many installers overlook.
Well done, excellent video.
I just took a glimpse at this video , while at work, with out sound, and I cannot wait to watch in the comfort of my home. I am not spending thousands of $ for this. You are amazing. I have not seen such a detailed video for those who sincerely desire to understand connections, I have no bathtub, and you give me hope!!!!!! thank you for SHARING YOUR SKILL AND KNOWLEDGE!!!!!! I wish more professionals would have the same outlook. again, THANKYOU!!!!!!!
Thank you for thoroughly explaining in detail!!!
GA tile master is awesome. Outstanding video on installing a tub. Thanks to your videos I installed a new tub, walls are lined up, tub is set and my drain lines lined up thanks to you! Excellent videos!!
Great teacher. Im doing a bathroom renovation by myself and im basically following every single instruction on your videos so far everything is going great. Thank you so much for taking the time to teach. You're a great educator.
TileMaster, thank you very much for doing this video, I am installing a bathtub at home and this video really gave me great ideas on how to proceed, May the Lord keep you healthy and wealthy. Regards from Costa Rica.
If it was not for these videos i would be Broke..Thank you very much for taking the time to educate us
This is the single best tub installation video on CZcams thank you.
I must say I got the best laugh out of the piece falling into the basement at the end. Nice to know that stuff happens to everyone and not just me!
Very thorough in explaining. Thank you!
I have been referring to your videos for several years. For a DIY person, your presentations are very clear. Thank you!
wow I'm so impressed how good this guy was, great job.
Absolutely outstanding video . Watched this and the second one. Just bought a house with that exact layout and was stumped by the drain. I now have the confidence to replace it all . Cant wait to watch the tileing one. Thanks.
Your videos are awesome. They are very informative and your explanations are easy to understand. Thank you so much.
Tilemaster, you are the BEST! Your videos and craftsmanship is amazing! I was able to install a new tub, and do the most amazing tile work ever. I wish I could post a picture so you could see. People are now asking me to do their bathroom..thank you! I hope all your days are blessed! Chris
These are the best demonstration of quality construction and installation that I have seen. Thanks for sharing all of the "tricks" that make the difference between average and quality work.
8;
0
Congrats guy, u got a whole vission about the building. Thanks.
Thank you for taking the time to make these videos. You have just saved me from making many mistakes. You're a great presenter, your instructions are clear and concise and you're really easy to look at.
Great information!
Great job on these step by step videos. Very thorough and professional! They are appreciated. Keep them coming!
Very informative and helpful! Thank you sir!
Fantastic work. Thanks for taking the time to show us.
Thanks for your video!! With it I was able to install my new tub and it is rock solid! Even the same make and model of tub so all the measurements were the same.
So thorough. Thanks for this vid!
thank you so much for all the help!
Excellent videos. Thank you very much for walking us through this work. I plan to begin a remodel of our bathroom soon. Your videos show that we really need to redo it from top to bottom. Pull the bathroom sink, toilet and work your way back to the tub. Thanks!
This is awesome. I'm a general contractor and this info is extremely helpful. Plus I liked the last funny part of the vid lol. Thank you!
Outstanding videos! All of them. I am doing a remodel on my bathroom and your channel has carried me along very well.
Thanks a lot for posting this, it is a huge help. I would have to have figured a lot of this out with the walls ripped open and kids waiting to use the shower. Now I have a plan to follow... until something unexpected comes up!
This guy is awsome !!! Would love to see a 12" toilet installed in 10" rough in.
Fantastic videos, thanks for all of these TileMaster.
I'm a painting contractor by trade, but am capable (I thought) in tile, framing, drywall, etc. Its a thoughtful moon putting up these types of how to search for people who are wanting to do these kinds of things themselves. You're saving/have saved A lot of people a lot of money including myself. From one tradesmen to another, thank you very much for this! Much appreciated! Kind Regards from California
*Move
Thank you for your details.
great job! Very helpful and insightful! Thanks a lot!
Perfect video I 've watched, thank you so much!
Thank you for the lessons. Great teacher.
Excellent instruction!
Im about to start a bathroom remodel and your videos are a great help.
You are very skilled.
Thank you for going through this so thoroughly and not just using jump cuts, but explaining the actual process right down to jotting notes on a chunk of box. I'm a plumber's son and grew up watching and working with my dad but this is one skill that escaped me growing up. Now that I'm helping a friend install a new tub this is EXACTLY the sort of video I needed.
I laughed and cringed when I saw that coupling fall down the hole at the end. Seen that happen enough to know it's GONE. XD
I just wanted to tell you that I and my brother in law just got done installing a tub. We both watch your video first and it went great. Thank you for the instruction.
You very welcome !! it means a lot to me...
You are extremely precise and careful with everything--the ultimate professional. This is superb workmanship.
The reason for level I don't get however, since some water will always drip outside tub on floor from shower or splashes. So threally issue is good caulking between tub and floor rather than level to try to keep every single drop of water going back to center of tub which will never happen anyways?
figuring out the drain position so simple and effective. my way would have been so much worse. thanks
I like your work.
great video very very helpful, you are the man, thanks for the very thorough video.
Damn good video. I couldn’t stop watching it’s almost 1:00am gonna be late to work in the morning. 🤣
I have installed a lot of these tubs lately.. they are very durable.. especially for the price .. not heavy either
This guy Rocks! I've viewed a bunch of your videos. super helpful!!
thank you for taking the time to upload this video series. It was invaluable to me as I took on remodeling our bathroom.
jumpercables40 you'll still need a plumber
Great video! Thanks!
Thank you for your expertise and attention to detail. I think my project will go better than planned due to the valuable information you learn through years of practice. A smart man learns from his mistakes, a wise man learns from mistakes of others. You have shown me how to avoid first time mistakes, and look for tips to make project perfect. Thank you
Nice job!!!
Great video. thank you
This video is awesome maybe I come this way visiting you
great video thanks for your help
Good job
excellent work, very good info
great video!
Nice
thanks
I've been watching your videos and have to say they are excellent. I'm getting ready to remodel an upstairs small bathroom in my townhouse. The previous owner did a hack job on the installation of everything in it, literally, and the ceiling and duct work below it were severely damaged. Of course I didn't realize the severity of the poor work until a few years after I owned the house. It's going to involve replacing everything from subfloor to drywall. I'm going to tile the floor.
How do you feel about 4 piece tubs? I thought it might be easier to maintain. I'd prefer a one piece setup with no joins, but it's impossible to get up the steps. Is tile be better? Looks aren't a major concern in the tub area. I'm more interested in durability and low maintenance because it's a second bathroom used by the kids.
Very interesting and helpful. Out of curiosity, would it have worked if you had checked the cardboard box for square and then used it as a template? Maybe putting the tub on the box, marking the edges, and then marking where the holes would be? Then you could cut out a template of the tub (including cutouts for the drain) and set that in place to get the drain lined up. You could even have folded part of the box up to get the overflow (if there was enough cardboard). Do you think this idea would work?
Pozdrowienia z NY
شكرا لكم
thanks so much for taking the time to do step by step instructions filled with little insider expert tips.. I'm sure you go into many new construction and older homes where the people did a crap job and you have to fix it.. we are currently doing our hall bath, having done the master a couple years back.. having trouble getting a 60 inch tub into the opening we just removed a 60 inch tub from.. making us a little crazy.. the bottom edge on the right end is hitting the 2x4, its a 60.5 opening, any tips? my husband things taking the dry wall off one side of the outside of the tub area will work, I think he's making extra work for me.
Michael- Thanks for your postings!! I've learned a lot these past few days about my own home and applying the knowledge you've shared through your videos. Now I know what it's truly like to be a home owner and tackling on projects to beautify your own home.
Just a quick question- what size lumber did you use to support the back wall? Is that just a typical framing stud which is 2.5" x 1.5"? I've up to that point now with my project before I drop in the tub. If you can reply ASAP that would be great. Thanks!!
Did you do a part 2?
I am having trouble installing one in a house I bought and renovating.
The drain from the P trap is about the with off the 1 1/2”pipe out of line with the 3” cast iron drain in the house.
Wondering if I can cut the cast on back and connect them with 22 1/2 degree Y.
The cast iron does have some play in it and is coming at a slant.
Btw, did you just put stringer on one wall?
can you answer a question, please? My husband wants to know which is the better to use, to set a whirlpool tub on a wood floor......cement mortar, or foam insulation? Thank you for your help.
Can you tell me how to frame a tub if one end is 45 centimeters from the floor and the other end is 44 centimeters from the floor?
Do you have a video of a tub installed new construction in concrete floor?
Around 4 minutes when you add additional 2x4s to square everything up, doesn’t this make the new drywall your adding (above the tub that you will be tiling) not be lined up with the original drywall above and be further out? Is this okay?
I agree them carpets
Great job! The best tub install video that I have seen. I was looking for the drain pipe kit and flexible overflow. Do you still sell them on Ebay?
Those thin plastic pipes have a short life span. Use pipes with at least 25-year life to them as the tub drain and overflow are very hard to access. Thick gauge brass or thick ABS pipes should be used. Also, the thin pipes are easily loosened or broken when snaked.
very informative video although kohler tubs in the install require a morter bed not foam nor ledger plate Every other step is spot on but a matter bed supports correctly foam will compress and then retact causing a fluctuating sub floor causing stress on drain and plumbing which will cause a leak
Thanks for the video. I worked at a plumbing supply house on the show room floor but was sure how the actual installations went. What I would like to know: if doing a complete remodel would you install the new tile floor under the tub just as you should under the toilet and vanity?
Please NEVER tile under tub - tub goes firs, then we are installing tile board and tiles to tub.
removal of skirt support under the tub?
Can you do a video of plumbing in the water pipes please
Aren't those pipe fittings used for sinks? I don't know if I trust it to use for my bathtub fitting...
where can i buy the tub?
Please, could someone tell me where I could find remodeling drain kit??? I am lost and can't find the ones he is talking about on this video...
Thanks for the great video!! One question though - I noticed you installed the tub on the plywood subfloor. Is there any value to laying cement board over the plywood, and then the tub over that? Thanks!
Value? The price of more material. No reason to add. Unless fully insulating the tub. You may want another layer to protect the subfloor. Never glue or screw to the sub floor
QUESTION: do you HAVE to re-do the drain par,t or you can use the old one assuming that it is still in good condition?
and by the way, AWESOME video. very helpful THANK YOU.
The original drain system can be reused if it is in excellent condition and it lines up with the new tub, particularly if it is a quality brass drain and overflow system. I would not reuse a plastic (ABS or PVC) drain and overflow. The plastic threads of the tub drain are intended for a single installation. Due to the usual problems of future access to the drain system, it isn't worth saving a few bucks to not replace the drain and overflow with the best quality new system available.
Shot myself in the foot by having someone install a tub for me even after watching your videos. The dryer vent comes through the subfloor next to the drain pipe and instead of moving it - the guy crushed it and it is gaping open. Next, instead of using a stringer board there are 2 unsecured vertical 2x4's holding the tub up on the back side, 1 is wobly. And lastly, level is pitched forward towards the drain and out towards the apron. Should have done it myself...
what type of tub is it
I've torn out 6 tubs and never saw a horizontal 2x4 to support the wall side of the tub. They were all screwed to the studs and that was it. I've replaced several tubs and never used the horizontal 2x4 either. I think I'll start.
Follow the tub manufacturer's recommendations. Some require a 2 X 4 ledger board and others do not.
This is an good video providing providing excellent instruction an attention to the details necessary for a successful tub installation, but I can't believe the remodel drain kit that you are recommending. That is the cheapest and lowest quality drain and overflow kit on the market, which is constantly critisized for poor performance and leaks. Due to the accessibility of the drain system after the tub and tile installation, one should never skimp on the quality of the drain and overflow kit.
can u post your name of your e-bay auction sometime................trying to fine your flex-able connector......
Excellent video! You mentioned that the tub is a Bootzcast - in your opinion, how does the quality of this tub compare to Americast or to a cast iron tub?
John Bratincevic Oh, here's one more brand of interest - Briggs Ultracast, ever heard of those?
Tilemaster, I've been watching many of your videos and you are a very skilled tradesman. I have one question: why do I never see you making access panels or trap doors behind shower plumbing to install emergency shit off valves for shower repairs?
There is no such reason. In case when you have bad valve cartridge, you can replace it very easy . For plumbing - drains, if anything will start leak all it takes to repair it is to cut drywall out. People hate look of access panels or doors. 99.999% homes in US do not have access panels for valves or drains - some will have access panel for jetted tub motor only. It is very easy to make access panel if we need one , but most of the times homeowners rather will fix drywall. Also small critters , spiders travel along drain pipes, and having access panel will allow them to crawl in to your house. Less access panel that better ! this is what I think.
“For plumbing - drains, if anything will start leak all it takes to repair it is to cut drywall out.”
You mean the drywall behind the shower wall, in the other room?
“Most of the times homeowners rather will fix drywall”
Just so I’ve understood correctly, you’re telling me that homeowners would rather cut a hole in the drywall, fix the issue, then patch the wall up again, as opposed to leaving an access panel?
I can certainly understand that you don’t like putting access panels because it does not look pretty (and you’re all about the finish, as I’ve seen haha) but in my home, each washroom has an access panel for the shower or tub incase repairs need to be made and I do not want to turn off the water to the entire building and only want to turn off water to that tub or shower that needs to be repaired.
I live in a triplex so I have tenants and as you know, tenants often require plumbing to be repaired or cartridges to be replaced so it helps having shut off valves in the access panels of their tubs and showers instead of having to advise the whole building that I will need to shut down water to entire building.
Thank you for answering my question! You are very good at what you do, the best I’ve seen, that’s for sure….
+Kjikl
INGsizeWINNER 9 king
.trcxb, , ,jvob., y,b. 9 .7th
Heaven .vying my
Sr m n ho of
The building code requires shut-offs (stopcocks) at all plumbing fixtures (sinks, toilets, laundry) except at the shower and bathtub. The code recognizes that stopcock installation at the tub/shower is often difficult or impossible, particularly for retrofits, due to tile or other waterproof enclosures. Some manufactures of shower/tub valves have incorporated shut-offs in their valves that can be accessed quickly through the front valve plate. In case of a leak, the alternative is to shut off the main water valve at the meter which shuts down all water supply to the home, which of course can be an inconvenience. Having said this, it is wise, good practice and good insurance to always install quarter turn ball type shut-off valves at the tub/shower, with a suitable access panel wherever it is possible and reasonable. This is an extra step, at minimal cost, that provides a high degree of piece of mind.
any advice for installing tub on concrete slab foundation??
Same situation as when wooden sub-floor. Sometimes you will have to nock-out some slab wit jack-hammer to make additional space for drain or to relocate it. Tip: never cover hole where drain is with concrete - only dirt.
I tried to order the remodel overflow through The Tile Master on EBay. However, the kit seems to no longer be available there. Where else can we buy it Tile Master? I really need three of them!
Thanks. LOVE your videos
Love the instructions in the video, however, the volume is too low.
Sir, How did you obtain the Bootz tub - through the sales rep in Marietta, or through someone else? Are these found retail anywhere other than directly from the manufacturer? I'm really interested in the sound absorbing qualities of the backing as I'm tired of hearing squeaky butts through the ceiling downstairs during bath time while I'm trying to read....
+Terence Harper You can get them at Home Depot. Just check them in the store or parking lot as some of them may be damaged.
www.homedepot.com/p/Bootz-Industries-BootzCast-5-ft-Right-Drain-Soaking-Tub-in-White-011-7000-00/100389019
Thanks for the help... I now have mine installed and am happy as a clam... Your tips made it very easy..
@@terenceharper5612 hi Terence, how has the tub held up over the past few years?
I see stringer boards as 2 x 4's but my tub's ledge is 1 3/16. The company says to use the 2x4 but that would put the tub further from the wall. Am I the only one who questions this type of thing?
Depending on the design of the tub, many manufacturer's tubs do not require a ledger board for back wall support. If the ledger is required, or you choose to add one for extra support, a 1 X 4 should be adequate to catch the tub ledge. I would not install anything that causes the tub installation position to be proud of the stud wall or causes the front apron to protrude.
Nice we dont level the walls or clean p trap lol
woops lol.
It's gonna be an additional " ehh " piece of two by four. Ehh.
u look like my premo but u sound Brazilian yea
Your Gorgeous
Yes, he is. When he came from around the camera, I was like, "heyyyy".
His gorgeous what?