How To Replace U-Joints 2 Ways

Vložit
- čas přidán 20. 09. 2016
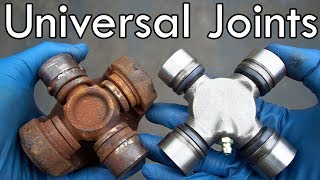
- I needed to swap over the yolk from one driveshaft to another. In the process I replaced the U-joint. Since there's more than one way to do this, I decided to show both methods of U-joint replacement I'm aware of. I'm sure there are other ways, but I believe these to be the most popular.
Either way, it's a fairly simple and straightforward process. The difficulties come in with the different types of fasteners used. The wax ones can be a pain, but a little time with a propane torch and they should come out fine. The thing is to spot those plastic retainers before you start.
Good luck!
The best place for answers to your automotive questions: www.ericthecarguy.com
Camera: Brian Kast
Thanks for watching!
Discussion about this video: www.ericthecarguy.com/kunena/...
Tools
Zep Penetrating Oil: www.zepautomotive.com/product/...
U-joint tool: www.jbtoolsales.com/astro-pne...
The U-joint tool I used: www.amazon.com/Alltrade-64861...
My Bench Vice: www.jbtoolsales.com/wilton-146...
Related videos
My Bench Vice Review: • Wilton 4600 Bench Vice...
2003 Nissan Sentra Ball Joint/Wheel Bearing Replacement: • 2003 Nissan Sentra Fro...
**Answers to your automotive questions found here: www.ericthecarguy.com/faq
Social Network Links
Facebook: EricTheCarGu...
Twitter: / ericthecarguy
Google+: plus.google.com/1001951801966...
Instagram: / ericthecarguy
Information on Premium Membership: www.ericthecarguy.com/premium...
Stay Dirty
ETCG
Due to factors beyond the control of EricTheCarGuy, it cannot guarantee against unauthorized modifications of this information, or improper use of this information. EricTheCarGuy assumes no liability for property damage or injury incurred as a result of any of the information contained in this video. EricTheCarGuy recommends safe practices when working with power tools, automotive lifts, lifting tools, jack stands, electrical equipment, blunt instruments, chemicals, lubricants, or any other tools or equipment seen or implied in this video. Due to factors beyond the control of EricTheCarGuy, no information contained in this video shall create any express or implied warranty or guarantee of any particular result. Any injury, damage or loss that may result from improper use of these tools, equipment, or the information contained in this video is the sole responsibility of the user and not EricTheCarGuy. - Auta a dopravní prostředky


Eric, back in the day (early 70's) we used to remove the U-Joints in a vice with the sockets as you did, which works fine, and no damage to the drive shaft. We didn't have the tool back then. I've watched about 8 other videos on how to replace &-Joints and all of them took two sockets and beat the heck out of them with a BFH, and that sent chills down my spine watching this, I mean really banging very hard with the hammer. Great to see a real caring mechanic doing things the correct way.
Method 3: beating the shit out of u-joints with shitty sockets, a sledge, and lots of beer.
If you have some experience, that is actually the fastest method. I've installed hundreds of u-joints with a hammer and workbench, but unfortunately my boss wouldn't approve of the beer
Brian X Method 4: log splitter
Brian X same and i cant get the last one in
replaced my first ever uni joints today! for the ordinary dude who needs a vice and doesn't have one, buy a vice. for the ordinary dude without a vice but has uni join cups painted and rusted in - buy the tool and use an impact. with the paint and rust I'd say I spent about 97% of the time removing the old rusted cups and sanding the drive shaft and flanges clean, filing out burrs etc. installation was so easy by comparison, probably 10 mins a piece (I had 3 unis in a 2 piece shaft to give one an idea.
I needed a vice, and this was the perfect excuse to buy one. if I had my time again I'd probably buy both. But I did it the hard way and I learned a great deal.
thanks Eric! I watched a few vids and this was by far the best
Forgot how relatively simple this was, but most importantly all the little tidbits and reminders are what I appreciate the most. Top shelf instruction there brother! Thanks! Stay dirty!
Thank you. I broke a yoke on a rototiller. Replacing the yoke was fairly easy, but I had no idea how to install the U joint. Your farm style method (no special tool) worked great. Again, thank you.
I really appreciate the video walk through, I consider myself "Mechanically inclined" but I've always been intimidated by U-Joints and this video gave me the confidence to do it myself this evening. Thanks!
Had my auto shop teacher show me a method to loosen those outside clips up real fast. Take that socket the fits just inside the hole of the yoke and place it right up against the clip. Now rap it with a hammer a couple of times. Breaks those clips loose every time.
Another method you can use to push the cups out is take the sockets and use a large C-clamp to press them. Just in case you can't afford to buy the tool and don't have a vice.
I've also used the hammer method as well.
Sometimes you just do what you have to to get it done.
.
..
.
Have done 1350 series joints several times. Used to use a 6 inch bench vise and did it with a USA made 6 inch c clamp once. Both removal and installation. Bent that c clamp removing. No faith in the Chinese c clamps around now. 2 days ago I was struggling with a vise and 3 foot pipe extension on the handle. Didn't want to move. For the first time I tried the hammer method. So much easier! 2 lb hammer and 24 oz ball peen was all I used. 5 inch diameter carbon fiber covered aluminum driveshaft on a 1992 GMC C2500. C-clamp to install would probably work well. I repeat, had no trouble at all removing these u-joints with a hammer. Do your best to keep things squared up. Don't use heat on aluminum, they sometimes warp. No need for penetrating oil. Study a few videos, read some posts and grab your hammer! Otherwise take the driveshaft assembly in to a shop that does this work everyday.
Had to do this three times on my 1996 ram 1500, this video is by far the best one in CZcams!
I just called a local auto parts store to see if they offer services like pressing u-joints. But I forgot that auto parts stores are worthless these days and only want to sell you parts that don't fit. So then I remembered to check ETCG and was pleased to see the use of a bench vise, because I have one. You couldn't imagine my disappointment when I discovered my vise was about 1/2 inch too short fully open.
How timely. I just ordered a set of u-joints from RockAuto for my 2000 Expedition. I have some non-specific vibration that I can't track down. When driving slowly next to a reflective surface I heard a rotational creaking coming from under the car. It's videos like yours that give DIYers the confidence to be DIYers. Thanks Eric.
I have to thank you for this video Ericthecarguy. I've been wrenching professionally 13--14 years, I'm master certified but U-joints are the one task that always give me trouble. Watched this a few days ago and used some of the tips and tricks today on a 2 piece drive shaft on a Tacoma.
brianthelion ..what brand/part number were the replacement U joints?
Exactly the info I was looking for. Excellent teacher. Thanks much!
Great video. Been years since i changed a UJ, under supervision. Your video brought it all home. Thanks from Mike in OZ.
Great video! It helped a lot to let me know what I'm in for in replacing the u-joints on my '95 van.
High quality and very informative. Best videos ive found while researching this. Thanks
Excellent. Thanks for taking the time to show both methods.
Best U-joint video I’ve seen
I would also add that if you are doing this and not swapping the yoke, mark the relationship of the shaft and the yoke so that you put it back on in the same location and don't risk getting them out of phase/balance.
Also if you ARE swapping yokes for some reason, make sure they will work. Bearing caps/cups come in many different sizes with very low (.001") tolerances. Make sure the yoke you are using is the appropriate size.
sobeforlife when you are swapping the rear u joints are the front and back of the rear different or do you get 2 of the same u joints? And if you already took everything apart and didn't mark where it was at how do you know where it goes?
Yeah I was in the middle of traffic when I took mine out, so I could put it 4x4 to get out the way so Idk how mine was
Nice video. Glad to see some of the issues and how to deal with them. Thanks!
I will probably never do this but good to know how. Thanks Eric.
Vjjjikk,l ...
"MORE!!!"
great vid Eric.
Thanks for this video. You're probably the only video that shows a sealed u joint install. Everyone else shows how to do it with a zerk fitting. My concern was that I wasn't sure if you needed to add any grease on the sealed u joints. Ordered the parts, will be doing this job on Saturday along with replacing the rear transfer case seal.
Been a while since I've had to do this - this was a great refresher. Thanks!
I like these videos. keep up the great work. I also like the upgrade on you camera, its alot clearer great resolution .
Those are great tips that will come in handy for many people, since U joint replacement is such a common thing. You had better luck with the snap rings than I did---on the rusty northern cars I worked on, I had to chisel mine out.
what's crazy is you guys respond to video as simple like this. They are u joints please.eric is simply straightforward showing novice attempts
That was the best instructional on u joints I've seen, thanks
i wish the one i was working on right now was THIS rust free!!! indiana boy here and mine is rusty gold and stuck! lucky dog!
Eric, I never thought of using a vise. Most people own a vise, so simple to use for u joints. Have a great day!
I did the u-joints recently in my 1999 S10 Blazer ZR2, there was surprisingly an original u-joint that I had to melt the plastic retainer out of. Pretty interesting, but also easy to remove. Just heat and wait for it to ooze out, and it comes out pretty fast! We used the sockets and vice method.
So glad I found this video. I have the inside clips. was having a little trouble getting the new cap in far enough to get the snap ring on.
Yeah I did it with a hammer at a guardrail on the interstate. I knew it was bad, bought a few buy just was surprised to see my drive shaft fall off. So replaced it right there!! Good video!!
videos don't get any better - well done
Once again, great video Eric.
Excellent video! It’s also applicable to pto driveshafts on farm implements such as old snowblowers, which I’m working on right now.
Thanks for a great video! I need to probably replace my u-joints on my Tacoma.
As always best how-to vid. I have the ball/u joint clamp, but haven't done joints in awhile. Nice visual refresher. I WAS going to use my impact wrench on the clamp...NOT NOW! Haha, thanks for that visual aid too!
By far the best u joint video. Thank you for sharing. 🖒👍
Great show, all of them. Keep it up.More power and thank you for sharing. That level of knowledge for it's show. applied not only for a car daily common issues .
I really like your videos. Very helpful and well explained. Thanks man
This is great. A ball joint press. great job Eric
You have a good camera man! Excellent explanations too. Thank you.
I did mine today with the 20 ton Harbor Freight press I bought last month to do the rear wheel bearings on my 03 Mountaineer. One thing I haven't seen covered in any videos is the old snap rings breaking. Lots of fun when that happens. Six out of 8 of mine broke like that. Easiest solution I found was to get one side out entirely, then just press from the other side. Once the cup is out, it's much easier to dig out the broken ring. I had expected it to be a frustrating balancing act trying to use the press and keep the sockets lined up with the yoke, but it really wasn't that bad. The first one went that way because I was trying to keep a 30mm socket aligned on the bottom, and a 17mm socket on the top. The last three I did by just pressing the u joint from one side until it bottomed out, then I flipped it over and put the 17mm socket in the yoke hole and the 30mm socket on top so I could press the cup all the way through. Wasn't that bad at all, and my horrible clicking and grinding noises are gone. On top of that, it no longer feels like the brakes are on when I let off the gas. One was completely seized in one direction. I'm guessing I should have done this a long time ago.
Don't you just love Wilton vises? They're great tools. Nice video Eric, easy to follow steps with common tools.
Helluva instructor! Thank you!
The Vise method is really useful! Much better than using a hammer. Excellent video, well filmed and explained.
Thanks Eric; this is much better than the hammer/socket method for when you ruin one on the trail.
love your videos ,learn a lot from your videos keep the good work thank you
About the way it generally goes....nice demo and explanation of the different type and methods.
very nice eric u r an Excellent Mechanic love all your video's I take note's and follow your procedure's saves a ton of money!!!!!!!
Push the cross piece back and forth after each yoke install to push the cups apart and out against the clips. Gives the cross that little bit of clearance it was designed with. Once installed, grease them ON THE BENCH. you can use the vise to put pressure on the cross and push it against the cups....this allows you to get 100% new grease flowing out of EACH of the 4 cups all around each one's lip seal. Don't stop until you have replaced all the grease that came in it. If a cup doesn't flow grease, put pressure on two of the other three as much as possible and 'hammer' your grease gun with palm of hand or helper to 'pulse' grease into that last stubborn cup. I've wasted lots of grease trying to get new grease into every cup, but never replaced a joint more than once. When it's on the car, you can do the same thing; hang on the drive shaft with lots of your body weight to bury the cross into two of the cups and 'aggressively' grease the joint...keep after it until you see new clean grease come out of every cup. The last resort to clean a dirty, not flowing cup: carefully remove the rubber seal (slide onto cross without tearing it). move cross away as much as possible from the bad cup and grease. Then, spin shaft around so you can hit it with rubber mallet and force cross rapidly into bad cup....hammering action will force the dirty clogging grease out.
very well explained !! awesome vid!!!
Your video helped me a lot, although I had one complication... my U-joints were so corroded that I had to use A LOT of pressure on the ball/U-joint removal tool - so much that it actually started to bend the yoke before it popped free. Re-installation meant using way more pressure than I probably should have to get the snap rings to seat. Rust belt truck that sat in the grass for 2 years, so it was probably worse than most. Now we'll find out how many miles the new joints last since I had to squeeze the tar out of them...
Thank you sir. Very informative and to the point.
Wow that looked so easy. My 2001 F150 had the axle side u joint snap at about 210k miles. It felt like the whole rear end fell out. I checked it, figured I could drive home. About a mile later the driveshaft shot out. So I put it in the bed, turned on the 4x4 which just made it front wheel drive at that point, and drove home. When the u joint initially broke it twisted the shackle. So I broke a clamp trying to press it. I hammered for an hour. Eventually I got a diablo demon steel cutting reciprocating blade and spent two hours and two blades cutting out the u joint. I wish I could have pressed it out like you. Geez.
I am so glad you made this video because I have to replace mine
Great, informative, video. Thanks !
Just had the U-joints changed out on my van. Damn Eric you were a week late with this video. Oh well next time I will know how to do it myself. -John
great video, thanks for making it!
Love your vids! Long time subscriber!
Really helpful! thanks a lot from Panamá.
Thanks Eric very good information.
:( i try to change the u joints last month this video is very useful but a little bit late jaja thanks Eric I love your show
Good one. Videos like this are the reasone I subscribed.
lol..."yay, I'm a u-joint yay!" Eric do voice overs on cartoons. great informative videos as always!
Eric, I've enjoyed your vids for a long while now. Full disclosure: I'm not a technician nor will I ever DIYer. I'm just a fan watching a "BOY WITH TOYS". I had a random thought watching this one today: You must own stock in and/or have cases and cases of "penetrating oil" somewhere hiding in the shop. It seems that use it "by the gallon"! Looking forward to Friday's installment. . .Keep on Keeping on!
Good video on U-joints Thanks
Lots of great advice in this video, such as making sure the clips are seated properly, tapping on the joint at the end, and direction of zerk fitting. Eric has great little tips that would be easy to skip over but are still important.
Well done and well explained
Thanks, been a few years, thanks a gain
Brillliant....great vid.
Great video I have used the vise method never used the ball joint press way
I was watching closely how you removed the old and installed the new U-Joints and will put that knowledge to use if I have to replace on on my vehicles.
THX for the video Sir..good info!!
When I was a poor servant of Uncle Sam I used sockets and a hammer. You do what you have to do to get by.
Abunai One the poor servant part is true-I feel ya
This is a great example of a u joint fix up
Great video!
I've done these two methods and my favorite is using a hydraulic press. Freaking magical compared to the bench vise and the u-joint tool.
You Rock dude! Thanks!
A large C-clamp and 2 sockets will work in a pinch as well. Done that in a parking lot in an emergency situation.
Great video, thanks
excellent job bro..
Driveshaft or axle.
Musta been a late night.
Here I thought it was going to be ball joint press vs hydraulic press when I clicked on this.
Oh well, good tip on grease fitting alignment towards driveshaft.
Thanks Eric.
Hey Eric, maybe it's already been said somewhere along here, but I had a minor cringe moment when you were holding the aluminium driveshaft in the vice. I would kindly suggest using a couple of lengths of aluminium bracket cut to the length of the vice jaws and placed (or fixed) into the vice to make a set of "soft jaws" for the vice when working on softer metals. No doubt you are aware of the practice, and you made a point of telling us not to clamp down hard on an aluminium driveshaft, but I think it may be worth passing along such a simple technique. It has helped me to prevent marking up some old, expensive and hard to replace soft metal bits on some of my old motorcycles. Thanks for another great video, and stay dirty!
Awesome...Thanks Eric
you are the man thanks i will get mine done 💪💪💪👍👍👍
thanks, great video.
gonna have to change a u joint on my 1990 f250 this week, didnt thought of the vise but definitly gonna use mine instead of my hammer!
Good tip on hitting the ears to settle the caps. I wish I knew that when I did my joints... that was a struggle. Ended up killing a needle and having to buy another $20 joint (I wasn't using the cheap kind).
Miss you ETCG
thanks for posting
Good catch, you forgot the 3rd way, and 4th way. Third way hammer and socket in vise grips, fourth is get a nice guy like u to do it. Great vid Eric
Very well explain thank you
@ 0:13 I thought those were driveshafts?
Just bustin' your balls, great lesson as always man.
Eric I have used a air hammer and a Yard store in wichita ks or aircraft spruce in tulsa ok. I also use the tool to remove tie rod end tapers and ball joints much easier on me than 2 4 lb hammers.
You have a great video voice.
Excellent job! Just add a Tiny bit of heat to expand the yoke before the vice.
A vice is not a press, I've seen vice Jaws explode from that type of use. Also, if the cup is stuck, you can bend the ear and screw up your driveshaft. You elude to that when you say you're afraid of screwing it up.
nice work
I was shaking my head when you busted out that powertool, thinking: "Bet he's going to say don't use powertools." And then you damaged your part :-)
Stay dirty and keep up the good work.
thinking the same thing....lol
The old "do as I day and not as I do."