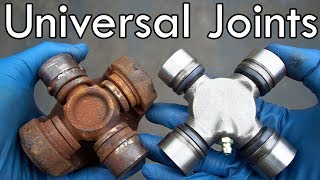
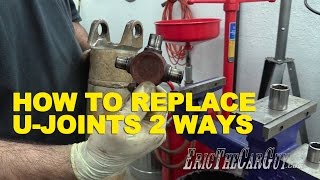
How to replace U joints with no special tools

Vložit
- čas přidán 30. 04. 2018
- Quick U-Joint replacement. Do it correctly, so they last.
Spicer makes some of the best Universal Joints and are OEM equipment on a lot of stuff. Generally they are only a few dollars more than cheap auto parts store brands. Amazon has them though: amzn.to/2rkj2px
The calipers I used in the video: amzn.to/2jmXS5m
Best of the Best Spicer u joints: amzn.to/2rkj2px
A lot of the Spicer U joints will come with multiple retaining clip thicknesses.
HAMMERING is far gentler than PRESSING with a vise or press. Pressing easily bends yoke ears and though you may get the job done you ruin the balance of your shaft, destroy needle bearings or worse. Don't believe me, talk the people to specialize in it and do it every day • Trade Secrets Revealed...
FACEBOOK: sixtyfiveford
@sixtyfiveford #sixtyfiveford - Auta a dopravní prostředky


I've been checking out videos on doing U joints. By far your video has been the best one🔨⚒🛠
Wow, thanks man. I'm glad you liked it.
You might want to check out the ( Weber Auto ) channel. He has a five part series on U-Joints , which is very informative. But I agree, this video is one of the better videos. Unlike some so called repair facilities that beat the heck out of the yoke ears, bend them out of shape etc.
This
Agreed, he did a great job with good explanation
@@sixtyfiveford Well done now I know a easy way cause Me & my late father did it with a bench vise,instead of using a hammer.This way is easier.And also NO.1 enemy is dirt in any place like rebuilding motors,universal joints,and transmissions also.Keep up the super fine videos on things like this.
I blew my u joint out next to a highway just below a hill from a parts store so I bought a new u joint and replaced it side of the highway with a pair of leatherman multi tool pliers a socket and a 3 pound mallet all without pulling the shaft from the truck with careless drivers flying past like dale Earnhardt running in nascar
That's awesome.
Damn…I tried not pulling my driveshaft in the garage and had a hell of a time pulling the u joint… you’re my hero!
Hell yea
🚙🚘
The testament of a true artist!
Thats it brother. This is a generational hand down from the men of wisdom who showed me when I was young!
WOW!! I am 62 and was taught by my father ,You are the first that I have ever seen that does this exactly the way I was taught in the 60's, AWESOME Knowledge,!!!
Your tip on using a file to thin the clips was the perfect solution to ease the tightness on my new u- joint. I used your entire method with good success, Thanks!
Glad it helped!
What makes this video better than the others is that it shows problems that can arise and how to fix them. We all know that in the real world nothing ever goes smoothly so it is important to see what might happen. Don't forget to read the comments below from 1979 XEGT Dodge Magnum and Mark Crawford about relieving the preload.
Thanks, I'm glad you liked it.
Good video, the only thing you didn't do is relieve the preload. The way you do this is hold the driveshaft in one hand off of the ground and with the other take a hammer and hit just behind the bearing straight down, just a light tap don't hit the tube only the knuckle. Now rotate the driveshaft 180 degrees and tap the other side. The stiff feeling u -joint will be free. Been doing these for 45 years. Great video for showing how to replace without any fancy tools.
good point!!
That stiffness won't go away on it's own, Magnum is correct
What if clips break hw do i remove
I'm a little confused. Is there a video of this anywhere? I'm about to go do them today.
I just did this. I was thinking about doing what he did but I checked comments and saw this and tried it and it worked released almost all of the pressure. Thank you. Also great video it truly helped me.
It’s been over 30 years since I did this job, thank you for the review.
Excellent and to the point!! No goofy intro or music. Well done Sir, keep it up
I think he’s done this a time or two. I assure you , it’s much harder than it looks. This guy just knows his shit and makes it look easy
Sometimes very easy, sometimes not. When they don't cooperate don't panic, take your time and be careful not to damage the parts.
Jeff is right, took me 28 hours to do both my front axles and driveshaft. They just didn't want to go in straight. Spicer joints as well. I took my time, all of my patience (I have none left and I may have thrown a wrench or two and have some knuckle imprints on my tool box) but 5 years later they're still going strong.
Oh yeah I know what I’m doing too and I smashed my finger in half.
@@BigBrotherIsTooBig Thank you for your honesty. Please prepare yourself for some insults from experts that are going to tell you that it should have taken less than 5 min. Their is always someone who is gonna shit on your accomplishment.
@@BigBrotherIsTooBig wow, this would be my first time. I didn't think it would be like that. it took me 6 hours to do my first brake job.
First video up. All issues covered. Well done.
In addition, your presentation is perfect: straight, to the point and no B.S.👍
nut rider
Yeah nice process. You mentioned several things I think about when working on cars. And several things other videos don’t mention. Stressing keeping crud out is highlighted appropriately. And of course the minimalist approach is always classy. Keep up the good work!
Good video! I would only add, for first timers, that you should note the angle orientation of the grease zirc. It should point in towards the driveshaft. If you miss this it will be harder to get a grease gun on the zirc. You should also try to get the zirc in phase with the front fitting so you can grease both at the same time without rotating the shaft.
Easy job done the right way, but the tip on the snap-ring thickness was SUPER helpful! Thanks!
Glad you had some difficulty with install because you showed how to get around the snap rings being slightly too thick and how filing down not just the one but better to split the difference with the one on the opposite side. I learned something important. Thanks!
This is a great video!! Very good job on explaining the process and showing what to do. I am changing out a pto drive shaft on my batwing cutter that bent when i hit a stump and the slip clutch was seized up and I didnt know it until now. Anyways, this was super helpful and my cutter is back up and running for a fraction of the price the kubota dealer wanted to charge me. Thanks alot!!!
Thank you! This video helps encourage those who haven't really messed with these procedures. Sweet and to the point! 👍
Thanks, I'm glad you liked it.
I remember my Grandfather and I doing this job at the side of the road on his old Ford truck. You make it look as easy as he did. Well done.
Back when vehicles were designed to be repaired by the owner.
How bad was it that you had to do it on the side of the rode, almost call bullshit cause if it drove far enough to get you somewhere then on the side of the rode, why couldnt it get you to the auto part store. Unless your grandpa magically just kept u joints in his truck which seems very unlikely being they get replaced once every decade. Sounds like some romantic, commercial. Hard to believe.
@@Gabriel.4190 parts tend to break while in use ( on the Road), not in your garage or driveway. He is not the first or last person to replace a u joint on the side of the road. There are many variables at play.
@@Gabriel.4190 im having to do this in my driveway with only enough money for 1 set of joints so if I mess up I wont have a car tomorrow. Which will be super bad cause Il loose my job. Better get it right.
@@Gabriel.4190 Because you were there and clearly know what the f#ck was happening. Idiot!
I always learn so much from your videos, mostly how much I don’t know. Thanks! I am always happy when you pop up.
Hey Thanks.
Done lots of these back in the day, just this way. Good one Moe.
I do fewer as the years go on. Maybe I just put higher quality U-Joints in these days or I just beat on the vehicles a little less.
Sean Spicer - former White House press secretary, conservative activist and CEO of Spicer u-joints.
Oh wow. one of the best videos out there regarding U-joints!
Awesome, I'm glad you liked it.
I've got 200,000+ miles on my truck and was just thinking I should change those u-joints .
I have the air hammer and all the good stuff.
I like watching how you did yours. Gives me more confidence
Good demo!... never really though much about the thickness of the snap rings; good point!
Just done this myself, have done it years ago too but this time 'trashed' a good UJ when removing it to separate the prop...replacement was very easy and not nearly as bad as I thought. Videos like yours have helped smooth the way...Thanks for sharing...(I watched Eric 'O' at SMA to get a 'feel' of how to do it..)
Thanks, I'm glad it was helpful.
This guy is smooth with the u joints! Great tips.
Thanks for watching.
I'm hoping that I won't have to change anymore u joints but if I do it's good to have a refresher with some bonus content.
Thanks for sharing and all the work you put in to help others
Thanks George. -Moe
Tap on those yoke ears and it'll help settle those cups in and free em up.
Best ujoint video period. For the fella who wants to get on the road asap. Thank you
Knoxville Driveline, now that's a quality piece of work. Thanks for the link to that video, Jim
Thanks 👍
i bought a lifted 93 f250 xlt back in april..its beautiful i love it...now its in the shop getting a new 460 big block installed because the rear main seal kept leaking.. come to find out all my motor bearings are shot and the block is worn down too far..gonna cost me a shit ton of money..on top of it.. my u joints are going bad.. this video gives me some relief that i can do the repair myself.. thank you!
Great tip. Usirng the file to fit the clip is something I never consided. Fought them hard and boke a yoke trying to force the clip in. Thanks...last time I replaced the u joint I was in therapy for a month.
Some of these can be buggers.
Our friends up in the rust belt may not have it so easy. Those boys are fighting everything with heat, torches, air hammers and cussing. :) Good tips. I for one never thought about those snap rings coming in different sizes, thanks,
I've had to use heat on one occasion. We get a fair amount of rust here in Utah, but some of the Rust Belt trucks are held together by nothing but rust.
We just use a larger hammer up here in the rust-belt. ;-)
But we also replace U's with new one's that have zerks..for a bit more life on the U-joints.
wyattoneable + Even our Indi 500 track has a touch of it.
Cheap balljoint tool and an impact is my go to in the rust belt
Yup struts going through the back of the seat isn’t unheard of here in Minnesota my old chevys shocks rusted out too so it was only leaf springs
I enjoyed the information on this video. I had took a sledgehammer to mine as they did not want to move out. But I was confused on the installation as it's been a long time since I did a u joint. Thanks again
Fill the cup half full of grease. It will keep the needles in place. Extra grease will come out of the zerk hole. Great vid!
Outstanding video for the guys like myself who are old school lol straight basic before going out buying other tools to do this basic job. Thnx fella
Finally, someone who understands that there are different thicknesses of snap rings for a reason. I saw one video from ------ truck guy, and when his joint was too tight, he actually hammered the yoke ears to widen them , and hammer closed when the other was too loose .
Thanks for watching.
I was taught long ago to repeatedly tap on the thick part of the shaft yoke casting after the bearings and clips are set while moving the ujoint back and forth you can feel it settle in just right everytime.
Correct! I worked in a transmission shop when I was younger, And the boss man taught me to give it a light thumping with a ball peen hammer and if it is still tight after you smack it is when you have to move it back and find a different thickness retaining clip!😉
Than you for all your videos they really help a lot. Dishonest mechanics are loosing the battle against honest people thanks 🙏
Great job ! Thank you for sharing ! I always point the grease fitting toward the center of the drive line. That way I can get a grease gun to go on the fitting to grease the joint. Please be safe and God bless you and your family !!!!! Eddy
Thanks.
Good information on the snap ring as I never really thought about it. I use basically the same meathord but instead of a hammer I use a C-Clamp. It allows for more control but still allows you to work on the one end without help.
I started out learning the method with a hammer, then I went with the C clamp method for 10 years. A few years back I went back to the hammer and seam to like it better as I'm not juggling a dozen items. It's personal preference I guess.
It was a solid crash course, I’m an electrician not a mechanic and last night i picked up my k1500 after having the trans rebuilt and reinstalled. Rear u joint snapped and I was able to take it out at least and now I’m gonna take care of that today
Bro I wish I could send a pic I literally just had a rear u joint on my k10 blow out 2 hours ago. Got the new parts and followed your video to a T and it was a 20 minute job on the side of the road, thank you!!!!
Nice work!
Agreed, this is the most informative video on making these installations. Thank you buddy.
Outstanding video, excellent techniques that are good for many applications, thank you!
Thank you very much for your video. Now I know what I did wrong approximately 7000 miles and how to make the job easier. Replacing bearings again this weekend.
Nicely done video and very informative. I'm about to replace the U-joints on my Corvair and now I know what's involved. Great job and thanks!
Nice. I haven't done one of those for decades and needed a refresher. Thanks man
I am about to do my u joints on my super duty and this was a great video. Thank you so much for making this. The socket on the bottom to support is a great idea.
Best video I have seen , especially the fact your using sockets as opposed to a press, thank you.
Thanks, I'm glad you liked it.
That was one clean truck. I've watched most of your videos and noticed your first truck was a V-10
and your new truck is a Cummins. no matter I'm still watching.
My driveshaft fell out going 55mph to my girlfriends. Just ziptied it. Finally getting to it today 🤣
Absolutely! Hammer method to remove for sure. Very easy and less likely to bend ears. Works fine to install also. Keep things square/straight. C clamp to install may work well in most cases. Personally have done 1350 series u-joints several times and used the hammer method for the first time a couple days ago. Was struggling with a 6inch vise and 2+1/2 foot piece of pipe as an extension on the vise handle. Wouldn't move. Hammer Time. So much easier!
Thanks, I'm glad you liked it.
Best way I’ve seen I tried my self with U-joint being stiff after I like the file keeper part make sense 👍
Thanks, I'm glad you liked it.
Thank you so much for thatI was going into doing this job quite nervous but after watching that I feel really confident back doing this job now 😃
Awesome, I'm glad it was helpful.
Awesome video! REAL and you illustrate the truly important points.
Thanks
Good stuff Moe, I like how you give a lot of warnings of things that can go wrong from your experience.
Thanks Robb. I bet you're rearing to get back on some projects.
@@sixtyfiveford Hey boss...thanks for vid...helped a lot...quick question....so I installed my u-joints today on driveshaft (not back on vehicle yet) and on one I had the cap on half-way ...the male part was inside the side pins which I viewed AND WERE ALL LINED UP NICE AND STRAIGHT ETC....I then slightly turned it checking stuff and it turned nice and smooth....I then finished tapping it in, which I thought was 100%, but was JUST enough to get snap ring on end...but then I went to turn it again it had some resistance....nothing jerky or rough but just not turning super easy....I then took snap ring off and tapped it in about 5 more HAIRS...and now it turns NICE AND SMOOTH / EASY.....should I accept this or be concerned that it didn't turn that easy 98% of the way in???
@@barrya.6212 Likey the ears weren't aligned completely. If any of the needle bearings are out of place you'd know for sure.
@@sixtyfiveford Thanks boss!...that's what I was thinking too as far as needle bearings... thumbs up
You did your u joints the right way. On the farm, some times yesterday wasn’t fast enough and it didn’t always get fixed in the proper way, hopefully it would last the day. Mixed emotions about those days
Time is money. But in the long run it takes more time....
Good video I'mma diy youtube mechanic and your video gave me good much needed insight my truck is vibrating and making noise like crazy bout time i chabge out my u joints
Thank you brother. Very simple procedure with very simple tools and very simple thinking. Awsome
Thanks, I'm glad you liked it.
Thank you!! Going to tackle mine this weekend!!
Great video, years ago I did the same project exactly like you showed except once it was installed, I would rap on the yoke a couple of times and that usually loosened it up. It's hard to tell on your video just how tight U joint is, but great job. Ken
Yeah, generally a few taps loosens up binding caps. This driveline yoke has had a fair amount of u-joints installed in its life and the ears are more than likely bent in a few thousandths. Spicer generally supplies 3 different thickness retaining clips with their U-Joints to accommodate any manufacturing tolerances.
Yes I never knew about different size snap rings, I was taught to install the new joint basic the same way but when done rap the yoke in the middle and that freed the joint right up.
very informative! especially about the different thicknesses of clips. also not mixing greases with other types.
Mate awsome video ,the concrete floor is gold today, cheers.
This really helped me and my dad on our rusty 96 dodge
That is weird, I just came inside from doing my 02' ford ranger front and back U-Joints, I use my 20ton press and the hammer method. Thanks brother, love your video and knowledge
Very cool
that's because you had your phone there listening to you while you worked......the miracle of google.....
Loved this video. Thanks for your help. I’ve gotta change mine tonight.
Thanks.
It's 12:37 AM and I finally learned something new today! Thanks brother! Or maybe I learned something for tomorrow???
Thanks, I'm glad you liked it.
I have a gorgeous Buick Roadmaster (rear-wheel drive) and she needs front and back done now. I wanted to see if others have better tricks than I. It seems we think and act alike so I will carry on. Thumbs-up on your video and editing. Great job!
Awesome, I'm glad it was useful.
Thanks, i have a ball joint clamp but this was way easier to get them out👍
Honest and useful.. thanks Brother.. about to do this service to my daily driver 68 Dart..
The front and back U JOITS the same sizes I'm replacing mine on a 1997 ford ranger, great video
This is the best way I was 15 years old working on cars for a man and this is the way I was taught never ever have I rented those specialty tools
"I blew a speaker yesterday, in the back of my car... He turned out to be a motivational speaker- full of inspiration"
- Doug Stanhope 😆
Boys and their toys. Have fun! Great video!!!
Hey Thanks.
Good how to vid. I've had u-joints that come right out and some that are brutal. Gotta be careful not to bend the drive shaft ears when the joint doesn't want to budge. Nice job Moe!
I started with the hammer method when I was 16 but gave that up for a large C clamp. The C clamp was nice but doesn't give the shock that a hammer does to free up stuck joints. I gave up the press and C-Clamp method and went back to the hammer. I feel that there is less chance of bending an ear with the hammer vs C-clamp or press.
That's the way I put them in and I think that is the best way lock the video keep up the good work
Awesome tutorial, very helpfull. Thanks!
Another good one, I'm sure I'll watch again when need be.
Hey Thanks.
Very nice video!
I like how you pay attention to the pre-load.
Thank you very much!
great video! saved me a bunch of money but i must stress the point for anyone attempting this, follow step by step, carefully!!!
I goofed and dumped the bearings out of three of the caps and had to painstakingly clean everything, put them back together and add grease to make them stay.
Thanks, I'm glad you liked it. Yeah, dropping those pin bearings can be a nightmare.
Helped me immensely!
I haven't changed a driveshaft u-joint in over 30 years amen! lol
James & rescue kitty 😺
Awesome.
Thank you very much man, you video help me alot! You just make it so so much easier than other videos. i install my U-joints on bouts sides by just seen you video. God bless you
Thanks, I'm glad you liked it.
Good video. I also like doing stuff on the garage floor. When I drop something, it doesn't have a chance to roll far away.
Thanks, I'm glad you liked it.
Great infomration,. Love all the extra details.
New subscriber on your account! Good explanations, good detail, only I can say Thank you!
Thanks, I'm glad you liked it.
And I can tell everyone watching that with the ease those came out , They’ve been replaced many times .
Also using this process can cause the yokes to bend inward causing that “pre-load”
Best practice is to use a U-Joint press and to have an assistant present to hold things while pressing .
Far fewer headaches will be incurred this way .
I made tools just for that job when I was working done a lot of them the same way you done a good job explaining it
Awesome. Thanks man.
Smashing job :-D, i never thought about end slack adjusting on UJ's.
So just tight enough for the seals to work correctly, keeping junk out of the needle rollers.
People put them on too tight and the end of the trunnion and cap wear. This puts metal shavings into the needle bearings and destroy them.
This is the best video I've seen in the topic...
Thanks, I'm glad you liked it.
I like how he doesn’t talk that much and he says Anyway on to the next 💪🏾💯🤟
Used the same method for about 20 years now except I use a vise when at home an not on the trail but same basics of using two different sockets
Good stuff and an unfortunate reminder I need to replace mine.
I've been procrastinating on the Front driveline for over a year. Took it out and there wasn't a single needle bearing left in the cups.
Great video . I’m doing my joints soon and the carrier bearing on the driveshaft
Thank u so very much for that video. It helped me fix my truck. GOD BLESS
Great video! I'm just about to change mine out on my 85 K30 , old national guard truck.
LOL, of all the stupid things to notice.... I see well used but well taken care of tools. As a tradesman, I like to see that. Too many videos with rusty crap tools being misused, usually damaging the piece in the process.
Fantastic! Excellent video. Extremely helpful. Thank you.
I'm glad it was helpful
Thanks heaps i had a lot of trouble with two u joints as it is so warm where i live the grease is melting a bit and not holding the needle rollers.this method works!
Thanks, I'm glad you liked it.
Nice job. Was gonna rent a press but will try ur way 1st. Like all your licence plates too! Be blessed. 👍😎🇺🇸☮️⚓
Huge Thanks. I used old C CLIPS ON NEW U JOINT ONE NEW and old one freed up u joint and locked in. Couldn't get 2 new ones to seat. Thanks alot for video!!
Great to hear!
Dude this has been the best video by far. Thanks
Glad it was helpful.