The Right Way to Install U-Joints

Vložit
- čas přidán 14. 07. 2024
- Part one of our three part series on how to install u-joints. In this episode we show you how we remove and install universal joints on a daily basis using the tools that are ideally suited to the job. Part two will cover how to do the task at home with access to normal tools but no specialty tools. Part three will show you how to change a u-joint on the side of the road with the most minimal of tools.
- Krátké a kreslené filmy
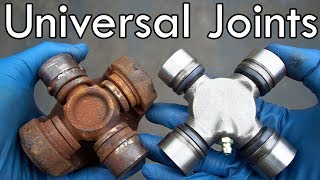


There are a lot of comments about how much more difficult this is on an old rusty shaft. That is true, a rusty old shaft will be more difficult, but the overall process is the same. I just wanted to demonstrate how we do it, in the shop, with new parts. Once you understand the concept you can apply the same concept to almost anything. When making the video we didn't have any crusty old shafts laying around so I worked with what we had on hand. I promise, we use the same basic procedures on older shafts too. When it comes to replacing joints in a shaft that is decades old and badly rusted there is a paradox. If the shaft is in that bad of shape it is probably not worth salvaging anyway. If your drive shaft is so rusty that you can't get the joints out using the procedures shown in this video, or this video 4xshaft.com/blogs/general-tech-info-articles/diy-u-joint-replacement, it is usually best to replace the shaft entirely. If the joints are so stuck that you have to use a torch, or have to hit the yokes as hard as you can with a heavy hammer, you will be further damaging the yokes in the process. The yokes are important, precision machined parts, if they are damaged, distorted, or extremely rusty, they need to be abandoned and replaced.
Its also alot easier when your using brand new, show us how to do it when their really stuck
Very useful information, you can tell you have been doing that for a long time you made it look easy!
Look at this cat, flipping his toys around like he's shaking up a cocktail. 🍸🥳
Wow, never seen a u-joint done with ease like this. Thanks for the tips! Can tell you have done a few thousand haha
Very good presentation Thanks
It seems like Shawn has done this a couple times... :) Looking forward to getting my new DS for my Jeep Wrangler! Cheers!
it does look easy perhaps is a NEW U-Join the one you are showing us. The ones I remove are rusty and hard as a rock and in some cases, I have to use the touch for a couple minutes before removing it. but thank you for showing us.
Awesome video! I Thanx!
I’ve never had a cup move with this hammer technique….I just use a vice and a socket to sort them all out. No hammer needed, no damage or burrs.
Since watching this video I have yet to find a cup that won't move using that method. Also working with jeeps that don't get driven in salt though.
I was wondering if I can tackle this same job without the use of any type of press? Great video by the way, very straight forward. Thanks for sharing!
You sure can! We did another video where I show the process in my garage, no special tools. I actually have only very basic, kind of crappy quality, tools at home and only used those tools in that video, found here czcams.com/video/iBFchnrsz-c/video.html&lc=UgzbbMjBtqHb2EwFlit4AaABAg
Damn pro speeds
You make it look easy. After wrestling with them and using a vise to press them in, I finally got them installed. I try to use your method but the drive shaft from a 58 Chev wouldn't go together any other way.
Great info.
I was about to fuckup.some ujoints😅
Ha. The way he is whipping things around it reminds me of Tom Cruise in that bartender movie.
do you have a video on removing center bearing , early chevy truck
All u-joints can absolutely be replaced, even the staked units. You don't need to spend hundred of dollars buying/replacing the entire shaft, just a lot of elbow grease and new u-joints. You just need to press them out.
No, they cannot. You could grind out the stakes and remove the old joint but there would be no way to install the new joint. There are no snap ring grooves the yoke on a staked joint. Maybe you can make a video showing how to do it, prove me wrong.
@@tomwoodscustomdriveshafts7159 just went through a similar issue with my double cordon for my 1972 Chevy Caprice It had the internal injected plastic retainers from factory and those joints press apart pretty easily iv seen people use a torch to melt them out but i had no issue with a simple clamp press. I then went to use Spicer intern snap ring ujoints and saw that once i would get the new ujoint in the snap rings would not seat on the internal portion of the joint because of the extruded molding of the joint itself was never intended to have a ring installed thus I would have to machine down the internal portions of the double cordon down flat to allow the rings to snap in place. It would have been a lot of machine work. I found a driveline company that sold a modified unit that had been machined to accept the internal snap ring ujoints and came balanced with 1 ujoint installed. my setup has the flat 4 bolt plate on one end of cordon that connects to flat plate on rear diff. the other end of cordon has the female internal yoke with ball joint seal retaining bushings and spring that attaches to the balls stud on the driveshaft end . Very interesting GM setup no wonder they only used this design for 2 years its a pain in the ass.
How many ft lbs would a press use without damaging the bearings? I remember hearing a click once and at least one bearing broke in half.
Damn bro you would be a good bartender!
Would’ve liked to seen inside snap ring U joints were the caps have to be pushed from the inside out
How is it that I struggle to do this with a 40 ton press and you make it look easy with a hammer my daughter got for her 3rd birthday. Clearly, I need more practice.
There's 0 rust on his
Yeah I agree. What am I doing wrong?!?!?
As a mechanic I've been researching on how to better properly put ujoint together and have come across several videos saying not to use a hammer and use just a press only to put the u joint together because the shock from the hammer can cause brinelling. My question is what is truly better? Is it fine to use a hammer or better to use a press to prevent brinelling?
In my opinion using a hammer is fine. This is for two reasons. 1 is that we're using a relatively small hammer and not hitting things very hard. If you have to hit the joint so hard to cause damage to the joint there is something wrong that needs to be addressed. 2 is that the force applied to the bearing cap and joint is axial, not radial. I think that brinelling is most likely to occur with hard radial forces. Although radial force is also the direction of force these joints are designed to transmit so I don't think we can do too much to them with a small hammer that the several thousand pounds of vehicle and a couple hundred foot pounds of torque won't do.
@@tomwoodscustomdriveshafts7159 thank you for the great information and answering my question. I very much appreciate it!!
You can remove a staked UJ! You just have to re-stake it when after installing he new UJ.
And how do you properly re-stake it? How do you ensure that it is perfectly centered in the yoke? I should clarify and say that it is impossible to remove and reinstall a joint PROPERLY on a staked shaft. You could try to re-stake it yourself but the results are going to be poor at best, downright unsafe at worst.
Thanks for mentioning the bushing/thrust spacer. I doubled one up and had to pull and reinstall 6 caps. Frustrating.
Does this work on a 20 year old drive shaft
Yea, try this with a rusty old driveshaft and see how well that's works lol
I wish you guys would be specific on your title. What vehicle is this shaft from? There are different types of unjoints.
We are general because this is a general demonstration. Most automobiles that use universal joints in the drive shafts use Spicer style joints. There are different size joints but the installation process is basically the same for all/most of them. This specific example is a 1310 series. This basic shaft (in varying lengths) would cover almost every Jeep ever made, many older ford trucks and SUVs, many older Chevy trucks and SUVs, international scouts, and aftermarket shafts for many Toyotas, Land Rovers, and more.
@@tomwoodscustomdriveshafts7159 My 1972 Chevrolet Caprice Sedan has a double cordon yoke like he was working on this video that yoke goes on the rear end of drive shaft and then bolts onto rear differential with 4 bolts flat to a plate on the differential the end of my cordon double also has a flat plate end and the 2 plates mount together. pretty interesting on the old cars the rings were internal and plastic mold injected into the joints to replace you have to use Spicer Ujoints with internal snap rings and the snap rings attach in the inside of yoke on the end of each cap so that they prevent caps from pulling outward back out of the double cordon joint under operating conditions. There is also a ball stud on my driveshaft that the yoke centers on and also has a joint seal and spring to seat it it acts to keep everything centered under twisting load of power when shaft turns its pretty awesome design but it was only used by GM for 2 to 4 years depending on model of full size coupe or sedan. Lime the Chevrolet Impala- Caprice only used the double cordon joints in 1971 and 1972.
Than why the fuch is every u-joint iTouch damn near impossible to get apart I got to put heat on it soak it for 3 months and still use a press..
That’s normal mate….hammering doesn’t work in the real world. I use a vice and a socket, that works well.
what a hack job but great if you want repeat customers because it has to be fixed again I would like to know where they are so I never use them LOL
R810
If it’s getting bound up like that where you need to wack it with your hammer to free it up, the UJ isn’t sized correctly. There should never be any play like that.
You are wrong. I even explain why the joint is stiff when first installing it, due to the thousands of pounds of pressure just applied to it, which causes it to be pushed up against the end of the cap. Please trust that the person in the video, who has been installing u-joints for most of his life knows what he is talking about, maybe even more than you.
With a staking tool
Not wrong. I assemble driveshafts for the big 3. We do a JAT (joint activity test) and then if need be change the snap rings thickness. That's why if you look at per say F-150 snap rings you'll usually see yellow, grey, and blue snap rings. Those are the primary ones that we use. Though there are about 10 different thicknesses. After hitting it, at my plant and customer specifications it's to much slop and not passable. Usually when it's that sloppy during a run, we know that there is a bad bearing cap. Either way, we'd never send that out.
@@camilla0210 This is Shawn Wood, that's cool that you assemble drive shafts for a living. So do I. Yet we disagree so one of us must be wrong. Could it be you? Could it be me? I've already explained in the video and then again in the comments. The extreme force of the press we use pushes the end of the trunnion against the inside of the bearing cap so hard that there is friction between the end of the trunnion and the bearing cap. I of course know that there are different thicknesses of snap rings but we use high quality parts with consistent and tight machining tolerances which don't require fussing around too much with different size snap rings. You'd never send what out? Are you evaluating end play in the joint from watching a video where the only thing you see demonstrated is how easily a joint pivots? There is no "slop" in the joints in the video, how are you coming to that conclusion? Seems like a huge jump to me.
Yeah these are little mini you joints on a trail machine, you’re not gonna be holding a full-size driveshaft out of a truck or car like that
Nope, you are wrong. These are 1310 series joints, the most common size used in American vehicles for decades. The concept applies to larger shafts such as 1350 or 1410 series. This isn't how you'd change the joints in a dump truck or semi truck but most people don't need a demonstration on how to change joints in industrial equipment and vehicles.
What the heck kind of magic are you doing there? Hitting the yoke makes the cap come out?? That's a great tip, however it's also a brand new install, yes?.
It is brand new parts in the video which sometimes makes it easier but also sometimes makes it harder because new parts often fit more tightly than older worn parts. When we filmed this we didn't plan very far ahead and didn't have any old rusty stuff lying around for demonstration. We also have another video that shows more of an at home DIY process, with a used shaft.
@@tomwoodscustomdriveshafts7159hahahhaha. old rusted ujoints will ALWAYS be harder. Naive.
@@glynnpowell7864 No duh. We didn't have any old junk shafts lying around when filming this so we used what we used. But the process we use is the same for old rusty shafts as well.
I feel emasculated
It's not that easy when you're changing out u-joints that have be in the vehicle for 100K miles or more. That's why most of here is to see how that is done. New parts go together easy.
Slimey automakers stake u joints. They dont want guys buying u joints they want to sell you the whole shaft. Nothing some needle nose locking pliers and heat cant fix though!
I get a kick out of these you tubers try that in the real world where the drive shaft has rust dirt and anything else that gets on them in real world use. I bet it would take more then a hammer too get it off.
That he has done this more than a couple times he’s really good at it! But a rum dum like me hasn’t! I need Shawn to realize whom his audience is! Someone not like Shawn whom knows what he’s doin dosent! That’s why I’ve turned to his site! Cause I don’t know and most everyone else that inquires! We need Shawn whoms seriously good mechanic to slow it down fer dummies like we! We need it to slow down and a little more up close to digest and perceive content! Constructive feedback Shawn no insult ure a smooth mechanic we’re all not!
Thanks for the feedback Mark. This video is mostly just to show how we do the install at our shop, the ideal way to do it if you have the equipment, with the understanding that most people are not going to be able to follow the same process at home. As I mentioned in the beginning of the video there is another video (I actually said there'd be two more, but we decided to just make one more) where we show how to do the job at home with more basic tools. Hopefully that video is more easy to follow and understand. We also have a page on our website with some step by step information. That at-home joint repair video is embedded on that page. You can find that here 4xshaft.com/blogs/general-tech-info-articles/diy-u-joint-replacement