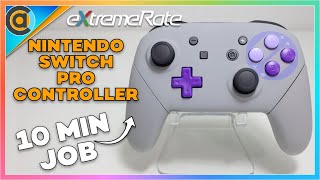
Nintendo Switch Pro Controller Shell Replacement with eXtremeRate | SFC SNES Classic EU Style

Vložit
- čas přidán 10. 06. 2024
- Welcome to the ultimate guide for Nintendo Switch Pro Controller Housing Shell Replacement! The step-by-step instructions for transforming your gaming gear. 🎮
Buy tools and housing shell on AMAZON:
Opening Tool Set: hfixt.com/pryt
Magnetic Mat: hfixt.com/mat
Tweezers: hfixt.com/tzrs
Housing Shell: amzn.to/3Ryzj5w
Global AliExpress:
Opening Tool Kit: hfixt.com/alit
Magnetic Mat: hfixt.com/amat
Tweezers set: hfixt.com/altz
Housing Shell: s.click.aliexpress.com/e/_Dkz...
🚀 Useful links
More DIY repair guides: how-fixit.com
DESCRIPTION
Unlock the full potential of your gaming experience with our comprehensive Nintendo Switch Pro Controller Housing Shell Replacement Guide. In this step-by-step tutorial, I walk you through the process of transforming your controller with an SNES Classic shell, elevating both aesthetics and functionality. Whether you're a gaming enthusiast or a DIY lover, this guide is tailored just for you. 🎮
❤️ Key Takeaways:
1. Easy Step-by-Step Process: Our tutorial simplifies the shell replacement, ensuring users of all skill levels can follow along.
2. Compatibility Insights: Learn about different shell options available in the market and compatibility with your Nintendo Switch Pro Controller model.
3. Enhanced Grip and Comfort: Discover how a new shell can improve your gaming comfort and control.
Highlights:
- Detailed disassembly instructions.
- Insights into the quality and variety of replacement shells.
- Pro tips for a seamless replacement process.
Follow us for more tech tutorials:
Instagram: / howfixit
Facebook: / howfixit
Twitter: / howfixit
If you found this guide helpful, don't forget to:
- *Like* the video 👍
- *Subscribe* for more gaming tutorials and tips 🎮
- *Share* with fellow gamers who might find this guide useful! 🌐
📌 Timestamps:
00:00 Introduction to Shell Replacement Guide
00:18 Replacement Shells for Nintendo Switch Pro Controller
00:37 Tool kit
01:17 Let's get into the makeover!
01:47 Removing the backplate
01:55 Removing the battery
02:26 Opening the controller
03:30 Reinstalling all buttons on a new faceplate
04:31 Reassembling the controller
05:22 Check the buttons
07:29 Transformation is complete
07:51 Final Touches
AFFILIATE PROGRAM
We are a participant in the Amazon Services LLC Associates Program, an affiliate advertising program designed to provide a means for us to earn fees by linking to Amazon and affiliated sites.
#nintendoswitch #howfixit #snes #switch - Věda a technologie


Hey, gaming enthusiasts! 🎮 Thanks for tuning in for this Nintendo Switch Pro Controller makeover. If you're looking to add some retro flair to your gaming setup, this SNES-style shell replacement is a game-changer! What style would you choose for your controller? Let us know in the comments below! 👾✨
The SNES Classic-style shell is pure nostalgia 😍 it brings me back to childhood memories with my first SNES console! Excellent video, and clear instructions.
Mine is sitting on my front porch freshly arrived from Amazon. Can't wait to get home after work and install it!
Considering the upgrade, but curious: Is this shell replacement compatible with both the original and newer versions of the Nintendo Switch Pro Controller?
Yes. This shell is compatible with the original and newer versions of the Nintendo Switch Pro Controller. The design and dimensions of the shell are crafted to fit seamlessly on any revisions of the NS Pro controller. Feel free to go ahead with the upgrade.
@@howfixit at 2:37, I noticed that on the printed circuit board, there is a date 2020/09/19 and a revision model of the WEL-VA 2.1 controller. I found it interesting that different versions of the controller may have distinctive elements in the housing design
@@user-ew6zf6ur8w I assume there are changes in the logic of the components on the printed circuit board in the newest revisions. As for the housing of the controller, there are no changes.
@@howfixit My PCB version of the controller is PWB_MAIN-01. Externally they are no different
@@user-ew6zf6ur8w Yes, the differences between PCB WEL-VA 2.1 and PWB_MAIN-01 are only in the arrangement of semiconductors and SMD components, otherwise, they are the same
Great video! Quick question, this kit contains spare screws, should I use these screws or the ones I remove from the original case?
I used the screws from the original controller
Should be easy with tool kit form the video. Many thanks, for the video
You're welcome! I'm glad you found the video helpful. If you have any more questions or need further assistance with the toolkit, feel free to reach out. Happy gaming! 🎮👾
I'm new to DIY mods here! How long did the entire shell replacement process take you in real-time? Any tips for someone attempting this for the first time? I'm worried I'll damage my controller
Welcome to the world of DIY mods! The shell replacement process typically takes 15-20 minutes. However, don't rush it-take your time to ensure everything is done meticulously. A key tip is to follow the tutorial step by step, pausing the video if needed, and double-checking your progress along the way
@@howfixitThanks! I just little bit nervous but I want it
Organize Your Workspace: Lay out all the tools and parts in an organized manner to avoid confusion.
Patience is Key: Take your time with each step, especially when handling delicate components like the flex cable.
Use the Right Tools: Make sure you're using the recommended tools, like the plastic opening tool and Phillips-head screwdriver, to minimize the risk of damage.
Magnetic Mat: If possible, use a magnetic mat to keep track of screws and ensure nothing gets lost.
Remember, it's normal to feel a bit nervous on your first attempt. Just take it slow, and you'll do great. If you have specific questions during the process, feel free to ask.
Happy modding!
Just wondering, does the new shell affect the durability or feel of the controller in any way?
This shell doesn't compromise the durability of the controller; in fact, it maintains the original build quality. As for the feel, the semi-slick, matte soft plastic adds a unique touch. It's comfortable in your hands, and the texture is different from the typical plastic finish, providing a fresh and pleasant feel during gaming sessions. If you decide to replace the original shell, you'll likely enjoy it
Loving the semi-slick, matte soft plastic finish you mentioned! Does it improve grip during intense gaming sessions, and is it fingerprint-resistant?
@@mikeroshchyna1475 Absolutely! The semi-slick, matte soft plastic finish not only looks great but also contributes to an improved grip during intense gaming sessions. The texture provides a comfortable and secure hold, enhancing your overall gaming experience. Additionally, the matte finish is generally fingerprint-resistant, so you won't have to worry about smudges and prints detracting from the sleek look of your controller.
How does the look of the shell take your gaming to ‘a whole new level’?
theoretically, the aesthetics of the shell can enhance gaming experience by providing a visually immersive environment that adds an extra layer of enjoyment to the overall gameplay. It's not just about performance; it's about creating a captivating atmosphere 😅
I would like that you will be my teacher jajahaahja its no a joke i would like open a shop with new ideas in Spain 😊😊 gime one email or something. Thanks