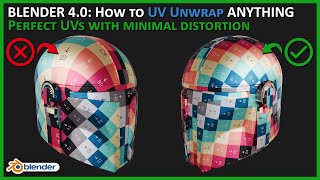
Lazy UV Mapping - In less than 1 Minute // Blender Quick Tip
Vložit
- čas přidán 25. 09. 2020
- Story time! I was texturing this helmet the other day, but when I opened Photoshop to start throwing in logos, I got so lazy and decided to do it the BLENDER way instead. Quick, lazy and hacky - But it kinda works, ehh?
Find more Quick Tips like this one by following me on my Instagram: / daniel_vesterbaek
_________________________
If you love Blender and cars, you can check out my other tutorial on shading and modeling the scene from "Courage". 👇
"Courage" Shading Breakdown: • Creating an F1 in Blen...
Animated Short Film: • "Just Another Car Ad" ...
_________________________
Check out my other platforms:
Instagram: / daniel_vesterbaek
Artstation: www.artstation.com/daniel_ves...
BlenderArtists: blenderartists.org/u/dan80/ac...


For those how cant find the vertex color node nowadays, its called color attribute now. Works exactly the same. I always did the painting part with a black/white texture with texture painting. But thats incredible better! Thanx so much man!
Thank goDDDDDDDDDD, I was going crazyyyyy
You just solved a big uv problem for my work flow. Thanks mate!
You are welcome dude :D
Thank you! I have been looking for something like this for a long time.
this is a great tip. Thanks for the help
this is all i want. thanks man
some good advance stuff super quickly again :)
How would you mix a third and fourth side? I successful did two perspectives but how would I further mix?
this tut is golden information
My model is quite low poly and the brush is not really responsive, like it easily paints one UV map over the other when I want them to blend. But I guess that´s what you get when using not a lot of vertexes?
very handy, thx!
That was helpful please make more of these lazy tuts 😃
Awesome you liked it! I will do that ^^
awesome tutorial
So awesome
Btw with this method can we bake the texture into 1 single texture and 1 single map?
very good!
Thanks very much, Bro! I wish you Good Luck!.
Thought you were going to import images as planes, subdivide, then shrinkwrap, but image projections certainly seem the faster method (provided you have the proper image refs) -- thanks for the quick tip!
Yeah! That's also a good way to do something like this - You will however end up with much more geometry because you have to subD the shrinkwrap mesh a lot to do that. - But it's always good to have a ton of different approached and then pick the one that works the best for each situation :)
how does one export this texture? blender doesn't seem capable of exporting a texture if a "mix" node is plugged into the principled BSDF, only direct textures. are you meant to somehow bake the mix?
More quick tutorials pleaseeeee
Gold
😱 ty
Can we do this in maya
Awesome tip. What happens when you export this to .fbx to Unity and it has 2 uv maps? Is this for Blender-only-workflow?
You could bake this into a new UV map actually
You're the best.
Thanks man! :D
Damn.... Until I download this video and played it frame by frame … I couldn't figure it out ....
Thanks a ton!!
Hahhahah xD
It had to fit in 1 minute, sooooe.. That was why, sorry about that
You are welcome.
@@DanielVesterbaek
Thank You 😊
Dude, what is that setup you dude made fast after you duplicated at 0:43
How to turn the UV Mapping to outline so i can edit the texture of my model to others software like Ibispaint or medibang
Hmm, I am not sure I fully understand the question :/
Do you want to "bake" the textures onto a UV map?
How do you mirror Max's helmet design to the other side? this mirroring problem has bugging me out. but this time its not helmets but Sponsors for my F1 car models. help?
Actually, I didn't mirror it. I just only needed to show this side of the helmet for the project, so I didn't care about the other side, heheh.. :D
Depends on how its modelled. If you use a mirror mod, than you can edit the UV settings in that. Otherwise the otherside will get the UV automatically if its modelled as 1 complete mesh
Yeah this workflow is nice, though you need the proper image sets for this to work
when i project from view and i move my uv map i still dont see my image appearing
You have to make sure you’re in UV edit not Image edit
OK I'll try thanks again
Didnt work with me blender 4.0
DUDE WTF THIS VIDEO WAS MADE FOR MEE....i am making verstappens 2020 helmet as I am a big fan and shrink wrapped everything one by one but I just couldn't get all those line and designs right at all.....u saved my fucking life.....
But still I ask is there a better way or this is it?
I can probably figure this all out by working through it and pausing through this video, but I also know that Blender isn't exactly intuitive and I often run into problems that have no explanation and there's not precise way to phrase it to find the answers online when I get some of these random issues. It would be good if you could break this down in a slower, more detailed, step-by-step video for people who just started working with blender, who are only really knowledgeable of the basic concepts. If you could make a video for stupid people, I would appreciate it. LOL.
didnt worked with blender 4.0 theres no vertex color in it now
its called Color Attribute now.
can i have that helmet
Background music forgotten
Yeah I'm Lazy 👁️👃👁️🙏
how do you project from view it doesnt make sense i click right click but theres no project from vview
You have to press U