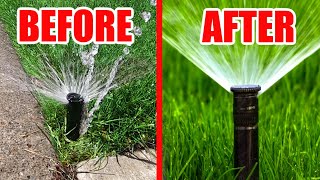
Replace SPRINKLER HEAD in 5 Minutes - Rainbird - Hunter - Orbit

Vložit
- čas přidán 26. 06. 2020
- Easy way to replace Hunter, Rainbird & Orbit Sprinkler heads in 5 minutes. Don't pay someone else to do this easy job. No shovel, no mess. Save your lawn from summer heat and make sure your sprinklers are doing their jobs,
Hori Hori Garden Knife:
amzn.to/3i6DAKI
Sprinkler Head Shown Hunter I-20 Stainless Steel HD Model
amzn.to/2Bhun1E
Hunter PGP Sprinkler Head
amzn.to/2VoAY10
Adjustment Videos
Hunter:
• Adjusting a Hunter Rot...
Rainbird 5000
• Rainbird 5000 Sprinkle...
Orbit Saturn 5
• How To Adjust A Saturn...
K-Rain
• K-Rain® K1 Gear Drive ...
Disclaimer:
This video, description & comments may contain affiliate links, which means that if you click on one of the product links I may receive a small commission.
Due to factors beyond the control of Silver Cymbal, I cannot guarantee against improper use or unauthorized modifications of this information. Silver Cymbal assumes no liability for property damage or injury incurred as a result of any of the information contained in this video. Use this information at your own risk. Silver Cymbal recommends safe practices when working on machines and or with tools seen or implied in this video. Due to factors beyond the control of Silver Cymbal, no information contained in this video shall create any expressed or implied warranty or guarantee of any particular result. Any injury, damage, or loss that may result from improper use of these tools, equipment, or from the information contained in this video is the sole responsibility of the user and not Silver Cymbal. - Jak na to + styl


![[柴犬ASMR]曼玉Manyu&小白Bai 毛发护理Spa asmr](http://i.ytimg.com/vi/0TsXQ7z2Dh4/mqdefault.jpg)


Thanks for watching I hope this can help you save some money replacing a sprinkler when you need too. I try to always keep one on hand to be ready, Check the description for links to each manufacturers fine adjustments as needed.
If that cup of water trick works I am going to be kicking myself!!!!
This trick worked great for me today!
Yes it was very helpful I'm going to be changing them myself like this just need to learn how to master the settings.
What if it's leaking? Still replace same?
Thank-you for this 5 minute fix video! It's the most awesome video out there. Clear and concise❤ 100 stars!💫
Here is a much faster, and safer way to replace a failed sprinkler. On the new sprinkler, unscrew the large part of the replacement sprinkler head from the body, exposing the internal spring and gearing and remove from the body, do the same to the old sprinkler in the ground. Now take the new internal part and insert it in the body that is in the ground and tighten and adjust. Should take less than 5 minutes. This way there is no digging, no chance of collapse of the hole. Then discard the old interior guts.
I am going to try this!
I had to replace eight Sprinkler Head today and was very glad I saw your video. The method of using water to create a nice tube to pull the old sprinkler out and slide the new one in WORKED GREAT! Saved a lot of time and digging. Thank you.
A couple of things I noticed while watching the video: 1) Aligning the right edge. Some heads say to align the left edge. The way you do it is the same, just read the instructions on the replacement head to know which edge to line up. Once this is done, turn the internal adjustment screw to set the other edge while the sprinkler is running. 2) The front adjustment screw doesn't change the flow. The nozzle size does that. The adjustment screw changes the distance that the stream shoots out of the nozzle, not the rate of water flow.
Fyi, if replacing with exact same sprinkler, then u can leave the shell in place and just replace the guts.
This was helpful, thank you
Nice tip!
Great tip about pouring water in the hole before removing the head!
Replaced several last week in my yard. Very easy to do DIY and saves hundreds of dollars.
It's crazy how much they charge and around here it can take 2 weeks to get them out. Good call either way to DIY.
I'm gonna try this. Not handy at all. We'll see.
This video by far is the best. I enjoyed it it provided the quick tips to replace it fast. thank you.
Your the best, Your home tips from snow blower to sprinklers is so HELPFUL. Thank you much approach, your great content.
One of the best "how to" videos I have seen! Well done.
I actually used your method today to replace the sprinkler head and it was about five minutes worth of work. The idea of water around the dirt one had came out the other one slid right in tightened up I just had to adjust it. Thank you so much
Thank you so much for this video. I found the instructions for my Orbit sprinkler absolutely mystifying.
This is by far THE BEST ADVICE. Follow this guys directions. Works very well.
Thanks for the info. I had 6 heads to replace and it took me 40 minutes to dig out the first one. I called it a day as my was aching when I came across your video. The next day I gave it a go as per your instructions and hey presto all 5 remaining changed in 40 minutes.😊
You provided great tips and the clearest adjustment advise that I have seen from others.
Thank you I appreciate that!
I was searching how to adjust sprinklers about 2 days. Only your vid make it right. Thanks!
I live in Florida and the ground is mostly sand. That was a great idea of pouring water around the sprinkler. Thanks!
FANTASTIC video, very professionally done. Thank you, very much appreciated, God bless !
Thank you so much, last time I paid $100 for this 5 mins job and now I want to it myself for another one that has failed to rotate (10yr+ old)
Top notch tutorial. Clear and concise. Thank you
Much simpler than the way I've been doing it. I'll give it a try (and I even have a Hori Hori). Thanks
Two times now, a couple years apart, a few of my sprinkler heads were weak and dribbling. I thought I should change the heads but the sprinkler repair guy showed me that it was big tree roots squeezing the lines that feed that particular zone. He dug down, found the root squeeze, cut the roots, or went around them with new line. Now the heads have full pressure and work great.
Good repairman. That isn't easy to diagnose. I'm in my 21st year working on Irrigation systems here in North Texas and I have only seen that twice.
big thanks to you. gonna save me lots of money and save my lawn.
I’ve found that for the Hunter sprinkler in the video, I can just unscrew the mechanism from the hallow case and skip the rest of the instructions. Leaving the case in place helps prevent soil from entering.
Is there any reason to replace the case? This would make it so easy to replace without getting any dirt in the pipe. Mine was getting stuck up. Figured it was the whole unit.
@@glenmuccini9771 It should be evident if the case is damaged. My experience is that damage to the case is rare.
Fantastic video!! Straight forward and no wasted time. Thanks!!
Followed your video today... Worked perfectly! Thanks!
So upset because I hit a sprinkler head with the mower. This puts me on track to repair. Thanks.
This is the video that I needed. I literally dug up some of my sprinkler heads last week to replace them. Definitely following these instructions for the remaining heads. Thanks!
Thank you. Very clear instructions.
Wow, that was easy. Thank you for explaining and demonstrating that.
Thanks for this video, very well done. I screwed the adjustment screw up all the out of the head of mine and water was just gushing out. I just needed an easy DIY video to replace it tomorrow
That slide was so smooth!
Great video as always! Thank you
Super good instructions. Easy to understand and follow. Thanks for sharing this.
I don't even have a sprinkler system but good to know in case I can help someone. Nice video.
Glad you liked it! Thank you for the nice comment too
Might work just fine if sprinkler head is still slightly above or at ground level, but over the years many of mine have become buried up to two inches below lawn level even though the head still pops up. When I have had to replace a head, I have to locate it (hard to do when it's below lawn level) and completely dig it out in order to put a longer riser in to raise the new head to lawn level again. Rain Bird says to use Teflon tape, too.
Yes because if it is not secure when you turn the water on the fucking sprinkler head will shoot off like a bottle rocket!
I had a bad sprinkler head and tried to replace it lately. Then I found the tree root surrounding it. Man, that was a huge word to chop away the roots before I could twist the device.
'tis the season! Thank you, I learned a lot from this video!
Yeow...saved me a lot of time digging and mucking around. Thanks!
Wow - was taught to dig them before I saw this by a seasoned sprinkler guy. I'll be doing it this way next time. Unfortunately I did my 2 bad heads before seeing this in my feed
Great Video!!! Thank you so much
Nice little American Eskimo bark machine you've got there.
Great video. Concise and informative, as usual.
Much appreciated!
I always dig up the sprinkler head because I’ve found so many sprinklers with kinked or stripped threads below ground. If I’m fixing a sprinkler, I inspect everything.
Great video, I need to replace 3 heads.
This is going to save me a ton!
Thanks ! :)
I have 2 sprinkler heads to replace. Great video with detailed instructions. Thanks 🙏🏽
So glad it helped! Thank you
@@ronjohnJK , Thank you for the info.
Thank you for the nice and simple video
Thanks for sharing. Easy to understand and follow.
Glad it was helpful!
Awesome tutorial as usual
Thank you so much!
Well explained.
Great helpful video man! Appreciate it
Great video
Thank you
Great video.
Great vid, thank you.
When you turn the sprinklerhead to put it on you will want to start by turning it very slowly backwards until you feel or hear a kind of click.
This is the threads lining up.
This will prevent crossthreading which will cause leaks or failures and also make it very difficult to remove if you hit it with your lawnmower again.
I recommend digging out all of the way to the fitting. Most leaks aren’t caused by the sprinkler head itself but instead are caused by a leak in the funny pipe. You also don’t want any dirt at all to get in the lines so this is just asking for trouble.
THIS, did not dig all the way to the bottom and now the hole is full of dirt, and will have to re-dig all the way tommorow
Obviously the point is to do this if you diagnose with certainty that changing your sprinkler head will solve your issue. You can also easily flush your lines if you, by chance, get excessive dirt in them.
@@BadAssDude69 how do I flush the lines? I followed this video and all was going well until I had to go in the house - during those three minutes that I was in my house my dog dug into the hole where the sprinkler head was. I installed the sprinkler head anyway and now the sprinkler pops up but the water doesn’t come out I’m guessing because it’s full of dirt ?
@@kg4955 Remove nozzle. Run zone. Clean nozzle in sink/with spigot. Reinstall. If nozzle cant be unclogged, replace nozzle - not entire head. Probably optimal to always flush new heads before installing nozzle.
Excellent video! Thank you!
Thanks for this video. Well explained and simple :)
Tip when the sprinkler cup stays in the ground (when the head and guts unthread at the top): If you are replacing with the same make and model of sprinkler, and the cup is not damaged, you can remove the new sprinkler guts and thread it on the old cup.
This method works well but it would be a good idea to run the sprinkler for a few seconds before screwing the cap on so that you don't trap any particles in there.
Excellent video! Thanks!
Another great video! Thank you!
Great video, thanks, very helpful
Thanks for the video and the link. They are very helpful.
Solid and useful video. Very inspiring.
Much appreciated!
Thank you!
the dog licking the knife that we "don't care about" killed me LOL
Thanks very much for such a great video.
Thanks for the great information 👍
Made it look easy!
awesome, I will try to replace one this time
Thanks for sharing
Buddy, absolutely a great video. wows
Thanks for sharing this
Thank you! I replaced the sprinkler head like a pro now!😂🤣😆
So glad it helped!
excellent vid! thanks!
Very helpful!
lifesaver, thanks!
Hello from Connecticut
I’ve been doing this for ten years and the better way is to go all the way to the bottom because you never know what you can find sometimes the saddles need to be replace this is the easy way
Yep, when my sprinkler guy changes a head, he goes all the way to the bottom.
Thanks
Thank you 😊
Thank you 🙏🏾
ty just purchase the knife using your link great video thanks
I appreciate that, that hori hori is still one my favorites. Has held up so great over the years!
Excellent video!!
Thank you very much!
Wow! What a great video!
Very helpful but how do I know which sprinkler brand to use ? There’s so many shapes different sizes for the same type.
Thank you!!!
Really Great Video!
Great video
I can change that head in one minute. You find your head you get a pair of channel locks open it up all the way you turn counter-clockwise until it comes out of the ground. You match your nozzle first then just screw it into the ground. My way or your way I call it the 90% rule. 90% of the time it will go in just as easy as it came out the other 10% what you threaded onto because of ground pressure will cock it sideways. So you're just going to have to dig the whole thing up anyway. I own my own business and parts and labor I only charge $40 a head.
Love your videos. What do you do if the sprinkler is the lowest sprinkler of a zone so when you unscrew it water comes out the pipe?
Also, what do you do if dirt gets in the hole? Thanks
Good video jimmy
Just wondering if you can put the new nozzle tip on before you put the new sprinkler head into to the ground?
For I 20s I’ll just turn the flow off and put the nozzle in when the head pops up. It’s pretty satisfying.
I'm in MA too. Had to replace a couple heads last week, Hunter PGP-adj's were sold out at every Lowe's and HD in central MA. Not sure what the supply issue is. Ended up just using an online vendor.
I don't want to cause a panic here, but you are right. There is something going on and most stores are sold out. The local rep tells me that there is a bit of a shortage with many models, a lot of it is high demand with the heat but there seems to be a supply problem. I would order them online while you can, as of now PGPs are available on Amazon here still. amzn.to/2VoAY10
William Johnson also in Massachusetts. I had to wait for an online supplier to get some in stock, about a week. Just ordered 10 more and the price went up!
I'm in MA also, look for your nearest SiteOne store, they have everything you need for irrigation there. I belive the closest one to central Mass is in Auburn
Just changed a pgp head tonight. It wasn’t popping up and burned the grass around it. Unfortunately the head was too low and spent about an hour digging it out and then raised it a couple inches. I have several spread heads that sunk, so will be looking for a riser kit. The pgp heads are hot right now, went to 4 Home Depot’s and couldn’t find any. Will try your trick the next time.
I just commented to someone else on this too. Buy them now, something is wrong and they are rout everywhere. I know amazon is a little more money but they still have them here amzn.to/2VoAY10 - But the rep told me they are having supply issues this season. Not good!
@@SilverCymbal I just got 3 from Amazon. So I have 2 spares. Thanks for the tip
@@mrpanos923 I ordered a couple more today too. I don't want to have a broken head with this heat and no parts! Glad it helped.
I like the accent!
Very clever.
I really appreciate it. Thank you
great video top 5