How to Install a Cable Deck Railing | This Old House

Vložit
- čas přidán 13. 07. 2021
- Tom Silva shows Kevin O’Connor how he’s using a hybrid railing system on the back deck at the Lexington house.
SUBSCRIBE to This Old House: bit.ly/SubscribeThisOldHouse.
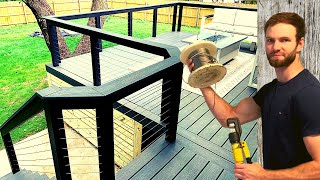
At the back deck of the Lexington house, Tom Silva shows Kevin O’Connor how he’s using a hybrid railing system that has cedar posts and railing caps, with stainless steel cable “balusters.”
Looking for more step by step guidance on how to complete projects around the house? Join This Old House Insider to stream over 1,000 episodes commercial-free: bit.ly/2GPiYbH
Plus, download our FREE app for full-episode streaming to your connected TV, phone or tablet: www.thisoldhouse.com/pages/st...
About This Old House TV:
This Old House is America’s first and most trusted home improvement show. Each season, we renovate two different historic homes-one step at a time-featuring quality craftsmanship and the latest in modern technology. We demystify home improvement and provide ideas and information so, whether you are doing it yourself or hiring out contractors, you’ll know the right way to do things or the questions to ask. Our experts including general contractor Tom Silva, plumbing and heating expert Richard Trethewey, landscape contractor Jenn Nawada, master carpenter Norm Abram, and host Kevin O’Connor give you the tools you need to protect and preserve your greatest investment-your home.
Follow This Old House:
Facebook: bit.ly/ThisOldHouseFB
Twitter: bit.ly/ThisOldHouseTwitter
Pinterest: bit.ly/ThisOldHousePinterest
Instagram: bit.ly/ThisOldHouseIG
How to Install a Cable Deck Railing | This Old House
/ thisoldhouse - Jak na to + styl


Couple comments - make sure to tighten from the middle cable outward to properly displace the load, and use post protector sleeves on the pass throughs to protect the post holes and gives it a finished look.
B
what material did you use for these post protector holes? cut to length on-site?
Television's original and best carpenter, plumber, and landscaping contractors. Now, the best on CZcams for the rest of the world to watch. Thank you.
I watched this about 100 times and finally finished my own project today!!! Thank you! Great project and learned so many new things!
Hope you put a 1x4 under the top rail. Top rail alone insufficient to prevent post movement with tension.
very helpful! I love your method for creating a bevel on the top of the railing by running it through the table saw at an 8 degree angle. I will definitely try that on ours when we get to the railing!
i like the way the cables were installed very straight forward on install you guys make it look so easy thanks
You guys are one of the only carpenters I trust to learn something new.
TOH used “Feeney’s Quick Connect” cable railing system …I zoomed in on one of the end pieces and saw their name stamped on the connector.
Available at Home Depot!
Thanks, I was wondering what brand it is.
Thank you! Huge help to all of us!
Yup zoom in at the 6:52 mark.
Thank you!
THANK YOU! Before finding this video I watched like 20 about railing and I T had headache of all the talking and got confused I almost give up..This guy is a GENIUS! thanks
Well the genius didn’t put stainless steel sleeves in the post holes
Big fan, watched almost all episodes. So far.
Nice design to keep the view of that sweet backyard.
It looks very stable and nicely.
The Feeney cable rail system is the best thing going by far! I was looking at Bullet brand (and others) that had individual tensioners at each side of each post and required a brand specific crimp tool. The 40' section of wood railing that I was replacing would have cost $1500-$1800 with Bullet. The Feeney pre-crimped 40' kit at $60/each times the 10 rows plus 90 protector sleeves and 10 end caps was less than $700. This system was so easy to install and looked great. The hardest part getting the holes drilled straight, which was done by an experienced carpenter for us.
Was the 90 protector pieces to insert into the wood so that the cable wouldn’t wear down the wood it’s threaded through? I’ll be looking up Feeney brand thank you.
Thanks Tommy!
"well look at that" lmao, soudned like inside of my head, everything is so awesome
Wow beautiful deck
Looks awesome
Great vid - very informative. Well done TOH.
Nice looking rails n deck.
Such good work
Tommy has mad knowledge and skills. Table saw to pitch the top railing...dow's and pins vs deck screws on the top plates.. these are small yet great tips.
Actually, @ 02:45 he did use deck screw, the dowel served to plug the screw hole.
I love it, looks great!
Good TOM, the Cable Deck Railing installation is very clear, I require you to tell me the name and specification of the materials, both the cable and its terminals.
I believe this is made by VistaView. Really good product.
It turned out looking really nice. I was thinking some kind of bushings would be nice, though, to finish off the holes drilled in the posts.
At the least some stainless collars to add more industrial robust look going through the posts.
I’d like that too
No
The few that I've done have those bushings,and are more adjustable as well. Cable railings aren't inexpensive, I'd rather cross the T's and dot the i's than cut corners. Looking at this makes me think the cables will chaff the posts at every corner.
Nice work!! Except you forgot the protector sleeve in the post holes. It’s just so the cables don’t wear out the holes at the pinch points since wood is soft.
Optional
Great video huge help!
Trabajo de calidad 👍🏻
Nice job 👏 👍
this just butters my biscuit
Can you please share where we can source this style cable, as well as how you fed the wire through a 90 degree corner within the 4x4.
I just asked the same question about the 90 turn!?
I just run a new cable, it's more expensive but I would rather not risk breaking the post
amazing video
one thing I would do differently is to, here at 4:30, to give it a little more cable so you could work with it outside the post, bending it to your direction.
after that, just pull from the other side
a quick question: how much pressure is too much pressure? It is a lot of horizontal pressure (10 cables)?
I love that
I wish they had showed how they did the turn at the 90 degree. How did they drill the holes?
Agree...possibly the main reason many people watch this video was to see how they did the corner. I was disappointed that they completely skipped any discussion on how to do the corner post. I read a comment that it was prob a 45 degree hole so that the cable can be pushed through but would have been nice to see them explain if that's what they did.
The steps are really nice, it looks like layers of milk and chocolate
NICE
Where do you buy the wire and kit from? Links??
The product is Cable Rail from Feeney
Excellent job , can you please tell me where or how to get the supplies !!!! Thank You
Just once I would like to see them do a 20 second pan of the finished product!
Then you would see all of the deficiencies ;)
Like that it does not obstruct the view
Thats the biggest reason people use it
You can tell the team cares about there customers and their work.
Thanks! I can't believe I witnessed dominos being used in a deck build! Just what I was looking for!
A wide top rail, sturdy cable system so nobody falls off the deck, AND a dope clothesline!
Seamless.
Much attention was paid to details on this job, but I’m very surprised no bushings were used where the cable transits the posts, especially where the cable changes direction.
Once tensioned, the cable WILL wear, & elongate the holes, those cedar posts are soft.
Bushings are the cheapest part of the job, HAAS sells them for less than $1, Feeny, (used on this job), are 10 for $12.
It is not true that the quick connects used here cannot be undone. Feeny sells a tool ($7j, specifically for that purpose, (works much like the gizmo for undoing Sharkbite plumbing fittings), works on all Feeny quick connects.
They also make angled bushings for going down stairs.
What A Beautiful Job, My Dream Would Be That These Super Heros Come To My Home ANd Help Me With It because My Home Is A MESS And You Think Maybe Its Like A Lil Bit A Mess With Some Construction, But NO, It Would Be The BIGGEST Chalannge To These Guys. 100%
Nice Festools sliding miter saw there @2:10, either a sponsor or a good show budget.
Barely watch them any more. Looks like they went full on Festool. So, Festoll must have dropped a lot of money on them. Festool very pricey and if you wanna buy parts it is an arm and leg and foot for good measure.
Is there a link for the hardware used?
This was great! Thank! One question. How was the cable run at the 90 degree turn?
What is the name of the cable railing kit?
One thing to note is that code changes when using cable.(in most regions that is) The spacing drops from 4" down to 3" so that as the cable stretches it doesn't stretch beyond 4 inches. Best to verify code before installing so that you don't have to redo it
Well, if you’re going to stick to the code, then don’t install railing that climbable.
@@scott5654 Always check with the local Building Department. In my case, the Building Department is OK as long as the maximum space rule isn't violated. That usually means building-in "safety" against deflection by using 3" spacing of the cables. Tom Silva knows his stuff, so I have to assume he's up on all this, but he might have been a little more detailed here.
I love the frame but unsure about the cables. I suppose you could install safety glass onto that frame. Would it support its weight?
Great video & very informative. I can't seem to find the one way clamps anywhere. Amazon sells the caps for the clamps, just not the clamp. Any link would be greatly appreciated 🙏
Did you ever find one way clamps??
Would like to know how you got the cable to run through the 90 degree corner? Great video
Were can I find and order the cable and the hardware for it? Thank you.
Great video! Can you please post a link or list for the cable system?
Can you please give us the info on where to get the material?
Could you PLEASE tell us the brand of wire you used?? I have never seen the wire pre attached! That is a game changer!
This would be much more helpful it you said what cable system this is. I haven't seen a one way grommet system like this. looks great would love to buy it.
My thoughts as well. Im getting ready to install a cable rail system for a client and would like to use the same product he was using. I suppose with a little research I can find it. Would be nice if it was listed in video info though.
I'm in the same exact boat. These guys are one of the only carpenters I trust to watch, to learn something I've never done.
@@gar949ever find out what it is ?
@@gar949 I believe I found it .
@@jaredmasonn5701 What is it? Thank you!
I have a deck with this exact design of cables and it needs refinished. I just checked my cables and they did something a bit different. You will want to have a decent amount of the threaded end poking out so that when you need to refinish the deck, it wont be a struggle to reinstall your cables as you will want to remove them to make your job a whole lot easier. The way he installed those cables does not allow for easy maintenance of the deck in the future.
I believe the cable hardware shown here is not re-installable, when Kevin cuts it flush before popping the end cap.
I have seen another YT video where they refinish the wood structure around a pre-installed cable railing and they just wrap the wire with masking tape to protect it.
So what is the name of this cable railing product? I'm interested in this and like this design.
How do they know everything that’s on my to-do list?
The weather looks like it is perfect….
You need a one 4 under the top rail to stop the posts from drawing together, tension wont last just using #9 SS screws
Can u explain this more? I'm trying to figure this cable railing thing out
@@schreckd he means that you need a piece of timber underneath the top rail between the posts to stop them from bending and being drawn in by the tension of the cable. It also a very bug run of cable without tensioners along the run. I think the cables are going to slacken a lot in time.
also a 4x6 90 degree metal bracket under the top rail will work .
Anybody know what system Tom used here? (Brand)
How did you do the corners? The one 90 degree corner- how did you get the wire through it? How did you drill for that corner?
That is the question!
@@alex1975uk I read a comment here that it was prob a 45 degree hole so that the cable can be pushed through but would have been nice to see them explain if that's what they did. And should use metal sleeves for all contacts with the posts.
How about adding a a gate? And how did he attach the posts to the deck surface? - trying to see if this is some thing I can take on myself.
how did you fix the over hang on the 21 degree cut joint? that would drive me insane
Hi Great info. Any experience with Cable Deck Railing on coastal areas? If the cable is exposed to the salt air, I'm worried about rust.
Make sure the cables and other hardware are all stainless steel, preferably something like 316 grade which is pretty resistant to salt. A 316 stainless system should hold up pretty well in most coastal situations.
I live in Miami, can you tell me where I can buy the accessories to do this job at home, thank you for the video, beautiful work.
it would be most helpful if you included how you did that 90° turn since that is where most people will suddenly stop and realize they have no idea how to proceed.
Where did u get the cable and hardware?
I learned so much from this video, EXCEPT for the ONE thing I came here hoping to understand... How did you get that cable to make the 90 degree turn on that corner post??? I am anxiously awaiting an answer from ANYONE who can help. Thanks in advance!
@wired4fun I'm going to do my first wire railing this summer. So I don't have any actual experience. That being said, I know there are metal sleeves that are inserted into a slightly larger hole. They are used to dress the hole and protect the wood from being damaged. In that case you would drill the 1/8 hole on a 45 degree angle through your post, then enlarge the same hole to possibly 1/4 inch, but only about 1 inch deep, to allow the insertion of the sleeve. There are sleeves for straight and sleeves for angled drilling. They both sit flush on the surface so it appears that the cable made a turn inside the post. I hope I'm describing this properly. I haven't found the correct brand/items yet, but I know they exist.
@@tiredofit1429 Thanks for the response. I ended up getting a 45 degree angle drill guide from Amazon and using the 45 degree sleeves you were referring to and it worked out GREAT. For whatever it's worth, I ended up using the guide from Muzata and the sleeves are CKE, which I found MUCH better than the other available options. They are good quantity and have held up well to a brutal Michigan winter.
Where can I fund the hardware you used on the deck, or what is it called? Would love to use it.
id you ever find one way clamps??
I’m pretty sure you’re supposed to have the nut tightening end of the cable on the opposite end where it’s more easily accessible. This is so you can tighten the cables in the future if they become loose over time. Also, after you tighten the cables starting from the middle out (not top down as you did), you trim the excess thread from the bolt and install the decorative covers.
Wouldn't look as clean. I like where they hid the spot for tightening it...
@@Wired4Fun that’s why they have decorative covers which look far better than having a threaded bolt with a nut sticking out the way he has it. His job looks sloppy but maybe you’re ok with that.
Please tell me how you ran the wire at the end of the corner...
Did you L shaped inside the wood, drilling halfway into the wood makind 2 holes? I couldn't see that part in the video,
Can anyone offer advice on table sawing a peak in rail cap board if using a standard deck board as opposed to 2"x6" boards? Are they 'thick' enough?
where can i find the one way slide on clamps?
How did you make the turn/drill the holes to make the 90 degree corner?
I know right? slightly #suss
He just drilled it at a 45 degree angle…
Slightly bend the cable end and feed it through
hello , how long can I run that wire with that hardware ?? any link for the hardware ??
How did you deal with a 90 degree turn?
Could you please provide the link to purchase the same hardware?
How did you run the cable around the 90 deg post?
I wondered this too.
He drilled at a 45 degree angle…
@@cd3rls that’s what I saw too. Haven’t found any system that recommends that strategy
How do you do the 90 degree corner
Who makes the one way clamps? They are awesome - where can you get this product?
how did you get the cable through the 90 degree turn? can't see it in the video
What's a sar? 😊
Love the look.
Only issue I have is that 4” spacing that code requires doesn’t seem adequate for a non rigid rail system. What happens when a little kid pushes his head through those flexible cables? 4” can easily become 6” or more with a little applied pressure.
They tightened them significantly, they’re not really flexible anymore
@@riffdex Since they did the whole cable run with a single tensioner, I can assure you these have some give
They are flexible
I'll tell you what will happen. That little kid will realize that it really hurts to squeeze his noggin thru a 4" cable rail, and will think twice about ever doing it again. Lol.
Where do you find this style cable and one way cable locks.
What brand of cable connectors are these?
Where can you find the one way cable and tension ends - and how did you make the 90 degree turn in the post?
Where do we find the answers to these questions?
Crazy question but think I could use 1/4” solid copper wire for the same effect, and be compliant with code?
Copper is probably too soft
Wood 4x4 posts not the best for cable railing system with the tension of the cable will warp the end posts and the corner posts will pull in. The correct way is to use steel posts clad in wood veneer. I've had to replace these types of railing systems a few times.
What brand of cable system did you use?
What's not demonstrated here is how the holes were drilled on the outside corner post. How was that done. Diagonally though it? Can't be two holes right angles to one another. That would be impossible to fish the cable through. I have to do one pf these next week and need to know. Also, what brand of SS fasteners and connectors did you use?
I read a comment here that it was prob a 45 degree hole so that the cable can be pushed through but would have been nice to see them explain if that's what they did. And should use metal sleeves for all contacts with the posts.
Tom Silva is America’s dad!
Love TOH..But they didn't show him drilling all the way through the post with his template and matching it from both sides and meeting in the middle of each post.OR did he drill all the way through from one side?
How do you screw a hole in the post that turns the cable through 90 degrees??
I read a comment here that it was prob a 45 degree hole so that the cable can be pushed through but would have been nice to see them explain if that's what they did. And should use metal sleeves for all contacts with the posts.
how did you drill the post and pull the cable on the 90 degree corner?
He just drilled them at a 45 degree angle from one hole to the other…
What cable system was used for this project?
Would of liked an answer to Your question. Did You find out?
@@ericwilkens it might be VistaView CableTec.
Could be Feeny.
I can't find the one way clamp (on min 5:30) anywhere. I would love to know the materials you are using! It's so hard to figure out these materials when they different so much based on the seller and I can't find "one way clamp" anywhere. Thank you!
What cable system is this?
Anyone know what brand railing system they used?
Such of a beautiful work, where can I buy that type of cable?
Amazon