I knew this was going to be a very good vid when he said, "When the glue had CURED" rather than "dried." Having a method of using machine tools, rather than the tedious hand cutting, is great when you are under time pressure.
Thank you Jay. I have cut these by hand before and it is definitely time consuming. Glad to know I am not the only one annoyed by the term "dry" when it comes to glue. Steve
Clever guy👍 How did those Chinese artisans do it all by hand with perfect accuracy “ 🤔 Back in the early 1700’s ! with no glue and no floating tenons . It Would have very time consuming 😵💫
Yes Mark. They were and still are artisans. Yeung Chan taught me this technique (except for the router part) and he made some exquisite joinery all cut by hand and with no glue. He made a curved chair with oval stock and it was perfect. Steve
Excellent video tutorial. Been looking for exactly this. Thanks for posting. A couple of tool questions. What make is your router positioner? Looks like the Incra functionality but different styling. Also you use a very thin chisel with what looks like a rectangular-ish Birdseye maple handle. Who makes that? Many thanks
Thank you Mark. The chisel is made by me - the steel is a Hock A2 blank that was hand ground as a small mortise chisel. The router fence is a Join-tec which is no longer in business. I purchased it used and would have preferred the Incra but that one was not for sale. The lift is branded Join-tec but was made by Jessem which was the original Mast-R-Lift. Steve
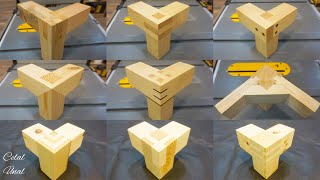
Great video. I didn’t quite understand how to size the height of the stub tennon. When you show the result of cutting the half lap at 2:50, the miter cut looks like it is inset from the end, which I think would mean that the stub tennon would protrude out farther than the miter ends. But if that’s the case it’s not clear how to match the stub tennon height to the depth of notches on the mating pieces? On the other hand some other parts of the video make it seem like the stub tennon doesn’t protrude past the miter ends. Maybe you can clarify for me?
Hi Justin. The stub tenon height is cut at the point where the two adjacent miters meet. It does not go all the way through and is there to aid in registration of the 3 way miter. Steve
Hi there, I was wondering if you would possibly give me feedback on a 3d printed jig that i made for a similar 3 axis job. I would be willing to send it to you for free to receive feedback. I am new to wood working but fairly decent with 3d printing
For the first time, since I started watching your incredible video's, I am confused about your cutting on the router table on the "other" side of the wood. Which has always been difficult to get around when using a router. In other words as many know, it can be dangerous trying to feed the stock from the outfield fence coming towards you. Try as I might, I still can't figure out what you are doing to make that "other" cut. I suppose that most of my confusion is my being 89 yrs old. But I just don't get it. It seems impossible to do it. Yet, somehow you did it. And that is where I go up against a "formidable" wall. Help..........kind Sir.
Hi Pat. I wasn't cutting the way you describe. I was using the outfeed side to set up the position of the fence to get the mortises to line up on the opposing face. The video never shows me doing a climb cut. Hope this helps. Steve
@@extremewoodworkerYes you are correct and I understand that. What I don't understand is; "how" you were able to make that cut without "climb" cutting. That is where I am confused.
@@MrPatdeeee The fence was in two different positions for half of the floating tenon mortises and opposite sides of the stub tenon mortise. This is the only way to avoid a climb cut unless you drop the piece down onto a spinning bit and have a normal feed.


Nice video. Thank you. And, thanks for using the word "cured" for the adhesive rather than "dried."
Great video. You are a great concise teacher.
Thank you Elliott, I try.
I knew this was going to be a very good vid when he said, "When the glue had CURED" rather than "dried." Having a method of using machine tools, rather than the tedious hand cutting, is great when you are under time pressure.
Thank you Jay. I have cut these by hand before and it is definitely time consuming. Glad to know I am not the only one annoyed by the term "dry" when it comes to glue. Steve
Woww!!! Quel travail de minutie 👍
Thank you Stephane.
Beautiful.
Thank you!
Clever guy👍
How did those Chinese artisans do it all by hand with perfect accuracy “ 🤔
Back in the early 1700’s ! with no glue and no floating tenons .
It Would have very time consuming 😵💫
Yes Mark. They were and still are artisans. Yeung Chan taught me this technique (except for the router part) and he made some exquisite joinery all cut by hand and with no glue. He made a curved chair with oval stock and it was perfect. Steve
Excellent video tutorial. Been looking for exactly this. Thanks for posting. A couple of tool questions. What make is your router positioner? Looks like the Incra functionality but different styling. Also you use a very thin chisel with what looks like a rectangular-ish Birdseye maple handle. Who makes that? Many thanks
Thank you Mark. The chisel is made by me - the steel is a Hock A2 blank that was hand ground as a small mortise chisel. The router fence is a Join-tec which is no longer in business. I purchased it used and would have preferred the Incra but that one was not for sale. The lift is branded Join-tec but was made by Jessem which was the original Mast-R-Lift. Steve
@@extremewoodworker Much appreciated Steve
Great video. I didn’t quite understand how to size the height of the stub tennon. When you show the result of cutting the half lap at 2:50, the miter cut looks like it is inset from the end, which I think would mean that the stub tennon would protrude out farther than the miter ends. But if that’s the case it’s not clear how to match the stub tennon height to the depth of notches on the mating pieces? On the other hand some other parts of the video make it seem like the stub tennon doesn’t protrude past the miter ends. Maybe you can clarify for me?
Hi Justin. The stub tenon height is cut at the point where the two adjacent miters meet. It does not go all the way through and is there to aid in registration of the 3 way miter. Steve
So you cut the half lap miters and then do a separate cross cut to cut the stub tennon to the right length?
@@justinleonard8515 Yes
Hi there, I was wondering if you would possibly give me feedback on a 3d printed jig that i made for a similar 3 axis job. I would be willing to send it to you for free to receive feedback. I am new to wood working but fairly decent with 3d printing
For the first time, since I started watching your incredible video's, I am confused about your cutting on the router table on the "other" side of the wood. Which has always been difficult to get around when using a router.
In other words as many know, it can be dangerous trying to feed the stock from the outfield fence coming towards you. Try as I might, I still can't figure out what you are doing to make that "other" cut. I suppose that most of my confusion is my being 89 yrs old. But I just don't get it.
It seems impossible to do it. Yet, somehow you did it. And that is where I go up against a "formidable" wall. Help..........kind Sir.
Hi Pat. I wasn't cutting the way you describe. I was using the outfeed side to set up the position of the fence to get the mortises to line up on the opposing face. The video never shows me doing a climb cut. Hope this helps. Steve
@@extremewoodworkerYes you are correct and I understand that. What I don't understand is; "how" you were able to make that cut without "climb" cutting. That is where I am confused.
@@MrPatdeeee The fence was in two different positions for half of the floating tenon mortises and opposite sides of the stub tenon mortise. This is the only way to avoid a climb cut unless you drop the piece down onto a spinning bit and have a normal feed.