Flip Top Tool Stand || Dewalt Planer / Ridgid Sander

Vložit
- čas přidán 4. 06. 2024
- In this DIY video, I’ll show you how to build a flip top tool stand. I’m using this flip top cart for my Dewalt planer and Ridgid sander, but you can use it for a multitude of tools. This mobile tool stand is a real space saver for the shop!
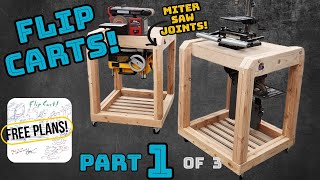
Get the CUTTING DIAGRAM
www.diymontreal.com/product/f...
SUBSCRIBE
czcams.com/users/diymontreal...
WRITTEN ARTICLE
www.diymontreal.com/flip-top-...
Original plans from FixThisBuildThat (specs may vary) gumroad.com/l/fliptop
TOOLS USED (affiliate links):
· Dewalt planer amzn.to/2QgtlFm
· Ridgid Sander amzn.to/2qqWO42
Hardware used:
· 5/16 x 3-1/2" eyebolts amzn.to/2CKd1c0
· 5/16 fender washers amzn.to/2EOYLRR
· 5/16 star knobs amzn.to/2CIHQOk
· 3/8 x 1-1/2" hex bolts amzn.to/2yEQ7A2
· 3/8 washers amzn.to/2EM2wYk
· 3/8 nuts amzn.to/2EPs86G
· 3/4 O.D. steel pipe amzn.to/2VdPjg4
· 3" locking casters amzn.to/2ERyTF1
· #14 x 3/4" wood screws amzn.to/2Sn3DQV
· #8 x 3-1/2" wood screws amzn.to/2yBMriz
· 1-1/4" pocket hole screws amzn.to/2EIYBLQ
· 1-1/4" wood screws amzn.to/2yCLoim
ALL MY TOOLS & GEAR
www.diymontreal.com/my-tools-...
SOCIAL MEDIA
Instagram / diymontreal
Pinterest www.pinterest.ca/diymontreal/
Facebook / diymtl
Twitter / diymontreal
MUSIC
Bounce House by Silent Partner
Toe Jam by Diamond Ortiz
Smokin Sticks by Text Me Records / GrandBankss
Invisible by Vibe Tracks - Jak na to + styl
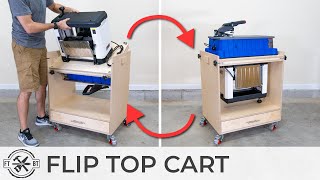


I love the swinging knobs to hold the top in place - as an engineer, I really appreciate how easy it is to use, made with common hardware.
For added stability, instead of iron pipe, I used 5/16" solid rod and skateboard bearings, which accept the rod perfectly. I embedded them in a 3/4" hole in each side and also threaded each end of the rod with a die. Then 5/16" nuts can then be tightened on both sides and provide additional support to the top of the stand.
Excellent video. You showed what you were building up front. Then did a quick how too of the important details. Most of all you gave me something to think about on what I want to make.
You included some fantastic design elements in your build.
Thank you for sharing.
Great video. We use the garage for our vehicles, and my shed isn't large enough to work in with the tools I have accumulated. I used to have my planer on a stand by itself. I built two flip tops. The first is planer and sliding miter saw combination. The second is a router table and 6 inch grinder (I will probably add another small tool opposite of the grinder). These flip top stands have saved space in my shed, and they also make it easier moving tools in and out of the shed. I found it easier to loosely secure the platform to the sides with the locking mechanism when placing the pipe through the platform. This way you don't have to hold the platform, and you can maneuver the platform as necessary to push the pipe all the way through. Looking forward to more of your videos.
Really cool! Love all your videos. They're detailed, "simple" but straight forward. And I mean simple as in a simplicity style of editing not as in easy to do. Thanks for sharing.
Hey thanks a lot, I appreciate it. That's exactly what I aim to do, so glad to hear I'm hitting the mark. Thanks!
Awesome job, love your timing. I just picked up my planner last week, and needed the perfect stand to make! Thank you
Sweet! Awesome Donna, enjoy the build and don't hesitate to reach out if you have any questions.
Love this I'm buying same planer and sander this is going to work great in my garage...well done not to difficult strong sturdy and looks great...very versatile
Wow this is super smart i need this for my basement shop!! Love how you secure it once it's flipped! Simply genius! :)
Agreed, the locking mechanism is awesome and totally secure. Thanks!
I echo what others have said. Detailed and straightforward videos are the best, especially for people that are new to this.
Thanks, much appreciated!
Great job Marie! Everyone's gotta maximize our precious shop space.
Exactly! I've run out of it (especially since I added the router table) so I'm getting a little desperate! This should help :)
Once again, you've created a project that will help my shop become all the more organized. Two thumbs up!!!!
Many thanks!
Great job Marie! Shop Projects are so much fun. That cart is a great way to save space in your work space. That is a great planer BTW. I have the 12 1/2" Dewalt and its so nice. And I completely agree with you on the Walnut. Sometimes I just make something out of it because I like the smell of it..Lol. Keep them coming!
Thanks Robert, can't wait to actually try out this planer. I hear it's a beast!
What a great build. Nice clear video too. Love the leather cord management strap!
Thanks! One of my favourite features too :)
Really nice work, not just the project but also your editing and composition. I've been eyeballing these plans for a while, and your video pushed me over the edge. Thanks. Also, I really liked your fence-straddling mortise jig. So simple, yet effective. Yet another "why didn't I think of that" moment for me. Looking forward to more of your videos.
If it makes you feel any better, I had the same moment the first time I saw someone else use that jig ;)
Thanks for giving me ideas on maximizing shop space.
My pleasure! More to come in the future hopefully, since I've really run out of space...
Great table! Simple yet perfect!
Its a great project - I'm halfway through building one for my small workshop with a belt sander on one side and mitre saw on the other. Saw will definitely get bolted. The only improvement I've seen is the guys putting an extension lead inside the work surface sandwich, plugging in both tools then running the extension lead power cable out through the pivot tube. Very neat ;)
Bonjour, une très très belle réalisation que je ferai certainement prochainement. Comme pour beaucoup de gens, c’est la place qui manque dans nos ateliers et la solution est là. Bravo à vous
Merci beaucoup! C’est définitivement une solution pratique pour optimiser l’espace.
Great build. Much love from California
Great job DM. Nice detailed video.
I see the shop is coming along great too. Keep up the good work
LOL well that depends on your perspective... I keep building stuff and I'm running out of room! Hence the need for this ;) Thanks Mike!
Looks very sturdy and definately useful. Thank you for sharing your awesome project with us, from Henrico County Virginia
Great way to better utilize shop space! Nice easy way to make shop drawers too!
You bet! Sometimes the simplest way is the best, especially for shop projects.
I saw your video of the tour of your workshop, and then this video. What great upgrades!!!!
I enjoyed these two videos, and will go back and catch the others. I want to see you how you got to where you are. Keep up the good work!!
Thanks! Hope you enjoy the other videos as well. Let me know if you have any questions.
Just a quick tip. When mounting the planer, make sure it’s mounted a little to the right to account for the lowering/raising knob that protrudes out or you won’t be able to fully flip it.
Yes… I learned that the hard way, but I just cut the knob in half to fit when flipping.
I’ve just had to cut my handle too. Pity it doesn’t fold down.
This is a great idea. I'll have to build one (or more) of these myself!
You bet, awesome space saver with a bonus of a little extra storage.
Very nicely done. I really like what you did with the eye bolts. Clever.
Thanks! I wish I could take credit for that idea, but it wasn't mine. I agree it's pretty awesome, and it works really well for this.
Awesome Video, Thanks Marie...Your videos are great.! I think I will start on this build to recapture some space on one of my benches.
Thanks, appreciate it! Happy building.
This is great.i might use the flip mechanism to build it into workbench.1x side plain for working on bench and other attached with planer. Theoretically on other side of bench yet another tool could be attached the very same way.thanks
I'm impressed! This idea is great.
Hello from MTL Westisland :)
Thanks fellow Montrealer!
You did a great job!! Video was super easy to follow without all the idle chit chat other videos have. Very refreshing to watch. Look forward to more.
Great job.
Thanks, appreciate it!
Thank you for your video! I know what my next project will be now.
Might have to build one of these. I have the same Rigid Spindle sander in my shop. Also have the Dewalt 734 planer, the one before yours. Combining the, both on one rolling stand would be a nice space saver. I use both machines all the time.
So far I’m really enjoying the space saving and practicality!
Beau projet et belle présentation claire. Félicitations pour le beau travail que vous faites.
Great design, I’m definitely going to use your design for my planer and another piece of equipment…yet to be determined.
Hi new subscriber, this video on the flip tool station is exactly what I plan to do with my now smaller shop. Excellent project I look forward to more videos like this .
Thanks !
Those are dang handy, great video!
Thanks Caleb! Anything to optimize my shop space, one project at a time.
When feeding the bar through it would be easier to put the unit on it's side and feed it from the top downwards.Excellent video though.
Hi Marie, it seems it was only a month ago that you started this channel and you're already at nearly 47K subscribers. Nicely done and the shop has improved immensely. Look forward to more of your creative input.
Thanks Luke! Time flies when you're having fun I guess!
Very nice flipper. I am enjoying all your videos and the way you present them.
Thanks, appreciate it Tom!
Beautiful job! And, a very nicely done video. And thanks for the update information.
Thanks!
I also have limited room in my shop. This is a fantastic idea. I will build one. Tom Dagostino, Spring Grove, PA
Thanks! It's been a great addition to my shop.
Love love you recreated “Fix This Build That” flip top table. I wondered how he built the top and flip mechanism, thank for sharing this ingenious build 🤟🏼
My pleasure, glad it was helpful!
Bonjour je viens de découvrir ta chaîne et je suis tombé sous le charme. Bravo pour toutes tes réalisations. C’est vraiment du très bon et très beau travail 👍🏻👍🏻👍🏻
Merci beaucoup! C'est très apprécié.
What great build. Very helpful tutorial.
Honestly love the leather strap for the power cord haha
I have that same planer...you're right...it is very heavy! Nice job, Marie!
You know it! Thanks Bruce :)
Great build Marie, i have those same plans from Brad but i think you explain it better, but don't tell him that ha ha ha. Your shop and the builds that you are doing, have come along way since those early days and i'm proud to say i have been there with you. The confidence in your builds is there for all to see, so keep up the good work and builds that you are doing.
Barry (ENG)
Hahaha shhhh, it's our little secret!
Thanks for following along in my journey Barry! :)
Barry Roberts ‘
belle job
je peut pas croire qu'il y a du monde qui n'aime pas çà! des jaloux
Haha merci beaucoup!
It amazes me that this thing can hold that kind of weight. It doesn’t scare you at all, you’re planer just floating upside down?!
Nice flip top tool stand. well built
Thanks! Much appreciated
I built the same one. Great plans.
Cool! Great plans indeed.
What a great space saving idea!
It’s so useful when space is limited! (Or when you start to accumulate too many tools like me ;)
@@DIYMontreal There's no such thing as "too many tools". :-)
Lovely work. Thank you
New sub. Great video! Based on other comments, I can't wait to watch your other videos!
Nicely done!
Great idea thanks for sharing!
Great video Marie. Thanks for the flip top idea. And by the way hello from Laval. ;-)
Nice job. Thanks
Awesome build!!
Thanks!
Great video. The only issue I have is that you used screws to mount the tools... You even commented on how heavy the thickness planer is. I definitely would recommend lag bolts. Otherwise, an innovative design and clean build.
Nicely done! I echo what Janie Gonzalez said. Detailed and straightforward videos are the best ones.
Thanks, appreciate hearing that!
It's amazing idea!! Greetings from Laval!
Thanks neighbor!
Nicely Done.
Really nice. Thanks for sharing.
Thank you
what a great idea love the video awesome job
Thank you
Exactly what i need 😀 thank you
Great! Merci :)
I recently found this video and am in the process of building one. Excellent job making the video, clear and concise! Please tell me, what model Rigid screwdriver are you using? Seems really handy in tight places. Looking forward to seeing more of your work!
So, you want to do a video about your new table saw and other tools you recently got?
Nice build!
Thanks Jay!
OOOuuuuAAAAA alors la je Kiiiffff ingénieux franchement merci pour les idées que tu apporte . merci pour la vidéo
Lol merci beaucoup!
Super intéressant ! Je veux justement en construire une pour mon atelier. Je ne sais pas encore par contre si j'aurai deux machines, ou une seule et de garder l'autre côté comme surface de travail.
Pour faciliter la phase d'assemblage de la table avec le meuble et ton tuyau en métal, tu pourrais prendre de petites serres pour tenir un morceau de bois pour servir de support temporaire à la table exactement à la bonne hauteur du trou.
Ha oui c'est une bonne idée ça! Mais pas aussi amusant que ma méthode ;)
Another great video thank you
Thanks Nolan!
hola la felicito quedo increíble muy buen proyecto. saludos desde chile.
Merci! Thank you! Gracias! :)
Ce que vous faites est intéressant et joli ! 👍 Je m'abonne !!!
Pretty cool ! 🍁
Thanks, your mean "flipping" awesome I think ;)
Très belle réalisation bravo....great job bravo
Merci beaucoup!
Before installing the second piece of plywood on the top you can rub a old candle into the pipe groove. This will help the pipe pass through the slot on final assembly. Please sweep up any excess wax off the floor ASAP as it will make the floor slippery (Don't ask how I know this LOL) I really need to build this for my small shop, Thank you for sharing.
Great tip, thanks!
And hope no one was hurt in a waxy floor accident!
Tres belle job
Love this! Thanks 👏🌹🇦🇺✌️
What a great idea! I have this sander and am planning to get the Dewalt planer. Do you recommend the optional extension tables for the planer and will they fit with the flip top stand? Thanks!
Congrats is very nice !
Great vid!! Thanks!
Sure thing! Thanks :)
Love the video you the best
As I said, great build. I can see you are just using pine, but it looks so good. I never see such nice plywood in Lowes or HD, but maybe I'm not looking in the right places. I'd appreciate hearing from you about buying wood for projects. I'm rebuilding a 1992 Airstream and besides hoping that being handy is gonna get me through I need to brush up on refining my carpentry skills. Hahaha
I got this at HD, it's sanded aspen. A bit pricier than construction grade plywood. It's ok, but when I want a really nice plywood I go for Baltic birch (they don't sell full sheets at my HD ) or maple plywood. Both are super smooth and flat. But it'll cost you. About $80 CAN for a full 3/4 sheet.
@@DIYMontreal Thank you. Yes, plywood has really seemed to have gone up in price while going down in quality. I'll take a more thorough look next time I'm at Lowe's or HD. I live in an area that has a couple of sources for nice wood. So, Lowe's and HD are not my only choice. I'd like to do a few projects, like shop cabinet builds, as practice for the cabinetry work in my Airstream. For the shop builds I'm not wanting to spend a fortune.
Nice work Friend! Thanks for sharing the video with us.👍😎JP
Thanks! Happy to share :)
Your very welcome Friend! 😎
Looks like Princess Auto caster wheels 🇨🇦
I need to make one of these
Totally worth it!
Thank you going to start on one this weekend. What size is your Bosch miter saw. I need one
If you had placed the worktop on the floor with some spacers to raise it to correct position and lowered the cabinet into place , then inserted the tube , it may have been easier !
Great build !
I'm sure it would have! 😉 Thanks!
I like the Idea how you lock the platform but I would highly recommend to use bolts to lock your Planer and Sander down I wouldn't trust the screw over time
Indeed! I've added lag bolts just to be safe.
Cool! Thank you!
Nice! A streamer from my home town! Plus one subs!
Well i have been toying with the idea of doing this for my table saw and jointer thicknesser i just feel it may be to heavy but would free up some space great build though
If you’re able to use bolts it would ease your concerns about the weight perhaps. And make sure to centre the weight of both tools from front to back.
Great vid, very clear and concise. Question for you. (around the 4:18 mark) Seemed like there was a lot of cutting and lining up for the bolts/screws. In hind-sight do you think it would be easier and more flexible to just use some more 3/4" ply? That way if you ever change out the tools you don't have to worry that the new holes might not be as supported.
Yes that would work well to just fill the inner void with more 3/4 ply. It would take the guess work out of positioning the blocks and allow for future tool swapping. I was just trying to keep it to a single sheet of 3/4 ply but that's a great idea.
VIDEO UPDATES: 1. I recommend using 3-1/2" lag screws instead of regular screws for mounting the tools. I will go back and add some into the larger holes in the tools' bases. 2. When making the drawer, it's best practice to put the pocket screws on the outside of the drawer so the screws have enough material to bite into, making a stronger drawer.
Tpo be honest, I had misgivings about using screws instead of bolts to mount the tools.
I was thinking the same thing. It looks like the only weak point in the whole project. I am definitely making this. Thanks for the video.
Do you have the bolts go through the table, and attach the nuts on the other side?
@@adamvanlangenberg2690 I plan to use lag bolts and t-nuts on the opposite side.
@@David-ql1hd Wouldn't that interfere with the tool on the other side?
Hi Marie,
Love this video! I wrote to your email for a cut list for the wood but maybe it went to your junk email folder instead.
Marie: I have both of those tools and like most, limited space, this mobile flip top tool stand will fit the bill perfectly. One question, actually two....1) how have the screws to hold down these heavy tools held up over time? and 2) did you consider bolts and nuts thru the 3/4" ply before securing them to the top frame? Thanks/Merci
What’s that little black and orange cordless driver you are using ? That looks handy ! Nice job on the build.
good job !
Thanks!