Learn from my STUPID mistakes before you build a Flip Top Tool Cart

Vložit
- čas přidán 23. 07. 2024
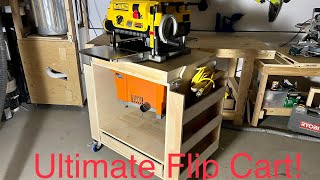
- I encountered multiple mistakes while building this flip top tool cart with built-in power for my father-in-law as a retirement gift. After overcoming each mistake, I was really happy with the end product, and I think he was too!
SUMMARY:
- The frame of the tool cart was constructed out of 2x4's with butt-joint and pocket hole construction.
- The flip top was constructed using 3/4" plywood for the sides and 1/2" plywood for the mounting surfaces and would rotate around a piece of pipe.
- The power for the flip top would enter the flip top through the pipe and then be split into two circuits inside the flip top box. Each circuit would consist of a switch and an outlet to allow the tools that are mounted to the flip top surfaces to be conveniently plugged in and switched on/off from a switch on the front sides of the box.
- A heavy duty 20 ft power cable is used so that it can reach any outlet even at quite a distance away as well as allowing the user to only plug in the cart rather than each tool installed on it.
- Barrel bolt latches are used to lock the flip top in place and make it easy to unlatch and flip over.
- The sides of the frame have peg board installed to hide the frame and the ends of the pipe and allow pegs and hooks to be installed to hang tools.
- The bottom of the tool cart has a large drawer installed to allow larger items or accessories to the tools on the cart to be stowed away.
- Locking casters are installed to allow the cart to easily be moved around and locked in place to prevent it from rolling while in use.
COST:
• 2x4's (8ft long) - x4 - $14
• 1/2 sheet of 3/4" plywood - $32
• 1/2 sheet of 1/2" plywood - $21
• Pegboard - $25
• Barrel bolt latches (x4) - $6 each - low.es/3ub9rVC
• 4 locking casters - $14 - amzn.to/49dBRx7
• Drawer handle - $9 - low.es/3OgGCxy
• Metal pipe (conduit) - $9 - low.es/3UdvW6M
• Power cable - $24 - low.es/3OfGmPu
• Romex 12/2 - $25 - (less than 10ft needed) amzn.to/3UffxPm (NOTE: Stores like Lowes and Home Depot have incredibly high prices on Romex. I've been buying Romex on Amazon for a few years now because it's like half the price of the big box stores.)
• Duplex outlet (x2) - $4 each - low.es/3Oecx1B (NOTE: if you only need 15A outlets, they're less than a $1 each)
• Single pole switches (x2) - $4 each - low.es/49b5Fu0 (NOTE: if you only need 15A switches, they're less than a $1 each)
• Outlet covers (x2) - $4 each - low.es/3vRdNl5
• Switch covers (x2) - $6 each - low.es/3HvYml0
• Plug end - $6 - low.es/3Uhw99c (NOTE: I installed 20A outlets, switches, and 20A rated wire so the cart is ready for 20A if desired. However, I installed a 15A plug end because that's more common in most homes. IF desired to make the cart 20A capable, all that has to be done is take off the 15A plug end and install a 20A plug end.)
• Consumables (glue, screws, etc.) - $5
TOTAL COST: $244 (I used a lot of scrap wood, plywood, and Romex that I already had which considerably cut down the cost.)
VIDEO CHAPTERS:
00:00 Background
0:40 Making the Flip Cart Frame
0:58 How to Determine Dimensions of Flip Top
2:43 Building the Flip Top Box
3:37 Mistake 1
4:29 Mistake 2
5:22 Installing the Flip Top
6:22 Wiring the Flip Top Cart
9:18 Closing up the Flip Top
9:34 Mistake 3
10:05 Making Electrical Components Dust Proof
10:25 Installing the Flip Top Latches
11:19 Installing a Drawer Box
11:35 Mistake 4...
11:54 Finishing Touches
12:04 The Great Reveal! - Jak na to + styl


Not mistakes, just opportunities to learn and design a better way.
Tienes un nueva subscriptor, me gusta la forma que haces tus videos , dejas ver los errores para que el espectador los evite .
Gracias
¡Gracias! Creo que aprendo de los errores, así que quería mostrarlo en mis videos. ¡Me alegro de que te guste!
Great project and video! Thank you for sharing your work. I'm looking forward to watching more!
Thank you very much for the watch and feedback! Looking forward to making more!
Nice work Chris! Looks like a handy work surface- I especially liked the clever routing for the power cord. Keep it up!
Thanks a lot, Brent! I really like how the electrical set up of this one turned out overall. From the cable routing to the location of the switches. Thanks for the watch!
Thoughtful, creative and totally Useful. Nicely done tutorial with a good pace and information.
Thank you very much! That's a really thoughtful and meaningful comment. I'm glad you enjoyed it.
Good job buddy - dads face said it all "He loved it" 😃 Happy retirement dad from the UK x
😁 Thank you!
You got me to subscribe with the breakdown of the math of how you chose your dimensions.
You're my people! 👊 I appreciate you sharing that! I know I find that sort of information valuable when I watch builds.
Good job. I really like the peg board sides.
Thank you! Trying to maximize the useful all the real estate.
Thank you for this. I inherited a great deal of tools, mostly small sanders best I can tell. If I ever wanna really get into it I'll make a miter station w/ a wall of flip up sanders.
That would actually be awesome if you had enough you could have progressive grits set up. No need to swap out paper, just go to the next machine! 😂
Huh! I didn't see any "mistakes". I did see a number of design changes, however:)
Just wondering . . . To attach a tool to the top, do you just screw into the 1/2 inch ply? You can’t bolt the tool on because you don’t have access to the inside? Is the attachment going to be strong enough to hand the tool on the bottom side?
That's a good question that I should have done better to explain. But yes, you would just screw to the top of the flip top box. A rule of thumb is the pull out strength of a #10 screw in 1/2 plywood is about 50lbs. With 4 screws on any piece of equipment, you're talking close to 200lbs. So it's more than sufficient.
Thanks. That’s good to know (the pull out strength of the screws).
nice work, but what happens when attaching the tool to the unit you drill and screw through the wiring? @@MadeByChance
That's a good question. We made sure screws were sized appropriately for each tool. So measure the height of the holes from the surface and add the thickness of the plywood, and that's the screw length that should be used. In hind sight, I realized that anchoring the wire inside the box is probably not necessary, and would add some flexibility to allow the Romex to "move" with a screw through the wood. Obviously, you don't want to use 3" screws or anything like that. But I think as long as you used reasonable length screws and the wiring wasn't anchored down, there wouldn't be any issue.
You forgot a wire clamp for the Romex going into the 4" Sq Box, you used one for SO cable, also your wire straps need to be closer to the boxes for the Romex.
I appreciate the comment. There's always code aspects and "best practices" that apply and people should be aware of, but I can guarantee with 110% confidence these wires aren't coming loose. I tested how well the SO wire twists when the flip top rotates, even if it always rotated in the same direction. With how it rubs on the edges of the entrance to the pipe/tabletop, it's not going to ware through before the wood wears our. I didn't show it on camera, but the pipe was siliconed with the wire in it, so it's only rubbing on the pegboard material which is basically MDF, so I'm not worried. Additionally, it's easily visible if it ever wears through now since it would only be on the outside. Additionally, the boxes and the table top the wires are attached to all move together. I'm even less worried that there's going to be tension created between the romex and the switch or outlet boxes because they have the same movement. It would be different if the wire was not rotating with the boxes. It may not be to "code" with the distance the romex is held down from the inlet to the boxes, but the national electrical code wasn't made with a flip top tool cart in mind - the intent of the code is met, and anchorage of the wiring is all adequate for the application. Nothing's going to burn anyone's house down.
Oh the maths 😅 lost me as i failed this subject
I understand. Definitely not for everyone. I try and simplify it in my videos when I can, but sometimes it just doesn't matter how you try and simplify it, some people just don't work well with numbers. 😆