Color Gels Photography: How to Create Gradient Backgrounds | Inside Beauty Photography with Lindsay

Vložit
- čas přidán 27. 07. 2024
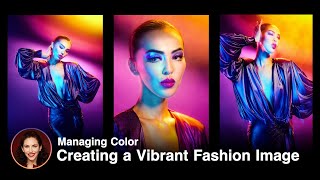
- What’s my NEWEST fashion photography obsession? Colored gels photography and creating beautiful gradient backgrounds. This lighting technique has become a popular trend in fashion photography - seen everywhere from celebrity photoshoots to beauty campaigns. But the high-end look is easier to recreate than you may think.
In this video, I will teach you how to achieve the color gradient background effect using three strobes and two colored gels.
How to build a gradient background step-by-step:
Step 1: Setting up the First Strobe & Orange Colored Gel
I place the first strobe with a saturated orange-colored gel upwards and close to the white/gray backdrop. This creates a gradient effect with the color changing from yellow-orange near the light source to a deeper orange further away.
Step 2: Adding the Second Strobe & Magenta Colored Gel
Next, I position the second strobe directly behind my subject on a floor stand and attach a magenta gel to it. This creates a saturated color close to the strobe that gradually fades and blends into the orange, creating the gradient effect.
Step 3: Introducing the Main Light
Then, I introduce the main light that will illuminate my subject - making sure it does not spill onto the background to keep the colors vibrant. I use this light to cast a narrow beam on my subject's face, which is why a light with a grid or one that offers restricted light, like the Westcott Optical Spot is my go-to.
Now that we've set up our lights, it's time to get the shot. In this video, I am shooting with a Canon R5 and a Canon RF 24-105 lens, which provides flexibility and sharpness.
The trend of colored gel photography in fashion is absolutely captivating - it is vibrant, and daring, and makes any backdrop look interesting. Although I achieved this effect with strobe lights, you can definitely do it with continuous lights too.
The possibilities of colored gels are endless. Don't forget you can experiment with different colors and color combinations to create your own unique look.
Interested in taking a deeper dive into colored gels? Check out my class The Magic of Gels: learn.lindsayadlerphotography...
0:00 Intro
1:23 Building The Background: Orange Gel (Light #1)
2:32 Building The Background: Magenta Gel (Light #2)
3:13 Main Light Positioning (Light #3)
4:30 Shooting the Subject
5:06 Restricted Light Effect
6:16 Final Thoughts
SUBSCRIBE AND BE PART OF THE ADORAMA FAMILY:
➥ / adoramatv
__________________________________
Be the first to shop our great deals and sales by signing up for emails from Adorama!
www.adorama.com/MyAccount/Login
__________________________________
✘ PRODUCTS USED:
Strobes - Profoto D2s
adorama.rfvk.net/BXPXqL
Profoto XL Umbrella (white)
adorama.rfvk.net/mVQaD
Rosco Creative Effects Kits
adorama.rfvk.net/oZDno
Westcott Optical Spot by Lindsay Adler
adorama.rfvk.net/P0r7rY
Camera: Canon R5
adorama.rfvk.net/JxzdE
Lens: Canon RF 24-105mm
adorama.rfvk.net/q74XY
Nanlite Pavo Tubes
adorama.rfvk.net/JrVx9q
#beautyportraits #beautyphotography #adorama
__________________________________
❐ LET'S GET SOCIAL ❏
➥ Facebook / adorama
➥ Instagram / adorama
➥ Twitter / adorama
❐ MORE ADORAMA ❏
➥ Shop www.adorama.com/
➥ Blog www.adorama.com/alc/
➥ Live Events www.adorama.com/g/42-live
__________________________________
Video: Samuel Bouret @samuelbouret
Hair: Linh Nguyen @linhhair
Makeup: Collin Rishell @collin_rishell
Styling: Raytell Bridges @raytell_bridges
Model: Andrea @andrea.carrazco
__________________________________
THANKS SO MUCH FOR WATCHING!


Gorgeous final output! Thanks for the valuable insights! ❤
Sincerely, appreciate you doing what you do: it's a great deal of work and we see it! And I appreciate it.
And thank you for your gift of teaching.
The model chosed for this concept is perfect..!! Thanks for keep us inspired and updated with the newest trends on fashion photography. ❤
Lindsay's always on fire with her tutorials. Please keep it up! :)
I love the experimentation of the whole process.
love the first look (w the first light)
Ugh Lindsey never misses!
Oh wow truly beautiful Lindsay Adler! Thanks for mentioning how important is to take into consideration the main light source as it can wash off the colors in the background. Thank you and your Team for all the great content you make in this channel for us all to learn and enjoy!
Really cool. Looks like fun! Thanks
Clarity, conciseness and informative. Lindsay knocks another one out the park.
Great video - thanks Ms A.
I must definitely give it a try!
Sweet!! Thank you for the tips. I will check Adorama during fall for sure.
Thank you for another awesome video, Lindsay! Your work is always inspiring. I'm going to take your analogous color-schemed gradient as the starting point and experiment with using it as the basis of a split complementary scheme by gelling the key teal. I don't yet have your optical spot but I'm eager to see what can be managed with grids and barn doors to start.
I'll save up for the optical spot but I'm going to definitely be buying the Magic of Gells first. You're an amazing teacher!
Great video. Excellent explanation and breakdown of equipment. Thank you.
you are my favvvvvvv
This is what I am going to do tomorrow for my fashion photoshoot, I just asked my Dad if I could borrow his gels. So glad I'll be on trend because although I love gel photography all the time, I did wonder if it was in style right now for fashion photography, glad to see it is.
Yesssss
Great tutorial. Thank You!
I gotta try this. soo cool
Watching now
Love it
Background color??
❤
Love this Lindsay. Is that a gray seamless background?
Yes it is! :D
Is the backdrop fashion grey or thunder grey?
awesome as always. Thanks so much Lindsay and team for sharing such informative, creative videos for us. I struggle to get my gels to be that saturated....I will play with keeping the main off the background and washing out the gels. But even without a main on yet my gels are not that saturated. Any tips?
A couple of things. First, make sure you are using saturated colors of gels (Roscoe creative color kit is a good choice). Next, watch your power. Too bright or too dim wont show the best saturation. Also, try hard light sometimes for poppier results.
😊
Beautiful effects in an informative presentation. Quick question please: does the optical spot overheat when using the D2 modelling light at the upper end of the power range?
It does not!
@@lindsayadlerphoto Thank you. I appreciate your quick reply.
So you are mixing strobes and constant lights? And you mentioned tube lights. I would like to see that with more details on exposure settings....thanks
Incredible video, as always, Lindsay. You mentioned the usefulness of the RF 24-105 f/4 L IS lens as you don’t need a narrow depth of field for studio work.
Do you shoot wide open at f/4 or do you stop down to ensure you’re shooting as sharp as possible/ have DOF latitude?
I usually shoot at F4 if I need more light, but F11 if I want sharpness!
How are you keeping the light from spilling into the background? Is it so soft that it just fades? I know you're using a projector but it can still be kind of bright.
Its a small light source from the side, so it only hits the subject. If any light hits the background it is on the right out of my composition.
Hi pls tell me which one is better for photography Rosco Photo Lighting Filter Kit or Rosco Color Effects Filter Kit and why , im already using Rosco Color Effects Filter Kit and i like to buy Rosco Photo Lighting Filter Kit
Question is how to put orange gel in to umbrella near by lamp witch it still on model mode - I mean how to not make a burn that :p
🙂
Do you use a light meter??? Which one??
Can this be done with a snoot as a modifier to light the model, any thoughts ?
Did you start with a pure white gel?
Great results!
need some help I'm a portrait photographer in Haiti and owning a Canon rp with 50mm rf 1.8 +viltrox 85mm rf 1.8 I've been considering the 24-105mm rf f4 to my kit. don't have budget for the primes. will it fit my photography type?
Depends on what you shoot!
@@lindsayadlerphoto as I've mentioned : portrait mostly full-body
@@Roddriley 24-105 is great or 24-70 on location
I've been shooting with an R5 since the day it was released, there is no way she took that picture with that lens! That looks like a medium format image! I'm gonna give this a try to see if I can pull it off.
I don't use a medium format camera or lens, it's all R5 baby!
what color was the backdrop?
Its all lovely but what r The f stop for all
I usually shoot at F11, but with optical spots and gel I often shoot more like F5.6
what color is the main photo background?
fashion gray
That answers my question too! Thanks!!