Antique Rusty Cleaver Restoration [Satisfying restoration]

Vložit
- čas přidán 19. 05. 2024
- Restoration of an old rusty antique cleaver.
Please subscribe if you love satisfying restorations!
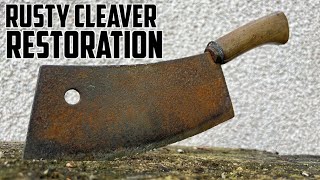
I got this meat cleaver for under $20 at a local antique shop. I did not know how special this piece was until I began to restore it. It turns out this rusty cleaver was made in Greenfield Massachusetts somewhere between 1890 and 1950. The steel was incredibly hard, I was impressed with the quality.
I began to restore the tool by removing the old wood handle and pins. The handle was brittle and easy to remove, but the pins were quite seized. I cut them flush using a Dremel cut-off wheel, then beat them out with a Starrett punch. Once the cleaver's handle was removed, I needed to clean the blade and remove the rust.
I started with a simple wash with dish soap and a gentle brass brush, then soaked it in evaporust rust removing solution. After a few days, most of the rust had dissolved, and and the antique cleaver was ready to be restored.
From there, a decided to smooth out all of the sharp edges, and mirror polish the entire perimeter. This requires a ton of sanding and alot of elbow grease. This was the hardest steel I have ever attempted to polish. After several hours of work prepping the blade, it was time to move on to restoring the handle.
I chose maple wood, as it is closed grain and well-suited for knife handles and kitchen items that are exposed to food and bacteria. I cut the handle scales by hand, then used a belt and disk sander to help shape the pieces of wood. I replaced the original steel pins with brass tubing. Instead of peening the pins like the originals, I knew I was going to use epoxy to fasten the handle so tubing was sufficient I then fastened the handle to the blade using two part epoxy. Tung oil was used to finish the handle as it produces a beautiful finish, and is also food safe.
The final step was to sharpen the blade. A 25-30 degree angle is sufficient for sharpening a cleaver blade as it is intended for rough work and not paper-thin cuts. I used a shapton 320 and 1000 grit whetstone.
If you love restorations, please check out the rest of my videos!
00:00 Restoration begins
01:16 cleaning
01:52 rust removal
02:32 grinding and sanding edges
05:22 mirror polishing
07:21 cold bluing
8:31 starting the handle
10:17 making new pins
11:10 drilling
11:32 mixing two part epoxy
12:57 shaping handle
14:00 final sanding by hand
14:20 finishing with tung oil
14:46 sharpening blade with stone


Great work!
Good stuff. I like how you didn't erase the history with a sand blaster.
Just a tip to make the endings of your videos more entertaining. People tend to show the finished product being used, like chopping a watermelon. Just silly stuff to add some entertainment value at the end instead of just ending abruptly.
Very nice
Love evaporust, always works good. Also like to media blast with a medium grit, buff out after with Wenol, once shiny use never dull for final polish. Great vid!
Beautiful Cleaver
Nice restoration and video quality was good.
Amazing and very educational ...thank you for sharing.
Awesome restoration craftsmanship. 👍👍👍👍👍❤️❤️❤️❤️❤️😈
Nice job.👍
Excelente trabalho.👍👍👍🇧🇷
🤙
Next video po yung Forging Octopus Sword from Bearing Ball
WTF? I swear I already watched this couple weeks ago, way before October 24th. Maybe DeJa'Vu?
You did, I had some issues with the video and had to re-edit.
أحسنت واصل 🖕🇩🇿♥️
🔝🔝🔝
Excellent travail idéal pour découper grand mère en petits morceaux
Cool but why a kitchen knife laying in mud and moss 😂
What mud? The moss is soft as a pillow.
You shouldn’t use this cleaver on meat because those hollow rivets will be too difficult to clean properly. Keep it’s use to wood. Regards.
The pitted Blade would also harbor bacteria. It's just a showpiece.