
- 6
- 5 180 296
Satisfying Restorations
United States
Registrace 31. 03. 2020
My name is Matt, and I love to fix and restore things.
As a child i remember destroying many of my parent's and grandparents items by disassembling them to a destroyed, un-repairable state. As I grew older, I got into model building, then radio controlled cars, then full size cars and trucks.
Luckily these days when I take something apart, I (usually) put it back together.
There is nothing more satisfying than the finished product after transforming an old, rusty, dirty, or broken item back to it's original beauty.
On this channel I remove rust, polish, paint, and restore old tools, coins, and anything else that is old and interesting!
I do not claim to be an expert, but I am excited to learn new skills and techniques to bring my restorations to a whole new level.
Join me as a restore, repair, learn and experiment!
Antique Rusty Cleaver Restoration [Satisfying restoration]
Restoration of an old rusty antique cleaver.
Please subscribe if you love satisfying restorations!
I got this meat cleaver for under $20 at a local antique shop. I did not know how special this piece was until I began to restore it. It turns out this rusty cleaver was made in Greenfield Massachusetts somewhere between 1890 and 1950. The steel was incredibly hard, I was impressed with the quality.
I began to restore the tool by removing the old wood handle and pins. The handle was brittle and easy to remove, but the pins were quite seized. I cut them flush using a Dremel cut-off wheel, then beat them out with a Starrett punch. Once the cleaver's handle was removed, I needed to clean the blade and remove the rust.
I started with a simple wash with dish soap and a gentle brass brush, then soaked it in evaporust rust removing solution. After a few days, most of the rust had dissolved, and and the antique cleaver was ready to be restored.
From there, a decided to smooth out all of the sharp edges, and mirror polish the entire perimeter. This requires a ton of sanding and alot of elbow grease. This was the hardest steel I have ever attempted to polish. After several hours of work prepping the blade, it was time to move on to restoring the handle.
I chose maple wood, as it is closed grain and well-suited for knife handles and kitchen items that are exposed to food and bacteria. I cut the handle scales by hand, then used a belt and disk sander to help shape the pieces of wood. I replaced the original steel pins with brass tubing. Instead of peening the pins like the originals, I knew I was going to use epoxy to fasten the handle so tubing was sufficient I then fastened the handle to the blade using two part epoxy. Tung oil was used to finish the handle as it produces a beautiful finish, and is also food safe.
The final step was to sharpen the blade. A 25-30 degree angle is sufficient for sharpening a cleaver blade as it is intended for rough work and not paper-thin cuts. I used a shapton 320 and 1000 grit whetstone.
If you love restorations, please check out the rest of my videos!
00:00 Restoration begins
01:16 cleaning
01:52 rust removal
02:32 grinding and sanding edges
05:22 mirror polishing
07:21 cold bluing
8:31 starting the handle
10:17 making new pins
11:10 drilling
11:32 mixing two part epoxy
12:57 shaping handle
14:00 final sanding by hand
14:20 finishing with tung oil
14:46 sharpening blade with stone
zhlédnutí: 113 531
Video


Restoration Of DESTROYED Ford RC Truck | Repaired and Upgraded
zhlédnutí 1,1MPřed 3 lety
Extremely satisfying restoration video of an old Ford RC Truck. This restoration was quite involved, and took many hours between filming, cleaning, and repairing this old electric toy truck. The RC truck I restore in this video is a vintage 1980's Tamiya Ford f150 ranger step side model. It is an electric, radio controlled model car powered by a 7.2v battery pack delivering power to a 540 size ...
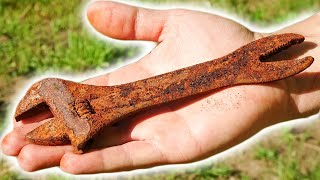
Restoration of INSANELY Rusty wrench 🔧Unbelievable Outcome
zhlédnutí 3MPřed 3 lety
Perfect Restoration of a rusty, old Bahco adjustable wrench. (Made in Sweden) This is the first Bahco tool I have owned, and it made for a challenging restoration. This is a very unique adjustable wrench, as one end is an Alligator wrench. It also has the word "Volvo" on one side, so maybe it was part of a car tool kit many years ago. I started this tool restoration by soaking the wrench in rus...

ASMR Restoration || Huge Adjustable Wrench
zhlédnutí 927KPřed 4 lety
ASMR Restoration of a large, rusty adjustable wrench. Watch this incredible transformation with mirror polishing! Today, I will do a perfect restoration of a high quality 15" Armstrong adjustable wrench. This tool is made in USA. I love to restore high quality old tools that will have a long service life when they are complete. I began by cleaning the wrench first with engine degreaser, then an...

Satisfying Restoration Video - Polishing Old Brass key (Made In USA)
zhlédnutí 4,8KPřed 4 lety
Satisfying Restorations: Episode 1! In this video I am restoring an old brass key, made in the USA! This key isn't quite perfectly restored, but I did the best I could with my available supplies. I tried to do an ASMR restoration style edit, with only natural noise and gentle movements. (besides the speed-ramped sanding and polishing) To restore this brass key was a simple, but time consuming p...
very good job, unbelievable!
It's a good idea to have the tools to do these repairs/restorations a beautiful job if I may say so :)
that is $20.00 bucks of Tito's Use 30% industrial Vinegar. Cost $2.00
Úžasna práce.mic inspirativní.❤❤❤❤
all that work and you reinstalled the garbage electronics? lol wow what a waste
It's a restoration accurate to the original that will never get run. The electronics are irrelevant.
Should have painted the section around letters Black Not a big job
For cryin out loud! I thought my project was tough, i just finished cleaning evey piece part and screw on a nitro rs4 RTR 3 evo, bout ready to re assemble😅 What is this thing??
Sorry but what’s going on at 1:00- 1:10? Am I missing something?
Ford RC Truck? Its Blackfoot!!
Super jest to zrobione i odrestaurowane pozdrawiam serdecznie 🥀👍👍👍👍👍👍👍👍
Well done my friend, from, Bayamo, Cuba
Is the cat for sale? 🐈
This is like the only legit restoration.. I’ve seen cars in this exact same condition, like my RadioShack golden arrow. It was in a garage for 35 years.
I would love to know what the hell he uses as solutions
Fake rust -
Amazing Job! Looks really good!
Are you going to drink the Jack? m f
Annoying video (play at 2 times speed)
Nice work dude 😍😍
Can u work a woman like that?
Great restoration!
Pretty cool shit man.
amazing job. perfect.
Another over-restoration IMO. Oh, well. not my place to judge.
Exactly! Now there's absolutely no character left. The beauty of these old tools is, that after you restore them, they still look their age. I just use wire brushes, wet & dry emery cloth, and sometimes used vinegar.
I paid several thousand dollars for an old "crocodile" wrench just like that one, but it came with a 1966 Volvo Amazon as a bonus. Nice video!
Hi, thank you for sharing that awesome restoration. Greetings Sascha
Should have soaked it in Coke acola it cleans rust well
Tohle není renovace, ale prasárna!
I have Bacho Cresent wrench,very heavy duty European tools
Can't stand it when they don't talk and give you information !!
its unique
Really liked the bedliner idleal 2 protect the handle
I have one of those. Found it as a kid 50y ago buried in snow, all rusty. Cleaned it up, not to this degree, but still have it today.
WD 40 is not a penetrant or an oil or a protectorant. it is pretty much useless unless all you are doing with it is displacing moisture.
Wow it doesn’t even look like the same key!!
3:59 intense servo noises
When you leave a wrench outside for "content" to restore it again.
The original Blackfoot was my first RC. Very cool.
Nicely done. I really liked using spray on bedliner on tools.
Great idea using bed liner for paint!
Very nice
I😂😮
Fantastic video. I have my Italian grandfather's micrometers and other other machinist's precision tools. I vividly remember my first mechanical lessons from him. Memories of a lifetime.
That's about what JD taste like..😀
Absolutely unbelievable……….
I'd love to see you repair an old broken LEGO 5600 set. It's an RC LEGO set and I need to repair mine. Please thank you.
Bushings in the gearbox is a fail.
Loctite melts plastic.
Pretty good restoration overall but some of the parts you used are somewhat incorrect. The tailgate that says Blackfoot is from the rerelease kit. The original Blackfoot that you have would've said ford on the tailgate. Also its missing some stickers on the side of the bed of the truck.
I clearly stated in the video that I purchased parts off a re-release
Beautiful job!
Love the labour of love.