Video není dostupné.
Omlouváme se.
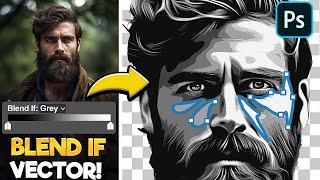
Photoshop: Create the Look of a WOODCUT Print Portrait!

Vložit
- čas přidán 19. 03. 2022
- Photoshop CC 2022 tutorial showing how to recreate the look of an authentic, woodcut print on paper.
Rice paper texture: 1drv.ms/u/s!Ar...
#woodcutprint, #PhotoEffect, #GraphicDesign
www.shuttersto...
Royalty-free stock photos provided by Shutterstock
ID #: 1074937754 by Improvisor
ID #: 165448373 By Eric Isselee
Photo provided by dreamstime.com
High-quality, royalty-free images
ID #: l_56442995
Royalty-Free Music provided by www.beatsuite.com
High quality, copyright-free music for CZcams.
Music track: "The Main Event"
All of my Patrons and Channel Members receive VIP Early Access Passes to watch my new Photoshop tutorials one week before the public can see them! 😊💙
Join my Community of Patrons on Patreon!: www.patreon.co...
Become a Channel Member!: bit.ly/2J3fP8c
To become a Channel Member on IOS & other "unsupported devices": bit.ly/2OoJnwO
Support Blue Lightning TV on Patreon for as little as $2/month!
www.patreon.co...
#photoshop, #BlueLightningTV
Subscribe to Blue Lightning TV!: bit.ly/2WkFbkj
BLTV MERCH @ Redbubble: BLTV.redbubble.com
TeeSpring: teespring.com/...
Society6: society6.com/bltv
CZcams Channel: / bluelightningtv
Website: bluelightningtv...
Facebook: / bluelightningtv
Facebook “Subscriber Page”: bit.ly/2WmWIbw
Instagram: / bluelightningtv
Tumblr: / bluelightningtv
Twitter: / bluelightningtv
Pinterest: / bluelightningtv
LinkedIn: / martygeller


I love your tutorials so much
Thank you so much!
This is an incredible tutorial. The amount of tools and techniques you concisely flow through is highly educational and honestly astonishing.
The most crystal clear tutorial in CZcams.
Can we all appreciate the time & effort that goes into these videos 💚💙
I wonder if Photoshop is paying you for all of the work you do.. (they should).. I mean.. your tutorials are always very neat and professional.. your voice is very super convincing along with all of the steps and they're all accurate!
Aside from all that ... I personally appreciate all of your time and effort and for sharing all of those valuable lessons. Thank you.
So refreshing to have a well paced, clearly presented and useful tutorial that I will definitely be using. Thank you Sir
There are a few spectacular tutorials on youtube that they are really at another level. But if someone put a gun on my head and force me to pick one, I'd pick yours. Simply the best.
That may be the best compliment of my channel that I've read. Thank you! 🙏
You explained it so simply. Thank you sir for these tutorials 🙏🙏
Such a wonderful teaching style!!! Great tutorial
So glad I stumbled onto your channel! So much goodness here! Thank you.
Thank you very much for tutorials every week, Marty!
Excellent tutorial, thank you. Very clearly described and a terrific outcome.
As always , amazing video ! Thx from France !
Your voice is soothing Marty!
Thanks for the share. I always love your videos.
I love wood print, this is fantastic!
You are the best graphic designing teacher ever
Thank you so much 😀
Your tutorials, always amazing
That was great! Thank you Blue Lighting TV!
That was a great one Marty.. Thnx
You are my teacher Thank you so much
Thank you for sharing 😎
Thank you Very much you .very good Photoshop use tool .
Perfect, just what I was looking for. I can't thank you enough!
This is great and I will use this for actuall wood burning, use a a template, it's great also could use for pumpkin carving
great tutorial!
Thank you so much!!
This is a really great tutorial
Thank you !!
Long time no see.
Love you tutorials they are really helpful
greate work
Hi there, This is great. I like your tutorial.
Muito obrigada pelos vídeos tutoriais. Muito instrutivos e interessante.
Fantastic sir 👏
NAice man.
❤️❤️❤️ I love you
well said. Thanks Lot.
❤❤
I almost fell asleep, but thank you.
Dude Aside from the video, Companies would hire you as a VOICE OVER artist and pay you lots of money for doing voice overs on commercials. You would literally be a millionaire in couple of years with that voice!
Thanks! If you have an "in" in the v/o industry, I'll pay you a commission for each job you can get me. 😀👍
Very clear and excellent tutorial. But you should sell this an an action - I'd certainly cough up for it!
Thanks for the suggestion!
mi sveglio ancora ca ca ta ti stimoooooooooo
Thank you so much, I wanted a practical way to convert a photo into a similar effect to cut it in cricut machine. my question now is how can I replace the picture without redoing all the steps.
Thank you tons.
maybe you can put a subtle (black and white) wood texture on the image to give it more real woodcut work look
👍
Thanks for you good pest
Hi Marty
Thanks so much for your super-useful tutorial. You say at the beginning of your tutorial that you can replace original photos with new images without having to redo most of the effects. How is this achieved? Many thanks!
At 3:07, convert your image into a Smart Object. After you complete the woodcut effect, you can replace your image with another by double-clicking the thumbnail of the smart object in the layers panel. This opens the original image. In the Layers panel, place your other image on top of the original image. Then, close the tab at the top (.psb). This will automatically apply all the effects to your new image.
@@BLTV_Photoshop Thanks so much - you're a life-saver. This worked, and so simple when you know how!
This tutorial is amazing, but I could not get the filter to show on my image. I tried several ways and even looked at my photoshop's graphic processor setting. I am working on a PC, but that shouldn't matter. I checked everything you did and followed it.
Which filter?
Hi! This tutorial is great - thanks so much! Quick (I hope) question: you mention in the beginning of the video that you can swap out a photo since it's now a Smart Object. How do you do that?
Double-click the Smart Object to open its source document. If the new document contains another Smart Object in its Layers panel, double it to open ITS source. Keep doing this until the last document you opened has no more Smart Objects. Place your new image on top of the original image in the Layers panel. Hide the original image. Use the Transform Tool to adjust the size of the new image. Close the tab of the updated source(s). Your updated document should have replaced all the effects with the new image.
Hi Marty, I'm one of your subscribers. I love your videos and I find them very helpful. I'm looking to buy a new laptop but I'm not sure what to look for. Do you have any recommendations? I'm only using it for Photoshop. Thank you!
According to Adobe, here are the minimum requirements to run Photoshop: helpx.adobe.com/photoshop/system-requirements.html
@@BLTV_Photoshop Thank you for your reply! That was exactly what I was looking for.
Thank you so much for this great tutorial
czcams.com/video/uz8rOgZbj8E/video.html&t=
@@BLTV_Photoshop Thank you so much, you're the best
Hi Marty
I'm your fan!
Your videos are amazing and I learned a lot from them.
At the beginning of this tutorial you say that it is possible to replace my photos with others without having to redo most of the effects, where can I find the instructions to do this?
At 3:06 in this video, I explain how to make the subject into a Smart Object.
Hey thank you for this tutorial it's very unique and helpful but can you do this on illustrator or will you be so kind to do a video of the same the design on illustrator
Thanks. I haven't worked on Illustrator in over a decade, so I've forgotten most of it. Sorry.
Little thing. At just before 4:10 you say "go to filter ... adjustments ..... threshold." It SHOULD be "IMAGE. adjustments, threshold." I was so friggin' lost for a while. HAHAHA!!!!
Indeed! Sorry about that! 🙄
Thanks for this. There is a mistake in your audio... you say Filter, Adjustments, Threshold but it's actually Image, not Filter.
Yes, you are right. My bad! 🙄
Hi, I've watched this video a dozen times. I've followed every step, but when you get to the adding the threshold part it is greyed out for me. I can add it at the bottom of the layers but of course that makes a separate layer which doesnt have the same effect. Do you have any idea why it would be greyed out for me? CS6
Go to Image > Mode > RGB color, 8 bits/Channel.
The gigachad face drew me in what can I say
i don't have oil paint in my filters! was it added after CS6?
turns out it's a graphics card issue, i think
3:34 when I go to menu Filter/Stylize and the option Oil Paint is disabled! :(
Go to Image > Mode > RGB color, 8 bits/Channel
Can i call it as line art also?
In general terms, yes.