How to Properly Install Architectural Roofing Shingles

Vložit
- čas přidán 25. 08. 2024
- Welcome and in this video I will show you my way of roofing with architectural shingles for the do it yourself people who want to cut cost and save money.
Connect with Me!
Follow Me On Facebook: jimbuild...
Follow on Instagram: / jimbuildstuff
How About Twitter: / iliketobuildst1
Check out Pinterest: / iliketobuildstuff
#Shingles #roofing #DIY
IGNORE KEYWORDS:
shingle,shingles,install,installation,start,waterproofing,first,row,starter,nail,roofing,roof,nails,nailer,edge,cap,shingling,DIY,laminated,designer,leaking,asphalt,3tab,safety,eave,IL2BS,I Like To Build Stuff,ILikeToBuildStuff.org


That's crazy I have been doing roofing for 20 years never knew the direction's were on the package 😂😂😂 that would have definitely helped speed up the learning process
Right?! Hey thanks for watching I sure appreciate it and if you have bonus tips that would be great for the community.
Thanks that was so helpful
Glad it helped Cedric, thanks for watching and taking the time to comment I sure appreciate it!
Straight nailing was pleasing.
Thanks for watching I appreciate it!
Great video love the music 🎶 very informative thank you sir 😊
Thanks for watching I appreciate it!
Different people have their own way of laying out the roof. As long as you dont have leaks or blow offs who is to say your wrong.
Well thanks for the input and watching we all appreciate it!
1/2 inch overhang is not enough.
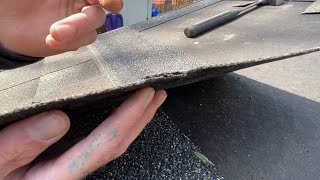
You can mark out the 2nd through 6th course cut off measurements (OC shingles: 6.5", 13", etc.) on a scrap piece of plywood/board (measured from the left factory edge) using a Sharpie marker. Then all you have to do is line up each piece of shingle and mark where you need to cut with a knife. This way you don't have to use a measuring tape each time you make a cut and you will find the measurements/cuts will be more consistent. It will take less time also.
Going to be doing my own roof. Did roofing in my younger days. Only have one small valley. The shingles will be about $1,500. Not paying someone 10k to do it.
Outstanding! please comeback and let us know how it goes. Plus if you want to show your work off, email pictures.
Score shingles on the underside, bend, then snap. Trying to cut all the way through from the top is a fool's game.
I sure appreciate you joining in here and the great comment it means a lot to me that you would take the time to watch my video!
What is the purpose of staggering the shingle, (6.5, 13, 19.5, etc) Is it for the appearance of the roof
Hi Mike, not only appearance but to alternate seams to shed water correctly.
If you don't stagger, all the ends of each layer will meet up. When ends meet up, it leaves a gap where water can penetrate into the roof decking.
The last roof I did was on my first house in 1973 with 3-tab shingles, of course. I came here to find out if laying the first course is the same, i.e., a row of reversed shingles. You let me down, Jim!
I am sorry I let you down, didn't mean to but I did mention it at czcams.com/video/BVWdAiWnhjs/video.html this time in the video Hope it helps.
Hey, Jim! Thanks for the video. Much appreciated. I noticed that the directions on the Owens Corning package says that the first cut made is 6 1/2" instead of 6". Any particular reason that you chose 6" ? Was it to save material perhaps? Thanks again!
That is correct because it seems to workout better
no. cut 8 inches. most arch. shingles are 39 - 40 inches long, 8 inches goes 5 layers perfect.... less waste!!!❤
Thanks, but all the little detail stuff at the beginning that you chose to skip over would have been helpful. Still looking for a video that demonstrates what is on the packaging.
Why not leave the left factory edge intact and just cut on the right? Ends up being the same anyway.
The color on the plywood is because it was the top sheet in a stack, they paint the edges on all four sides a color pertaining to the thickness (blue is usually 1/2"), the entire top sheet caught a lot of overspray.
Thanks for the info! Thanks for watching too, I appreciate it.
At 1:49 you say you use the nail and cap because you didn't know how long it would take to get it roofed. Would you leave the roof exposed to the elements at this point or cover with a tarp?
Hi Colleen, Depending on where you are. I live in a mild climate and not much snow or rain but if the roofing paper is laid down properly it should protect the roof. If I were doing a house I would use the synthetic underlayment which hold up really well. Of course right now some items are hard to find, I am going to build the doors because I can't get the garage door. Waiting for drywall too.
Thanks for watching I appreciate it!
Why are shingles installed in a step up formation? I never understood that.
Not sure other than overlapping concerns
Stagger the seams ...
How did u do the roof tip?
Are you talking about the cap or the ends on the caps?
@@ILikeToBuildStuff The ridge cap...
@@luisbatista1103 I did purchase the matching cap shingles and used a 20' ridge vent for heat release
I just use my knife length for measuring. .no need for measuring tape...
Thanks for watching and the tip we all appreciate it!
Would be better without music.
Thanks for the input, I appreciate any help I can get!
You totally confuse me with this puzzle
Sorry, just look at the instructions on the packaging it will help.
I thought the packaging kept it all at 6,that way less confusing
I gave measurements for each layer instead of adding up how much to take off but the actual length of each one, Sorry I confused you, didn't mean to
Slowwwwwwwwww
Sorry Andrew, I just wanted to be sure those with less experience gets all the information to do the job right. I appreciate you watching and again sorry you feel it's to slow I'll work on that.
@@ILikeToBuildStuffI'm sure Andrew has tons of videos on how to be a speedy roofer, no need to work on that haha, I appreciate the information
I know I'm not a roofer, but WHY do you need to stagger shingles like that
for looks and placing the edges to not leak when raining
You stagger so that all the ends don't meet up, which allows water to penetrate down to the roof decking. Cutting six inches off an end allows water to drop down onto six inches of shingle and shed down off the roof.