How To Replace Front Wheel Bearing Silverado 1999-2013 & 2014-17 for $120 | AutoZone Duralast Hub

Vložit
- čas přidán 17. 07. 2024
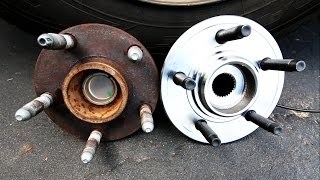
- Wheel Bearing Replacement. Learn how to replace the wheel bearing hub assembly on almost any truck or car. This is a 2004 Chevy Silverado, GMC Sierra but the process will be very similar for replacing any wheel bearing hub assembly with an axle running through it. I was able to purchase a new hub assembly from AutoZone for $120.
Duralast Wheel Bearing/Hub Assembly-Frnt. We will provide a review of the wheel hub assembly after testing it for some time before recommending you to purchase it. Other wheel hub assembly companies: Moog, NAPA, Driveworks, Timken.
Here is the Wheel Hub Assembly that I used: www.autozone.com/suspension-s...
Similar Wheel hub assembly products available on RockAuto: www.rockauto.com/en/catalog/c...
Other related products:
1AAHK00001
1AAHK00002
1AAHK00022
1ABFS02019
1ABMS00007
1ABMS00047
1ABPS00178
1AHTF00019
1APBS00350
1ASBJ00055
1ASFK03014
1ASFK04629
1ASFK04683
1ASHF00005
1ASHF00063
1ASHS00002
1ASHS00043
ACSHF00004
ACSHS00005
TKSHF00022
TKSHF00080
TKSHS00029
TKSHS00304
******************************************
Required Tools (Affiliate Links)
• 15mm Wrench
• 18mm Socket
• 22mm Socket
• 35mm Socket
• Lug Wrench
• A Piece of Pipe (for leverage)
• Ratchet
• Torque Wrench
• Hammer
• Chisel
• Jack Stands
***************************************************
🎬 Most Current Recording equipment (Affiliate Links)
***************************************************
📷 Video
Canon R6: geni.us/CanonR6_4K
Canon RF 24-70mm F2.8 L is USM Lens: geni.us/VnTwT
Canon 80D Camera Body: geni.us/Canon-EOS80D
Sigma 18-35mm F1.8 Art DC HSM Lens for Canon: geni.us/SigmaLense
Race clips shot using GoPro: geni.us/HERO9Black
🔊 Audio:
Lapel Mic: geni.us/PicoMic
Zoom ZH1 H1 Handy Portable Digital Recorder:
geni.us/ZoomRec
💡 Lighting:
Genaray Flood Light geni.us/GenarayLED
Genaray Softbox: geni.us/GenarayLightBox
Newer Ultra High Power Video Light: amzn.to/2Hl3QO7
----------
Thank you to all of our fans and subscribers for supporting us on our journey!
FOLLOW US ON INSTAGRAM: @THESUNDAEDRIVE - thesundaedrive
CHECK OUT OUR WEBSITE & BLOG: www.thesundaedrive.com
********************************************************************
👪 Partners and Sponsors
********************************************************************
Tool and Dye Designs - Auto enthusiast inspired clothing:
Website: www.toolanddyedesigns.com
Kies Motorsports - For all your BMW needs
Website: www.kiesmotorsports.com
CZcams: / kiesmotorsports
Speed Circuit - LS Powered Exocet and Evo Upgrades
Website: www.SpeedCircuit.net
********************************************************************
🎵 Music
******************************************************************** - Auta a dopravní prostředky


Im.not a mechanic by any means, i change my own oil, brakes.. this was the first major repair ive ever attempted and with your video it helped me out tons.. i was nervous at first but i was able to do it. I called a local shop and they were going to charge me between 800-1100 dollars to change. No way i was going to pay that.. i looked up so many videos and urs was the only one that i felt was in depth.. thank you so much for your time and knowledge and for saving me a ton of money.. take care and be safe..
Glad it helped you! Love hearing this
a lot of work on these older trucks is pretty simple, best thing to do is be confident when you go into a job and PLACE THE BOLTS IN ORDER OF REMOVAL. also take pictures on every step so you remember what goes where.
Past few days I am watching all the bearing hub exchanges and honestly, your video clip is the best of all.
Thanks for the good job and have a wonderful one.
Yes. I appreciate the actual camera change angle when you were hitting the hub assembly. That makes a big difference in a video. We can’t see from afar (which many creators do, plant a camera a few feet away & never zoom in to where their fingers are at) and you had good lighting as well. Thank you for uploading.
Great video and good advice for getting the hub off a lot of people skip over that 10/10
this is by far one of the most helpful videos because you actually showed everything
Glad it helped!
The best self help video for changing wheel bearings on chevy silverado!
Thanks for keeping it super basic and respectful. There's a lot of guys that are learning off of here
Awesome job, thanks a million. I just did my 2017 GMC Sierra with your video.
Thank you. Great video. Was able to replace my hub assembly on my 2005 Silverado with the help of your video!
Woo! Glad it helped :)
Thank you for this video. I took on this job this morning and still have not gotten the job off and was thinking I was missing something.
So much easier than I thought. Thank you for this!
No problem! Glad it helped
Thank you for your tutorial/example!!! This was on point. Other than the old parts being fused, it was extremely easy. as far as total time time working on it is concerned, it was quick. Thanks again!
Automatic Sub and like because you don't skip steps. Thank you so much. I was going to pay a shop to do this, but you made me confident I can do this easily myself!
Good video👍🏼 short, to the point, and well edited. I’m going to fix mine tomorrow. Thanks
Thanks! Hopefully it helps you out!
I usually loosen the Axl nut before I jack up the truck. If it helps anyone. Awesome video
This is a great video from start to finish. It's even better you had the sizes of sockets and what to torque them to. Very helpful 👌
Glad you found it helpful! Best of luck with the job!
Just did this job yesterday. I used a cheapo air hammer from harbor freight (less than $20) with the chisel and it popped off the hub from the knuckle pretty damn fast. Nice video man!
Harbor Freight is the best for tools like that lol. Glad it helped!
Great explanation on the hammer and chisel part, watched several other tubes and for the life of me I was wondering how theirs came off so easy. Thanks.
most CZcamsrs just ship over the hard parts. we try to show it so it isn't a surprise lol
Thanks for the video. I got all my parts (Front Rotor's, Front Wheel Bearing & Hubs, Front Brake Pads, Front Shocks & Front CV Axle Shafts) for $860. Figured might as well do it all at once.
Definitely a good time to get in there and do it all together. Hopefully the video helps you out!
Nice video. Better than most. Explained well and to the point and yes, you showed the hard part.
I did these steps on my 2005 2wd Silverado. It was a life saver I went ahead and did the whole front suspension. Thanks for the video!!
Awesome! Glad it helped!
@@TheSundaeDrivethe title said the bearing. U did the hub.
@@johnperez93640I don't think you can change just the bearing on these vehicles. You have to change the entire hub assembly... So replacing the gun assembly, is replacing the bearing.
@@brody6634 the bearing alone CAN be replaced instead of the whole hub. But its just easier for the average DIYer to just replace the hub. The hub was put together somehow. If u reverse engineer it, ull see that the bearing CAN be replaced. (With a shop press and correct plates n stuff.) Myself, i buy just the bearings 6 at a time for a cheaper price, and then just replace the bearing whenever another comes in needing a "hub replaced". Like the bearing in idler pulley's, most are all the same bearing. I buy those by the dozen at a time for cheap and replace just the bearing when one comes in needing a pulley replaced. Parts stores dont really like that i do that for people because they wana sell hubs and pulleys. But for how much they sell those parts for, id rather not let them rip people off.
Great video i will do it this weekend thansk for the encouragement first time ever
Since the new hub assembly comes with studs in it,knock out a couple of the studs from the old one, run a bolt through the hole, and put a nut on the back side. Use a wrench on the nut ,and the impact on the bolt. Eliminating the hammer, and chisel
New sub. I had my passenger side wheel bearing on my 2011 GMC Sierra replaced by a garage because I had an extended warranty and the defect was found during state safety inspection. That was two years ago…this year, during inspection it was found that the drivers side is shot. I’m mechanical proficient enough with a fully equipped garage, that I believe I’m capable of doing this myself. Your video convinced me that I absolutely can! I was quoted 500 at the garage…I can’t deal with that. So, this week I’ll do it myself. Thanks for a detailed tutorial video.
Awesome! Love hearing this. Best of luck!
For those of you who stripped the bolt, I reccomend using a William's bolt extractor. It worked like a charm for me.
Nicely done, nice video work as well. I was able to see what you were doing .
Wow very simple explanation! And helpful! Thanks for this great video ! You are the man ! 😊
Glad it was helpful!
Literally just now followed along and change mine!!
Awesome! glad it helped
Good video. Ive always used never seize on all my cars lug nuts. People think its a no no but i never had an issue with doing so
Ya'll make it look SO easy! But this is definitely a useful video. Thanks so much!! 👍💪
Glad to help!
Great vid, thx. Going to try it myself.
This video helped out a ton. Thank you!!
Awesome!
Nice and quick but didn't skip the tough part, thanks
Glad it helped! This definitely has some hard parts so don't want to minimize that
Thanks for adding the ft lbs tork to the vid!!
Of course! We want the videos to be as helpful as possible 👍👍
Second this lol thanks
Awesome video! Easy to see, follow, & I love the fact that u gave the torque specifications. 👍🏾💯
:) glad it helped you out!
Really appreciate the content man, you were a lifesaver
Glad to help!
wow well done bud ,one of the easiest to follow video you again.
Thanks! Glad it helped!!
the hub vids for this job have different t specs ..thanks 4 giving the correct ones
Great video man. Thank you!
Glad it helped!
Great concise video... Thanks for the excellent video
Glad it helped!
Thanks this video really helped, i have the same noise i just want to be sure before i spend the money on the parts.
Glad it helped!
Replaced the driver side hub about five years ago. Had to do the passenger side this morning. Excellent video, hit all the key points you need to do this job. One thing I might add, is that you'll need to apply anti-seize to the hub where it contacts the spindle. Oh and using the chisel to separate the hub was money! Pro-tip right there that was extremely useful.
Glad it helped!
Chiseling that joint definately puts a high spot on the mating surface of the knuckle. It may look like you did no damage, but if you stone that surface, youll see it.
Does it matter? Depends on how bad the damaga is vs how long you need the bearing to last.
@@TheSundaeDrivehow long did it last ?
Really nice job. Thank You!
Thanks!
For anyone struggling. remove one lug stud,, get a long bolt put it through the old hub hole, thread on a big nut till the bolt touches the spindle and the nut threaded up to the back of the old hub... hold the nut with a big wrench as you tighten the bolt,,, when it starts to move.. loosen it and rotate the old hub and do it again. Another trick is a pipe wrench slipped over the hub flange(wrench pointing down so it stays) tighten up the jaws good and then hit the handle of the pipe wrench with a sledge hammer. I havent tried this but ive seen it work good. Maybe a jackstand under the lower control arm spindle to support it before you swing the sledge hammer? Getting pissed helps too ..lol
Good tips!! Thank you
THANK YOU!!! I was kicking meself trying to get it off!👍👩🔧
Glad it helped!
I DID using it!! thanks to your video tip..took me 30min! 😘👍👩🔧
Thanks for your help.Hopefully I wont screw up replacing mine.
Best of luck with it!
Torqued the lugs! Great video! Thanks!
Really great tutorial. 👍🏼
Thanks!
Bout to go change mine now, wish me luck
Awesome video bro helped alot! Thanks pal
Glad to hear that!
GREAT VIDEO I THOUGHT IT WAS SIMPLE AND DIRECT
Thank you! glad it helped
Great video!Thanks bro!
No problem! Hope it helps!
Great help.. thank you
I enjoy your video...thanks!
No problem! Glad it helped
Great job...thanks for the video...
My rotor is frozen also..lol😂
I replaced mine 8 years ago,now they're needing to be replaced again. I ended up getting a 2" x10" x1/2" flat stock. Drilled 2 holes for the studs and 1 exactly centered between them. I bolted my slide hammer to the flatstock and the flatstock to the hub. My first try was to leave the three bolts in the housing and hit each bolt till the housing moved an inch,it was alot of work.
Good video very well explained. I read Autozone hubs dont last more than a couple of years. Many guys recommend Timken. I got one for my Escalade for $140 on amazon.
Thanks! I've heard Timken is a good brand as well
Same here. Got mine at Summit Racing for 145.00
very helpful, thanks!
Glad to help!
Really good video... well done!
Very helpful
Good Video Sir Very Informative
Glad it helped!
Thank for your video I do it today but mine doesn’t have the middle nut so is more easy
Good video. 👍
Thanks!
Good vid, you skipped removing the bolts that hold the bearing on tho. Those can be a challenge. Sometimes you can only use a box end wrench because of the cv shaft being in the way. And they definitely aren't just going to come out easy with a little stubby 15mm.
true need a long wrench 15 mm. make sure you dont round the the head bolts. tough to get off
hey just was watching and noticed a step you missed. it's important you clean the splines on the front axle and apply some sort of grease as well. it makes it easier for the next time and prevents the new hub hopefully from seizing onto it
Vertical play is the best way to check as you demonstrated. Horizontal play could also be tie rods.
Good point:
Thank you
"6 minutes of just pounding it" lol, nice work, good stamina and grip
😂 it’s all about the stamina
@@TheSundaeDrive great vid tho!
Alternative to all that pounding is to remove the 3 hub bolts halfway, then with a punch or air hammer on the bolt heads it'll break free easier as the force is in line
I'm not gonna even put the 3 bolts back, it's gonna fuse shut anyway lol
😂
Thank you for the video! What can you say about the tires that you have installed? Good quality?
the part you said you don't want to feel stupid on at 4:04 put the nut back on to protect the threads then whack it with a hammer to drive the axle out the back - - it moves axle back allowing access to the hub bolts and makes it easier to separate the hub - - it may still take some convincing but the axle end no longer adds adhesion to the issue
Is there an after market hub assy where the sensor is separate? My passenger side sensor is shot but the hub seems perfectly good. And the warranty is done. I did this job last year on my '06 Silverado on the diver's side. I used the manual chisel&hammer. After 1/2 hr moved to air. 10 seconds later it's off. Only downside was the dust shield got wrecked.
If you have really loud mud tires then it would be a good idea to check them every once in a while cause you won’t be able to hear when they start making noise.
Had to sub once I saw the Eagles hoodie! Go Birds
haha thanks!
A torch is your friend. A little heat on the bolts does wonders getting them to break.
I forgot to add that I drove home today 12 miles driving 20 mph emergency lights and all cause of that grinding kinda noise I was legit scared. Then I come home hop on you tune and see you during like nothing lol WOW! I took my 06 Silverado to the shop I just wanna drive safely plus I don’t have the tools for that. Subbing!!!
Haha definitely be safe out there!
One of the scariest sounds ever lol
Haha yes. Any vehicle making unnatural sounds scares me into compulsively reaching for me wallet 😂
240 that cost me but I have peace of mind and I can speed again
Thanks 🙏🙏
Also helpful use some penetrating oil where the hub goes inside the spindle loosen the cv axle nut and beat around the wheel bearing that your going to scrap anyway sometimes that way you get away without the chisel
That is always a good idea
Not bad...thanks.
So I just bought a hub assembly and the holes for the 15mm bolts that hold the hub on is not threaded, so is there anyway somehow to put it on?
Good job
Thanks! Hope it helps!
Those 15mm bolts don't come put without a fight. I used a breaker bar with a pipe extension and broke a socket. The socket split into two pieces. Ended up using PB, WD40 and a torch.
A Torch and PB blaster are a mechanics best fried
Did you apply anti-seize to the studs ?
just bought complete set both sides with new fasteners 100 bux from detroit axle dont know as to the quality will get back to you on it
Great video!!!!!!!!@
Glad you enjoyed it!
Made it look easy.. Have a 03 rado and my hub bearing broke a part on the highway at 70 mph today 8_20_2020. The inner cap fell off all the grease spilled out also pieces of the bearing including the stones it has inside the bearing . The thing is I didn't have signs of a bad bearing or hub. No knocking or wiggle or grinding what so ever. It just tugged to the left hard. Could of been worse. Hopefully no heavy damage to anything else
Aww man. That stinks! Hope everything else is ok! Surprised you didn't have any warning prior
@@TheSundaeDrive I live in Los Angeles Cali. Weather is hot. Windows up a.c. on. I run 33s on my truck it is alil loud with the howling maybe i didntt catch the warning signs. But yea bro all fixed New wheelnhub and rotor 💪💯
Glad it wasn't too bad to fix!
I had that exact noise for a week it was so bad. I had to get the hub & bearing replaced on the front driver side. I felt it right under my butt, it was so bad. $ 376 for parts & labor.
Definitely something you want to fix. That's not a terrible price. Especially if it siezed up like this one.
For anyone interested investing in a 6" puller will make that hard part easier
Definitely a good suggestion!
You can usually rent pullers for nothing at parts stores. They have you put it on your Card. And when you return it they refund your money back.
How to take the top bolt from the back of the bearing ? I can’t even get my socket in there.
I really was hoping to see how you disconnected the abs cable at the top...
PHILLY PHILLY!!!!
What greese ?
When replacing the hub assembly
Was the truck getting bumpy when reaching high speeds?
going to have to do this fix on my 14
How many miles did it take for yours to go bad?
I have a 2015 with mostly all highway miles 55 - 60mph. I have 90200 at the moment and my driver front just started to "hum"
@@kingrukus1234 oh boy. I'm at 84K probably 50% highway on my 2014. Hopefully mine doesn't go bad too soon
Yeah, probably getting close. I had it repaired today. $443.70! Only $70.00 of that was labor!!!
Ouch
Good explanational video, but anti seize or any other lubricant should never be used on lug studs. It can cause them to back off and become loose.
How much grease do you put the hub?
Do you know how to fix your gas gauge and your temperature gauge I cannot find the fuses twist Victor stopped working
Anti-Sieze is NOT good for lug nuts, it can seriously change the torque value.
You know the Navy are ones that used never seize on bolts on their subs.
We use it on all our race cars to prevent damage to the threads. Never a issue
Facepalm..
Torque values (torque charts) are typically calculated on lubricated threads. In the power generation/turbine industry, we always use anti seize on threads. Kluberpaste now instead of Loctite N5000 anymore due to hexavalent chromium issues. Great video. Just paid thru the nose to have the RF done on my 2018 GMC Sierra 1500 SLT Z71 at the GMC dealer. I’ll do the LF myself next time. Sorry to see you can’t re pack and reinstall wheel bearings anymore…
I was wondering what that thing was called my hub thing is just hanging there it already off when I took everything off
That was dope
What’s up man great video I notices though you have a 35mm socket listed but you said 36 in the video? Do you know which one it is? I have to buy one
For anyone else wondering, I bought a 36mm and it worked but I felt it was 1 size too large and a 35mm would have been better.
So I’m getting a lil cold but I still got sandals on Lol ...good video tho jejeje