Thanks for the video. I’ve never used a jig before. I bought all the wood for making my own cornhole boards, but wasn’t sure how to join the 2x4’s to the 1/2” plywood. (A couple videos I watched the 2 gentlemen drilled straight through the 1/2” plywood and joined the 2x4’s and countersinking the decking screws. I thought “There has to be a more professional way to attach the plywood to the 2x4’s, not have screws visible, and potentially snag the bean bags during expansion or contraction of the wood. I bought a few extra 2x4x8’s to experiment/screw up. I’ll be watching your video several times during the process. Thanks again!
What setting did you use for the 1 1/2" wood? The booklet states 1 1/2" slide and 1 1/2" drill bit slide. But that wouldn't even be on the board but starts before it and the stopping point is before the outside wall?
It’s a 50/50 chance. Although I think since it’s a little rustic it would look fine with a crack and add character . I have built some things this way even an apron and it was ok. What you can do for the apron is after drilling the hole for the pocket hole get a little bigger size drill and drill on the holes on the apron making it slightly bigger on the apron side which gives it some room for movement. I hope that makes sense. God bless .


Let's watch another video:
czcams.com/video/qkHy4mvKR9Q/video.html
czcams.com/video/Ck4i189bVE8/video.html
czcams.com/video/AbWgWF-f_hU/video.html
czcams.com/video/-8ItDK-aaUY/video.html
czcams.com/video/YsFMwb-4BQc/video.html
czcams.com/video/bN3uXlQLB0I/video.html
Thanks for the video. I’ve never used a jig before. I bought all the wood for making my own cornhole boards, but wasn’t sure how to join the 2x4’s to the 1/2” plywood. (A couple videos I watched the 2 gentlemen drilled straight through the 1/2” plywood and joined the 2x4’s and countersinking the decking screws. I thought “There has to be a more professional way to attach the plywood to the 2x4’s, not have screws visible, and potentially snag the bean bags during expansion or contraction of the wood.
I bought a few extra 2x4x8’s to experiment/screw up. I’ll be watching your video several times during the process. Thanks again!
Undoubtedly, marvelous masterpiece made by master craftsman. Thanks
謝謝,詳細的解說
Very nice
Nice little table 👌
Table top should be fashion with Z clips to allow for movement. It will split probably.
Tks Bác Toàn đã tặng 🥰
🥰🥰
Awesome!
Thank you! Cheers!
Thank you for the video.
Great job and beutyful table brother
Thanks for visiting 😊😊
Well I have to try your method. You make it look as easy as eating Cake.....
Hope you enjoy
Maravilhoso trabalho de um Gênio...🇧🇷🇧🇷🇧🇷👍👍👍🤗🤗🤗😷😷😷😷Parabéns e Deus abençoe...
Thank you so much!
great job, man
Tks bro
❤️🥰🤟
Dude. Heck yea. I like. Great video.
Thank you so much!
What’s the lumber list that you used?
@@justinmccallum1 I use pine
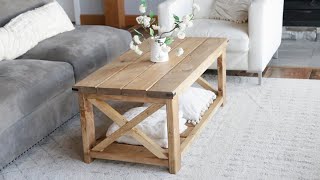
- Legs: 6x6cm, 4 pieces
- Cross bar: 3x6cm, 4 pieces
- Table top: 3x12cm, 4 pieces
length x width x height: 60x50x42cm
@@CAT.Creative need more vids brotha!!!!
What setting did you use for the 1 1/2" wood? The booklet states 1 1/2" slide and 1 1/2" drill bit slide. But that wouldn't even be on the board but starts before it and the stopping point is before the outside wall?
I like it, good!
Thank you so much! ❤️❤️
@@CAT.Creative Would you be interested in working with us?
@@zokmokus5211 yep bro
@@CAT.Creative I have sent an email to you.
What pocket hole jig was you using.
Pocket holing along the apron like that ok? Would the boards not crack from wood movement
It’s a 50/50 chance. Although I think since it’s a little rustic it would look fine with a crack and add character . I have built some things this way even an apron and it was ok. What you can do for the apron is after drilling the hole for the pocket hole get a little bigger size drill and drill on the holes on the apron making it slightly bigger on the apron side which gives it some room for movement. I hope that makes sense. God bless .
Всё просто замечательно, но почему щит не склеил?
ÖLCÜLERİ NEDİR
Not everything has to be mortise and tenon!
I like it,
Cool, 🥰
Loved watching.! What is the name of the tool you use to smooth the edges?
it's sand paper wrapped around a piece of scrap wood.
that is a hand planer
Hi what wood and varnish did you use?
Pine wood and acrylic PU
what type of wood is it?
It is pine,
At 2:11 this should never happen. You're suppose to clamp the two pieces together.
Using a pocket hole jib. Simple top. Why all the useless filler, e.g., sanding the wood. Damn people.
There is something called wood glue
The point of the video is to not use glue!!!
You should've been a foley artist, not a woodworker
Wood working skills of a 3 yr old
Comment of a 3 year old