How to hide layer lines on 3d prints.

Vložit
- čas přidán 25. 05. 2024
- A simple process using spot putty to achieve a smooth surface for you 3D prints.
In 3 simple steps you can get great results. Initial sanding, apply putty and sand, paint.
If you would like to support my videos or get early access before they go live on CZcams and files I’m able to share from my builds, check out my Patreon.
/ daverigdesign
Chapters:
Intro: 0:00
Test on complex model
Initial Sanding: 1:28
Applying Putty: 2:50
Sanding Putty: 4:30
Paint: 7:09
Final: 9:33
Test on Simple Dome: 9:42
Visit my amazon store for a list of products I've used in builds
amzn.to/3vvFOP2
Items used in this build:
Spot Putty: amzn.to/3439qGd
SandPaper: amzn.to/3uh4W9B
Popsicle sticks: amzn.to/32RjIZp
AirBrush Paint: amzn.to/3gdrnUZ
Brush Paint: amzn.to/3sagPeL
Clear Coat: amzn.to/3J0vW1h
Music from www.BenSound.com - Jak na to + styl


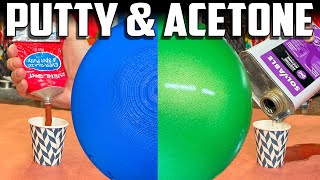


a little added note with the spot putty. You can thin it with acetone and then you can lightly brush it on. Doing this will make the putty dry faster (within 5 - 10 min.) and allows you to work it faster as well as building it up faster. (very similar to working with UV resin and baby powerder)
Cool, I didn’t know you could thin the putty that way. Thanks for the tip.
Assuming the acetone won't dissolve your plastic.
Acetone doesn’t work with PLA
Thanks for that tidbit, I might use it
Def gonna try it, what’s the thinning ratio?
i have to admit, after seeing this it makes me realise how hard it truely is to get a nice looking 3d printed rc car body done, as im planning to make one at somepoint
Thanks for the video. Ive been doing this for a few years now, its all information I already know, but great job with your explanation of the process and your pictorials of the layer lines and build up of fillers is great. GREAT JOB!
This is by far the easiest and simplest way I have seen.
I am so testing this method.
Thank you for sharing it.
Your welcome, hope it works out for your projects
Thank you for posting this. It looks like a fairly straightforward process to get some very good looking results.
thanks !!!!!
I like this process, looks like it solves a lot of the primer issues in one coat!
Thanks. Out of all the different ways you can finish a print it’s the simplest/fastest/easiest way I have found.
This is awesome
I have just put my feet into 3d printing
You video has given me a new horizon, thnanks
I've found that Elmer's Wood Filler works just as well. You'd expect that a wood-based product wouldn't stick to the plastic of the print, but it works just fine. One thing to do is scrape off any excess while it's still wet, because once it dries it's quite hard and can be difficult to sand off all the excess.
That's so useful. Thanks a lot.
Amazing! This is gonna help sooo much!!
I printed my project with 0.2 layers and I think in combination with your method this will be a nice finish. Thx for the video.
I printed at 0.3 to emphasize the layer issue but defiantly using smaller layers will mean less filling and sanding work.
You are an artist. Very good.
Thank you, I do what I can :)
My goto filler paste is Bondo Glazing putty thinned to a milk consistency with Acetone (finger nail polish remover) and then Brushed on. At least one other site has recommended thinning even more and spraying the putty, but this stuff dries near instantly so it would need to be a trash/throwaway airbrush. This works great and is quicker than hand applying. Then the process is the same as you described.
Other have suggested thinking putty with acetone, sounds interesting but I hate working with acetone. Fumes are intense :)
Good we have adaptive layer height now to mitigate the layer rings on top of the domes.
Thank you so much for your help, it really solved a big problem I had.
Glad it helped!
This is decent post processing. I used to do print with 1mm nozzles and blading and sanding them after because i also have no patients. Luckily you can run printers way faster this days in better quality, because nothings beats a good print.
good job
Thank you, ive been looking for a solution to this annoying problem with layers🙏🏻, that makes painting them useless.
You can do this real easy with popcorn salt and an easy bake oven lol. The finer the salt, the better the prints come out post process. I take pla prints and put them back in a metal Folgers can. Put about an inch of salt in, then place in your parts as open to the sky as possible. Fill the interior areas as best as possible l, then the surroundings until the salt completely covers and has an additional inch. Then play your favorite death metal drum solo on the side, and put more salt in and place in the easy bake and let it go for at least 10 min. Afterward let it cool to room temp to avoid any warping. Pour out the sand into a tray and slowly take the parts out. The excess salt will add weight and may cause damage to fine areas if not removed gently. Dip the parts in room temp water. Warm water may warp parts, cold water does not solute salt effectively. After about a 5 min dip, take it out and admire the textured injection molded look.
Hey @tpros6289 - that deserves a video showing how you do it - and the results! I'm intrigued! 😎Let's see!
honestly looking at the process you are going through - just print it at 0.1 layer height and give it light sanding for rougher areas and you are done - yes the print could take 24h to complete - but it will have more detail with far less post print effort. I print large scale miniatures that I mostly don't need sanding just because I keep the layer heights at 0.1 or below.
Fair enough, if you want to wait that long for the print that is a option that would work for the building in the video if you painted with a thick paint. I think you would still see the layers if you sprayed as I did though.
For the done example you still could not achieve this level of finish like that.
Also the lower the complexity of the model to faster the process. The dome took maybe 5 min to apply the putty and 5 min to sand off.
That’s the lazy way to do things, i mean i understand the reasoning for it. For something that doesn’t need to look super good, like just a background thing that isn’t the center of attention. Otherwise the way in this vid is a bit better
Also seems to defeat the point of starting with a multi-colour 3D print in the first place.
But the principles are good if you want a gf one finish. Depends how good you want the end result I guess. Pick the process for the requirements of the job ..
I swear this would not have taken 24 hours at 0.1 just a year ago. Maybe 16 at most… Defiantly within one working day. If I wanted it done in 4 hours I would have just resin caped it mainly for heat resistance.
You can just print a picture of something, why do people spend all that time drawing or painting?
I'd just like to mention that folks should use a Respirator good for working with fine particles while sanding/cutting. You mentioned this piece is plastic but a lot of people 3D print with resin and that stuff will wreck your lungs if it gets in. If we're making any content like this at all we should warn people as it might be someone's first video in the hobby. Be safe folks, your lungs are important.
I'd also just like to point out that the audio in this video was a little off. The music was overbearing and made it hard to hear you talk sometimes, and when you were showing yourself sped up it sounds like you were listening to something in the background which we can hear at like 4x speed under the music while we watch you.
Still I really want to say I appreciate this video.
I'm not really into telling people what they should or should not do. I believe in personal responsibly and people should research what they are working with and take the precautions they see fit. I have my own children, I don't need to parent anyone else :)
Glad you liked the video though, and yes the audio mix was a bit off. The issue was fixed in future one though.
I'm going to try bondo great video
Cool, I recently did a new video thinning the putty down with acetone so it can be brushed on like paint. I Ike that process better cuz it’s easier/faster. You should check it out.
Is the little airgun painting board really enough to shield it? That seems so easy. I need to get one
After the first minute and a half, I feel like I don't need to watch the video. Spot putty huh? I'll give it a try. I appreciate your efficiency in youtube. Straight to the point, I appreciate that greatly!
Thanks. I also hate it when people drag things out, but it's not great for my algorithm stats so do me a favor and just leave the video playing in the background while you go off and try using putty on your prints :)
Thank you
Best video on CZcams
Thank you, Best may be a stretch though, I’ll settle for really good :)
Awesome video thank your for taking the time and sharing!
What's your favorite paint & brushes?
Thanks, glad you liked the video. I don’t do a lot of brush painting. Mostly air brushing and don’t really have a favorite paint yet :)
It looks wonderful, but what about using a very low heat model iron to just flatten the little bumps and valleys?
I've done that is small spots but over a big area you end up just making a mess
Not bad but you may want tonlook into resin based fillers. They can be brushed on and are self leveling. They sand well and strengthen the part as well. They also help to stabilize the part against heat like when they are left in a hot car. You do have to worry about sharp corners and pooling though.
I've looked at that also but its a messier processes and has similar issues to using layer of primer. Too hard to control and on vertical surfaces it ends up dripping down. if you had flat horizontal areas it would be great. It would act as a self leveling material.
One year later and he finally does it, lol.
Very nice video and lovely desing. Didnt know you are a star wars fan :).. anyway, reminds me that its time to finally purchase a 3D printer. Wondering are there printers with higher printing accuracy so they dont leave so much 'stepping' on the surface printed or is this a common issue for any 3D printing?
Thanks.
with this style you always get layer lines. you can make them less by printing thinner layers but there is a limit. These prints were at a .3mm layer height which is a bit big for something this size but I did it to emphasize the issue.
If you want prints that are smooth right off the printer you would need to look into Resin printing, but that has it's own set of issues :)
Resin is great for printing small detailed things. I have one but don't use it too often.
Incredible amount of time and material...
That's post-processing for you...
If you want pretty it takes work, there's no free lunch :)
if you want a morror finish, apply a healthy layer of high gloss black, then apply a thin layer of colour. it works for mirror chrome this way
Yup, but that only works if the surface is smooth.
I use wood filler works well. what was that handy little scraping/sanding tool you were using first?
Just sand paper glued to a large popsicle stick. That and a metal file.
Awesome! 🤩
Variable layer height would help alot on those domes.
Both models were printed at 0.3 layer heights to make a worst case scenario.
Printing at a smaller layer height or using a variable setting would lessen the issue but still not allow you to get a mirror finish as show. It would just require less putty and sanding.
This is why resin is the future of 3d printing
A resin printer doesn't work for all projects. I print 3d rockets that we really launch and the a resin printer would never work for that. Also resin does waste a lot of material just for supporting.
Can also use uv resin to smooth printed surfaces. Just saying
@JB-smokn ya I have a video for that too :)
Wet sanding will help too as your sandpaper won't clog and it will give you a smoother finish
That Rustoleum primer dries really slowly, you should try 2k automotive primer, they sell cans that you can pierce at the bottom and mix the mixture and use right away, it dries pretty fast but it's much harder to sand (although it is really strong, so a possibility for an outdoor model for instance) but the can can't be stored for later on, it will keep reacting and getting harder inside the can but there are at least one brand that I've seen that is 2k but everything comes premixed and the can is good for storage and using later on.
That sounds like an epoxy like the kind you use to paint garage floors.
PETG sands better than PLA so it's easier to remove layer lines. Spray applied and left to dry horizontally seems to work best. Lacquer like acrylics dry faster and sand better than enamels. Lacquer actually works better at hiding layer lines than fillers as the resulting surface sands evenly.
What do you call the name of the first blue handled tool you used to clean up the edges of the print?
Its a deburing tool.
I usually use:
ABS -> ACETONE
PLA -> ETHYL ACETATE
Use a metallic container, pour around 50ml and heat up (use an electric source of heat, no fire at all), once you get enough vapor on the chamber, introduce your print for periods of no more than 10 seconds at a time. Stop as soon as you have desired results or you risk melting your print.
Use a respirator and keep away ignition sources from vapors.
You can achieve great results.
True, but with a much higher risk of explosion :)
How much actual time did it take you to clean up this individual model for the final result in this video? Asking because I'm trying to gauge realistic product finishing times for my own 3D printing efforts.
It obviously varied based on model, a dome is pretty fast to work with. I actually have done a new video using UV resin thickened with baby powder. I think this is my new favorite process mostly due to the fast drying time. No waiting, just hit it with some UV light and sand. czcams.com/video/KVf0mbBCygQ/video.html
No drying time is a big game changer and really speeds things up.
On a print you can go from start to finish in maybe one hr with 2 coats of resin applied and sanded and ready to prime.
Great video showing the process but dang what printer are you using?!? Those layer lines are crazy big.
That was done purposely by setting the layer height to 0.3 and using a dome.
@@DaveRigDesign Ah thanks for the reply
What tools where you using at around 2:00? Where can I find something similar
Those are just small metal files and a flush cut wire cutters. You should be able to find them on Amazon or any hardware store
@@DaveRigDesign thank you for the info and thanks for the quick response!
I was a little confused by the 'SIMPLE' word on the video thumbnail - this was not simple at all in my opinion :)) Lots of hard work as should be expected. :)
But thanks for the tutorial anyway - great results!!
It is simple, You spread the putty on, then you sand it off and you are ready for paint :)
The rest of the painting process is only if you want a mirror finish and isn't part of hiding the layer lines.
A resin printer would've knocked that out of the park. Js!
Yes but this is just an example. The point is to show the process for prints that can’t be done in resin
Great tutorial! Which tool are you using at 1:40?
That a deburring tool.
did u use thinned out acrylic paint to paint the dome red and if so what ratio to paint did u use
Yes, The red paint on the Dome is "Golden Fluid Acrylic" Normally for the airbrush I would use "high flow" and not need to thin but was out.
Ratio, not sure. Just thinned by eye to the right consistency.
Clear coat was Rustoleum Gloss
@@DaveRigDesign thanks for that much appreciated
COOL
Thanks!!!!
I have seen a guy that thinned down the putty and airbrushed it on... he got even better results... you should be able to find it on youtube
Ya I’ve heard of that also. I’m going to try that next.
@@DaveRigDesign if you do know the title of a specific video ahowing it let me know I cant find the video I was talking about
I noticed you are doing this inside, are you using a protective mask? I had a mask on and was by an open windown and it still stunk up my entire house and made me worry for my pets. I did use the bando brad, is yours less hazardous?
I didn’t fine it that bad. The small can be a bit strong at the start when it’s off gassing the most as it dries.
Just having a window open may not help if the air is moving into the house instead of out.
Putting a fan in front of the window to force the air out would help.
High quality high build primers (1k is enough) are by far the best way to tackle finishing 3d printed objects. Spray "wet on wet" let the surface "flash" and do another coat, it means you don't have to sand between layers to create a bond, it does it chemically. Learning how to use polyester fillers is an extremely difficult process to learn. It's fine for most people on large surfaces, but when dealing with detail you can end up creating more imperfection than were already there. With all due respect you can see that in the video, the filler has been applied once the chemical reaction has gone to far, and you end up getting a sandy surface, or alternatively dragging cured pieces from your knives through uncured filled. This in turn means you have to sand most of the material off to get it flat, or you end up having to fill your filler, which is a huge wast of time and material. You should definitely key the surface first, but not to much, otherwise you end tearing the plastic and creating nibs which are difficult to remove or hide when priming - also to some degree the ridges act as a key.
Apologies I didn't realise you weren't using 2 part fillers.
I don't have spot putty
Would it still look good if I use filler primer right after sanding?
It will just take longer and you will need to apply more coats of primer and sand in between coats. But will still work
Micromesh sanding/polishing pads
What do you use for gluing pieces together?
Usually I use CA glue
what tool did you use for sanding? Thanks!! Great Vid!
For the sand paper its just normal sand paper glued to a big popsicle stick. And the other tool is just a small file.
@@DaveRigDesign Thanks for the info!! Noob trying to get ready to dive in this workd
@novachris616 you can also buy nail file sanding sticks. They are the same thing and save you from glueing up your own :)
Do you used a compressor for the paint pistol?
Yup, small air brush compressor
Just print in ABS or ASA and use acetone vapor... it takes out of ton of labor
Use 3d printer resin with baby powder mixed in as 'filler'. Just take care (as with all fillers) on the details. Benefit is you can tweak (within reason) the mix of powder and resin to get the consistency you want and then brush it on with a foam brush etc.
Esa masilla es para autos? Sirve la que se usa para pintar automóviles?
Yup, the putty is normally used on automotive body work.
how long it takes to keep the putty ready for sanding?
Usually the putty dries in 1-2 hrs but depends on that temp and how thick it is applied.
Is this the same as bondo red 2 glaze and spot putty? Bondo is way cheaper
Maybe. I know bondo also make a spot putty.
Sir some slicers have an ironing tool which gets rid of the layer lines
ironing only is applied to flat surfaces.
What sanding tools do you use?
No special tools, mostly just hand sanding. I use sanding sticks to get into small areas. You can buy them or just glue sanding paper to large popsicle sticks.
Sometimes I'll use a rotary tool with a sanding drum to remove material but you have to be careful as any power sanding can generate alot of heat and melt the plastic.
Why did you print with colored filament if you were going to cover it with putty first and paint later?
All filament is colored. finding a non-pigmented filament is not easy
Try ASA filament and aceton ;)
How resistant is it against chipping off?
Since it’s not very thick should be pretty good. It’s made for automotive use so it’s pretty resilient as long as it has a clean surface to stick to.
Have you tried this with polymer clay and baking it ?
Nope, but you need to be carful baking PLA as it’s glass temperature is around 50 deg Celsius meaning it starts getting soft and deforming.
My arms are sore just watching this
Hey, what primer do you use?
It’s usually use for car body work called “filler primer” or “high solids” primer.
It’s a thicker primer that is used to fill in small gaps
@@DaveRigDesign Isn't that primer an enamel based primer? Did you have any issues with using acrylic over it or did you seal it fist?
Doesn’t say on the can but I don’t think it’s enamel based. Dries way too fast :)
Tell me what colors do you paint with a brush???
After in 3DP for 7yrs. I'm still doing this. Spot putty... and last layer one. After 400grid. Spray putty.
Any recommendation for what spray putty to get
thin coats of resin. cure outside in the sunlight. repeat if needed. Reduces the amount of sanding.
I did a few other videos after this using resin, you should check them out. I use UV lamps to cure though. :)
Dude, you should play guitar in a speed metal band, with as fast as your hand can move! 🤘😎
Is there a printer that prints without the lines?
For home use resin in the only way I know of that has its own challenges. There are commercial ones that print different ways that minimize layer lines
Try using wood filler.. spackle or even plastic wood.. very little sanding and sands much easier than auto filler... u can even start smoothing while it's still soft.. just use moist sponge... super easy to sand...
Why are your layer lines so large. What size nozzle are you using
.4 nozzle with .3 layers.
Couldn't you just use regular old bondo?
Does anyone know how to upscale an 3D model without losing detail
how much you scaling the model. Really your only option will be to add it back in.
How many hours?
For what?
I can't use this. I tried modelism putty once and the smell is so strong that I can't do it at home. I can't paint either... It sucks to live in a flat.
I would qdjust the temperature in ac 8rdqnce to the print speed, you cannot use the same temp for various speed, the sweet spot for pla and 40mms is 215, bjt If you print 60mms you should raise it. The plastic depending on type and hotend requires tests, I dont even have laser lines, I got some ghosting occasionally on my ender 3 but thats about it..
Isn't it worthwhile to print with a bit more precision in order to have a bit less extra steps afterwards?
It depends what your goal is.
If you don’t want to paint the print then yes.
If you are painting the print a flat finish then yes as you don’t need to process it to the same amount.
If you want a gloss finish then no because you will have to highly process the print anyway and you might as well save on the print time.
@@DaveRigDesign I agree on the gloss finish which looks really nice; but with a decent Cura profile and a 0.2mm Nozzle you can print very nice minis that don't need a lot of sanding. I didn't mind the print times ;).
@klaesregis7487 for a mini sure, but imaging how long it would take to print something big like a helmet :)
@@DaveRigDesign True indeed!
646 thinner
plz use resin
Maybe houses get printed in the future, so it quite accurate... in some way.
They are already printing small houses now. Maybe it will become normal I. The future.
It's way faster than the resin + corn starch video you made.
Not really cuz I had to wait a day for it to dry before I could sand. Resin cured instantly. I'd say they are about the same time wise, but if you miss a spot and need to re-apply putty you are waiting for it to dry again.
@@DaveRigDesign There is two time: the 'all the manipulation time' and the 'total time including curing + all manipulations'.
Why the music? It crazy!
Music makes everything better. :)
Inhaling plastic aint the healthiest thing
hold your breath then?
Wear a mask
This just isn't a viable option for many given how long it'll take to do everything. You've got 32 hours worth of work into that one model, not counting the print time.
Filling is surely the ultimate approach to hide and remove layer lines. But it is a huge mess and pain in the neck especially on complex shapes. In your case of stone or clay it is the ideal way to go. Surface imperfections would even add more realism. However , this might not be the best way to finish other shapes.
ya, the shape will make it more/less difficult. I did some follow up videos using resin, you should check them out.
You achieve the same result with dichloromethane just by bathing your pla model in it and it takes three minutes
I looked it up, results don’t look the same. It melts the surface but not to a consistent level. You still have a lumpy surface that will need sanding and filling.
With 0.1 layers and DCM you can barelly see any lines. Gravity helps with consistency. I usually do three dips - each one from different angle and then use a brush for parts that need more detail. Still ten minutes tops and it smells funny
good tutorial. the music is a bit too loud/out of balance, it kinda drowns out your voice in spots
Thanks. I’ll keep a closer eye on the mix in the next one. :)
Dial in your printer with the appropriate settings along with the right tip will almost eliminate all layer-lines.
Polish machine
Whats the point of printing is different colors if you are going to do this?
I didn't print in different colours.....
this seems like a difficult way to do it lol
Faster and easier then most if you still want to keep details.
There are faster ways by spraying, dipping, aor coating in other products but along with filling in the layer lines you fill in all the details of the model.
I find the background music to be quite irritating.
Also louder than it needs to be.
Looks like this was printed in .3
It was, to get a worst case
No one talks about multiple color 3D prints here, they're pointless
Well, Not really the place to talk about multi-colour prints since this is about painting them. Would be a waste to do that and then paint it.
But they are cool when used for the right prints. :)