How To: Samsung Spider Arm Assembly DC97-15877B

Vložit
- čas přidán 16. 04. 2019
- How To Replace: Samsung Spider Arm Assembly DC97-15877B www.appliancepartspros.com/sa...
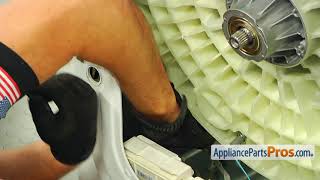
Symptoms: excessive vibration, noise or smoke from burning door boot seal, or no spinning.
Tools: Phillips screwdriver; flathead screwdriver; Torx 10 screwdriver; plastic mallet; socket wrench with extension, 10mm head, 13mm head, and 19mm head; penetrating oil; wire brush; and heat gun.
This Samsung made Washer Spider Arm Assembly replaces the following older part numbers on Samsung Washers: DC97-15877A.
Buy the new Washer Spider Arm Assembly DC97-15877B here: www.appliancepartspros.com/sa...
Most orders delivered in 2 business days or less.
If you enjoyed this video, please click the like button. Subscribe to this channel for more appliance repair tutorials.
If you need any more technical advice, call us at 1-877-477-7278 or chat with us on our website www.appliancepartspros.com/. We're available 7 days a week.
For more appliance advice, information, and tips, follow us on social media.
Facebook: / appliancepartspros
Twitter: / applpartspros - Jak na to + styl


![How to fix Shaky Samsung Spider Arm Washing Machine [FIXED] Imbalanced - Replacement, Flange Shaft](http://i.ytimg.com/vi/CNDuuHvrzPE/mqdefault.jpg)


It is one of the best videos on internet. Kip. Up
Fantastic video. I actually just used this to help me replace the bearings in the same exact model. The first test run of the machine after repair went great! Thank you for the help.
Glad you were able to complete your repair! If there is anything we can help you with in the future please let us know.
Great video. Thanks! This happened to my washer 5 years ago and I ended up buying a new one--repair $450 or new washer $550 (wish I had repaired it myself). This time, new washer $900+, repair ~$450, DIY $150 (1.5 hr). I also was able to clean the hoses that had some junk in them and I replaced the front boot that was showing a lot of wear. I also recommend painting the new spider arm to slow down the corrosion and new bolts. All six broke when trying to remove them. Two thumbs up!!!
Great video, I managed to do this exact repair by myself with no problems, even though my model is the WF45K6200AZ/A2 and it has some minor differences (2 additional bottom screws in the front panel, one additional bottom counter weight in the rear, and the front control panel can be removed by disconnecting a single connector). Very detail explanation, a "must follow" channel. 👍👍👌
Thank you so much for the time to make this video! I was able to follow the clear instructions without any issues! You have saved my family hundreds of dollars.
This was one of the best step by step videos , Replaced Spider arm assembly with no problem. was made to believe from progressive Appliance repair hvac, I needed everything from the basket all the way down to bearing and shocks , didn't make sense my washer is only five years old , spider arm went bad due to galvanic corrosion , usually occurs between 5 and 6 years due to two different metals stainless steel tub, with aluminum spider bracket , soap and water are the perfect mixture to cause galvanic corrosion, replaced spider arm bracket washer runs like new :-}
This has to be one of the best how to video I’ve ever seen on CZcams. Super well done sir!
Agreed.
You r the man. I returned my washer to life because of your step by step demonstration. Many thanks to you.
This was amazing. I ordered the parts and followed this step by step - flawless! (I got 6 bolts, my spider arm was in 3 pieces!)
Great tutorial! Replaced my spider arm with ease. My washer would spin go down to seven minutes left and then jump up to 12 minutes again in an endless loop and made quite the racket never getting clothes sponge dry. Total cost for the spider arm and a 6 new bolts was 235.00 but it would’ve been cheaper. Had Amazon delivered the part and I didn’t have to pay an extra $70 at a local part supplier. Spider arm is 138 on Amazon or 132 from Samsung… But they wanted $276 to deliver… Six pack of bolts with blue thread lock tape already on it was 25.99 on Amazon. A local supplier wanted $16 a bolt and I just laughed at him, all in all it was a very simple job but the tub and drum took about an hour and a half of cleaning and scrubbing! pro tip… either paint your new spider arm with metal paint, or a clear protective coating to keep it from corroding and breaking again! Never use the old bolts on a new spider arm. Had Amazon delivered to my location. The total cost would’ve been around 175… Much cheaper than buying a new washer.
Thank you!! saved me the replacement cost of a new unit!!!
Thank you for such a great video. I had that same problem with the spider broken in three places. I was able to get it fixed with this video and the part that I bought from you guys was exactly the part I needed.
Thanks for the clear and helpful instructions. spider arm replaced on Samsung WF219anw
Thanks ! I repair my Samsung with your video !!!
Thank you, thank you, thank you for such a great instructional video!! I fixed my washer myself! You guys are amazing!
Video was very helpful. I was able to get my washer working again. My boot got chewed up some so had to replace that too. When I was done there was one bolt on white drum not completely tight and had a leak. It took a little time to find it but things are back in action for $200 in parts + my labor.
Thanks repair my washer with your video.very helpful step by step with all details.thanks very much
Very nice demonstration,clear steps.thanks.very good for self repairing.
This video helpfully, thank you so much
Спасибо, очень хорошее видео
Thank you so much!
Great Video Thanks a Million
This video is awesome! My model was slightly different (8 years old), but was able to replace my spider arm using this step by step video with ease (mostly). Washer is working perfectly now. Thank you very much!!!
Excellent video
Great demo, I would have to buy tools, heat gun, gloves, grease spray, and cinder blocks. Added to 3 days of painstaking video rewinds and lost screws and bolts to replace. 😅
how did it go? appliance rpeair guy came and said spider arm needs to be replaced and that labor alone is 3-400 plus a few hundred for parts. Might as well get a new machine
I spent an hour and a half taking it apart in two hours, putting it back together with relative ease. Everybody should have these tools, doing a job like this means you can afford to buy them.
Where did you get those wooden support boxes you used in the video? They look very handy to have
Should we be using thread lock on spider bolt?
Thanks a lot for video.
Sir.. When inserting the shaft after replacement, is it okay if i do not apply grease between the bearing and the shaft?
Very nice video - With all of that work and so little cost extra what not change the bearings, seal and tub seal at the same time ?
Seals not necessary as its receded. I didn’t do the bearings on mine either as they were in good shape. They should definitely be inspected, but no need for replacement unless they’re damaged.
The way he bent that boot spring. Just use a hook to pull it. Yikes. And no inner tub? Look at all that rust.
My Samsung washing mashine has a broken spider arm and i want to fix it, but I need to know if all Samsing washing machines have the same size spider arm, bolts, tub seal, and bearing? My samsung washing machine Model # is WF218ANS/XAC 01. Thank you for the video!
They’re all different, simply write down your model number then go to Samsung site put it in and they will give you the exact part numbers you need
Hello, we had the smoke and loud noise problems on our front-load Samsung. We replaced the spider arm following all these steps. Now the washer will vibrate but the drum does not spin and still doesn't work. Any ideas? Much appreciated.
It would be so nice if when I put in a certain thing I want or need to see that it would take me to videos of just what I am for. I was looking for a video showing me how to tear down and change the spider arm on a Samsung FLEX washer and I only get videos for regular Samsung. Mine has a second washer on top that needs to be taken off in order to get there drum off, so a video of a regular Samsung isn't gonna help me.
Our videos are to just help give you a general idea on how to do the repair. Unfortunately, we do not have videos for all of the models that we carry parts for. We are adding videos everyday on here.
Does anyone know if the new spider arm comes with the small thin washer and rubber seal on the spindle? Both are about 1.5 inches diameter, on the shaft.
They do not. Just take it off your old one.
whats the name of spray?
kroil
I'm just going fork out and get me a top load washer. Chuck my Samsung front loader..
I thought about doing the same, but save 800 bucks replacing my spider arm. Took four hours total to disassemble and reassemble. Certainly will never buy a front load washer again. Samsung deliberately used crappy spider arm they knew would fail. Very easily should have put a protective coating on the spider arm, or made it out of the proper material not impressed.
The new spider arm actually looks to have thinner walls than the original?!?
Yes, mine was different as well, but better, the old one sat right on the drum, where it got corroded, this one sits up about a quarter inch and only touches the drum where it bolts
Why do they make them with aluminium it just corrodes over time
Metal fatigue is much more an issue with aluminum. The oxidation doesn't penetrate last the surface unlike in iron.
Past*
So you have to spend money to fix it or replace it. Could’ve easily put a protective coating on it or used better material. Samsung has lost my business with this nonsense. It happens to every single one of them. Couple buddies at work but the same washer as mine and both of them had to replace the spider arms two weeks apart.
Where was the spider arm broken? Isn't the purpose of the replacing the spider arm bc it is cracked or broken? More importantly, wtf is everything Samsung builds trash? Why build the spider arm out of something that breaks so frequently? Whats that? OHHHHH, so that I'll have to buy a new machine in a couple years? BS
They’re made to break down, so you spend more money, repairing it, or buying a new one, dirty cheap trick by Samsung. I will never buy another Samsung appliance or front load washer
Why are the Samsung parts so junky? The bearing support should be made of forged steel. I won't buy one ever again.