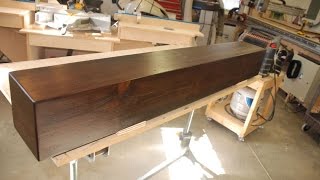
DIY Rustic One Piece Look Wood Mantel

Vložit
- čas přidán 28. 12. 2017
- Make this solid one piece looking rustic mantel for right around $40! This is a fairly simple DIY project that you can do with a few common woodworking tools. Add a very cost effective yet custom look to any fireplace.
Dewalt DWS780 amzn.to/2S08KGu
My Camera Setup:
Panasonic G85 amzn.to/2Nu0y24
Rode VideoMic GO amzn.to/2wYEsKM
Jobi Gorillapod amzn.to/2QfocOh
Original idea from blazingnailgun, thank you! Check out his page here • Build a Rustic Faux Be...
Thank you for watching Life of Bliss and the progress I have been making on my basement build! Please subscribe to be updated on new videos!
Music:
Great Days / great-days
Classic / classic
I'll Be There / ill-be-there - Jak na to + styl


Great video. Are moving into a new house next week and we were discussing what mantle (brick from floor to ceiling on our fireplace) we wanted and we landed on something like this. Great to know I can do it fairly easily with the tools I’ve got.
Awesome! this is my rock, fireplace etc this is my project too!! Glad you made this video combines all the good ideas from other videos I saw and it makes sense! I like making the french cleat part out of the 2x4 seems sturdier.
I'm glad it helped! Good luck with your projects!
This is EXACTLY what I was looking for on how to build my mantle. Thank you!!!
Mad skills!!!! Phenomenal work!!!
Thx. My wife followed this and it turned out great. Thx.
In the process of building this now and referencing your video. I'm very novice so I had some trouble making nice mitered cuts, but I learned a lot along the way. I ended up using way more wood filler than I'd care to admit... Thanks for the great guide!
We all gotta learn and make mistakes! I'm far from perfect lol, glad the video helped though!
I followed this video to a T. My first real wood project and I gotta say it came out amazing! Great video very helpful
That's awesome Alex! 🤘
Excellent video I followed your instructions to a T. I went over it with a wire brush which gave it a more distressed look also used grinder to add some lines which gave it the crack spitting look. Love the way you basement ended up coming out, simply beautiful. Too bad homes here in Los Angeles don’t come with basements. Looking forward to future videos.
Awesome man! Sounds like yours turned out great. Appreciate it, got some more stuff coming soon...
Good work. I’ll do the same tomorrow out of walnut. Thanks good ideas I got
This is awesome!!!! Few men posses this talent.
Thank you! It's not too difficult of a project 😉 there are many people much more talented out there!
Been binge watching your videos last 2 days! Fantastic job and looking forward to more!
Thanks! My editing skills have gotten better on the more recent videos haha... got some pretty cool stuff coming soon!
Great video.
I watch a lot of “how to videos”, you do a great job explaining everything very clearly and thoroughly.
He did do a great job explaining. My husband and I watched this together. Hes Italian too. I asked him what he thought about this as hes not a man of many words. Of course, he gave me that little look he always gives me when hes pleased and said, FUHGETTABOUT IT, amazing! lol
🤣 that's awesome lol, thank you!
Nice work… very motivated to do the same to our fireplace!
Wow you really did a fantastic job 👏👏👏
looks great man! well done.
awesome! ill base mine off this. Nicely done
Wow! Badass.... thank you for sharing!
Built it today following the video! Just need to fill, stain, poly, and hang and it'll be good to go
Awesome! Hard part is done. I like the staining/poly process. Finally comes to life.
Thank you for a great video though. I need to build a mantle like this for a customer and you nailed it.
Awesome job!
Great video I am a little shy on equipment like what is used but it gives me inspiration and a reason to clean out my garage to have a work space Thanks
Glad you liked it bud
It’s amazing!
great job!
It looks really good! I really like it, kinda wish I watch your video before making my mantel lol...
killer work man!
You should be very proud of yourself. It looks beautiful
Thank you Dave
Such a clever way!!!
Great job man wow
Great video- we’re doing this project tomorrow!
Nice work! Thanks for the video...
Very helpful video.. Doing one for placement on an existing red brick fireplace as well.. plan to use masonry screws with the lead inserts. Not sure how to address the gaps yet either, hopefully from looking straight on they’re null..
I wouldn't think it would be too bad with a standard brick wall. Maybe if you were directly off to the side, but hopefully not too bad besides that
You just made my day! I was about to order one
Line $145
Might as well. He spent about 20 hours on that
Nice work. I’ve also used a round pipe to “burnish” or roll down those edges as it’ll usually closes the tiny gap between the 45 degree joins instead of using wood filler.
Thank you for the tip!
Great video!
Amazing!
Awesome 👏🙌
Thank you for a Great video !!! We are sold on your idea... I'm pretty sure this is going to be our method for a new mantel as well... Thank you!!!
Awesome! Good luck with the project! I have a more recent video on my channel of the whole wall done with some more shelves and recessed lighting, May help with more ideas...
Nice work
The French cleat is a great idea. I would put a conditioner on the pine before staining to avoid the blotchiness
Sick!
You are awesome with wood. I wanted to do something like this but I don’t own all the tools needed. Need to find some willing to make me one. Good job!
nice work
Beautiful! I’d love to see your finished fireplace when completed.
Thank you. I actually have another video going over the stone process. And after 2 years.... I'm finishing the other floating shelves this week haha. I'll have a video out on the finished wall soon
😳😲😲😲😍😍😍😍😍❤️
Nice work bro!
Jerry Pease thanks man! I'm excited to get the rock up to see how it all looks!
I’ve never tried anything like this but I’m planning to stack stone my fireplace and I think I’ll get a friend to help me add this mantel. Thanks!!!
It's not too difficult with the right tools. Good luck with getting it all done! I also have a video on stacking stone for my fireplace, as well as more of a how to video on the stacked stone. Check them out in my basement build playlist if you were looking for videos on that as well!
Thank you! You saved us a trip to a Denver architectural salvage store and prob $300.
Love it
45 degrees bevel cut makes a nice clean fit
$40 of materials. $300 of labor. $1000 of tools. Experience and expertise required? Priceless.
What some people don't understand is. 1. People find joy in working with their minds and hands; it can be a hobby. 2. When you're "off" work on weekends, you're not making money; if it's your hobby, the labor is "free." 3. People with this passion already have the tools, why not put the tools to work? In conclusion: The mantle was FREE since no money was spent playing golf, going to the game, drinking beer with the boys...
Exactly. Drinking beer came the following weekend lol!
The labour (hopefully) includes the experience and expertise.
DIY and is 40$
Stop crying
Nicely done! Exactly the route I'm looking to build mine. The mitered corners is the cherry on top to give it the solid look.
I am the 100% like -_-
Great job man. Looks fantastic
Thank you sir! Should be doing the matching floating shelves for beside the fireplace in the next month or so
It looks awesome. Thanks for sharing!
I admit I had my doubts at first, but this looks great. Strong work.
Appreciate it man. If you wanna see it with the completed stone work, it's in the basement build playlist where I go over the install of the veneer. We are very happy with how it came together, especially for the cost
Well explained
Thank you sir
This is excellent. I think I am going to copy your idea
Really nice man Los Angeles
11:44 , A Big Dog's shadow is passing on the wall
Only suggestion I’d make, to avoid screws in the top, use the kreig jig and put some pocket holes in the top cleat then screw the top into the top of the French cleat. Cleaner look without having to sacrifice strength.
I would pay you to do mine!!! This is exactly what I want but way above my pay grade. Excellent video, wish so much you would let me hire you!
Thanks Jill! Sorry I don't really have the time to make things for hire 😅
I made something similar to this...I don’t have all the tools you have so it took my a while. Great video nonetheless....
That's awesome man! Honestly I don't have many tools for wood working either besides my table and miter saw. Just goes to show you can make cool stuff without the best of tool. Good luck with future projects!
That is awesome thank you for the video I just got an order to make one but won't sure how. How would I mount this kind of mantle if the fire place already has brick around it?
You could still use a French cleat an lag some bolts in there for the piece that goes on the brick
Thank you ,i hope to have one made soon and it will be exactly like that love it ,,,cheers you have a new subby,,,
Thanks! Good luck making yours!
Nice job! I’m tempted to try something like this. How did you keep the pine from warping or twisting in any way before assembly? I see wood workers build such nice stuff but trying to find wood that stays flat seems impossible for me by the time I’m building with it.
Paul Synek you should! Not too expensive and a fun afternoon project (besides the staining part). I went to a local lumber yard and looked at several boards. Picked the straightest I could find. Built it within a few days of buying the wood so I didn't have any issues with warping.
Pine is horrible to use
Thank you much for this video. I’m a girlie girl with tools. My hubs and I bought a fixer and my skills are carpentry, painting and decorating. Hubs does everything else. Wanted to make a faux barn wood mantle to slide over the ugly existing mantle that the former owners mounted to the stone forever. Your video was just what I needed to show me how to do it. Thanks a bunch. 👍🏻👍🏻
Glad it helped!
Wow 🙌🏽🙌🏽🙌🏽🙌🏽🙌🏽💯💯💯💯
Great video! Why did you mitre the short ends with a mitre saw rather than the table saw? Could you have used a table saw for all the cuts if you wanted?
It was just easier to cut the shirt end of a long board like that. I don't have a good track for my table saw besides the little one it came with. It's kinda hard to keep long boards straight when cutting the shirt side on the table saw. But you can absolutely use a table saw for all the cuts
Bro this is FIRE 🔥! But definitely will cost a kidney to make in 2022 😂
😂 you're not lying! Hope things stop going crazy at some point...
I completed my mantel and it came out great! Thanks for the tips! Just one question though. I noticed if I don't turn the fan on for the gas fireplace the bottom of the mantel gets up to 200 degrees. I don't think that's good. Any suggestions? Heatshield underneath?
200 degrees? That's pretty dang hot man... theres certain code requirements for mantel size and how close it is to the fireplace opening, idk if you looked at that or not, but it may be too close? Regardless, that doesn't seem right that it would get that hot. I'd never use it without the fan if that helps
This was under $40 5 years ago. Now I just spent 135 on the lumber alone. Inflation is crazy
Great tutorial! I will be applying this method to my new fireplace. One question, is it necessary to make a 45 degree cut on the side that is going along the wall? It looks like the top board, where half of the french cleat is attached, was cut at a 45 degree angle. Does that make it slightly more difficult to squarely attach the cleat? You can see it at 7:05 of the video as you slide the box forward to get a better angle to nail it. I am just curious, as I am a beginner and the more cuts I have to make, the greater chance I mess something up!
Ha good eye... no that edge should not have been cut. That was a mistake. I got to cutting things and apparently couldn't stop lol! Good luck with making yours!
@@LifeofBliss I am glad this question was asked because I too was confused. I had to rewind so many times to see when that piece was put in and to find an explanation for it. I did not find and was confused until now. Other than that, great video. Thank you.
How did you make the bracket I see it was made of wood do you have a video on that an im trying to do something similar but onto a already stone walled fireplace
Check out the video in the build of the mantel, it has the process of making the French cleat
He said “random objects to beat the wood with” and I felt that 😂
🔨🔧🪃⛓🪛🔩😳
I can’t seem to figure out the miter, say my board is 7” and that’s the width I want it at, set the saw to 45, do I set the fence to 6 1/2?
Nice job man, turned out good!
Appreciate it sir
2:34 nice
Thanks for the the tip , would you share what type of rock you use? Thanks
Sure, its cliffstone from El Durado Stone. Here's a video I did on the install process
czcams.com/video/BOzPUSn2TnE/video.html
Great job!! What’s your clearance from the very top of the fireplace to the mantel?
Thank you! It's roughly 10 inches above the fireplace. The top of the mantel sits about 64 inches off the floor as well
What direction should the grain be going on the end caps?
If you add the stone wall afterwards how would you be able to take the mantel off if you wanted to? Wouldn’t the stone block the clearance above?
TREBLIG yes is does not allow for the mantel to be removed. It made it very easy to adjust side to side, then I actually angled some screws into the wall to hold it in place before doing the stone. I have to plans on removing it, the French cleat is just a very easy mounting solution. I made a very similar mantel for a family member out of maple wood. They used the French cleat on a flat wall and are able to remove it if need be. Has worked very well for them. I actually have the fireplace finished in another video, check out my channel page to view it. Have a good one!
This is a great info! Can you do all those cuts with a circular saw as well? I'm asking for either a miter or circular saw for Christmas... but miter saws are so much pricier. Thanks for the response!
You could, it'd be harder to be precise, but it could be done
Great vid. Do you have an update photo with the rock all completed?
Here ya go! czcams.com/video/9uTAvEkQOjM/video.html
I wouldn't beat your wood with just anything.
Queen Elizabeth II I see what you did there...
2:34 Random objects to beat the wood with 😂😂😂
Very nice, I might use your ideas for making a mantle shelf. I spied a
Victory motorcycle sign in your garage and a Victory shirt. What Victory bike do you ride? I rode a Kingpin for 8 years, something different now.
I have a 14 cross country that I've done some mods to, and used to have a 13 Jackpot as well. That jackpot was damn fun, but really only needed 1 bike so it was the one to go. I have a few videos early on the channel where I show them. Thought I was going to be a motovlogger 🤣 you can see how far I got with that...
Can you rent the tools? My problem is that I dont have any of the saws
That French clear is genius idea! Wish I had miter and table saw to make a mantel like this!
could you please tell me the width and height of this fireplace mantel
This looks great! Are those just pine boards from Lowes or HD?
Thanks, yep just some nicer straight pine boards. I got these at a local lumber yard cause I was in the area, but I'll be doing more with pine from Menards
Very good work! I'm a newbie subscriber
Thank you! Hopefully the videos will help you out with some projects!
The French cleat on the mantle itself..is that attached directly to the top edge of mantle?..in video it looks like there is filler piece..any help would be appreciated
It attaches directly to the mantel top. I think I accidentally cut a 45 degree andle on the top piece that sits against the wall, which wasn't needed. I just added another small piece to fill in they 45 degree cutout is all
So did you screw in the cleat to the mantle using 2.5” screws? then when you actually set the mantle on the wall, screw in another set of 4” screws into the top of the mantle going into both cleats to keep in place?
Thank you in advance, your mantle looks great!
Yea I decided to screw it into the wall to stabilize it more.
Looks awesome! Any reason you would or wouldn't use conditioner prior to staining?
Thanks. Not using it brought out the grain colors a little more I thought. Some have said it looks bad/splotchy with no conditioner. Up to you though
@@LifeofBliss cool - I personally like the coloring, thanks for the response
What is a tack,? What kind of glue? What took so thou use to screw yt?together
Just an 18 gauge nail gun is what I used to "tack" them in place. Tite bind II glue.
I have a square gas fireplace with tile around it. I would like to know if I can make it rectangular that way I have more space avobe for my TV and maybe add a beam or a small mantle? I will also take tile down and update it. House was built in 2005. Will this be too expensive to change opening shape of fireplace?
By the way my gas fireplace Loo's identical to urs.
If you're talking about the material around the fireplace on the wall (tile, trim, stone) you can make that whatever dimension you want. Only thing that is consistent is the fireplace opening. You may have to cut sheetrock and replace with concrete board, but you can go with a wider area if you want
Do you have a link to any social networking pages I can share mine? Love to get your impression
Hey Matt, my Instagram is @life_of_bliss or email me at lifeofblisskb@gmail.com. I'd like to see it!
What wood stain color is this?
How much weight can that frech cleat hold? Great video
Not sure exactly, but I know they are a very sturdy mounting method. There are metal French cleats you can purchase at big box stores that have stated weight limits, you can get an idea based on length how much they can hold.
Is there anyway to have this open in the front so I could pit my game consol in there??
Sure, just build an open shelf with no front 👍
Awesome 👏 Did you use water based or oil stain? Also do you prefer one over the other?
I like oil based stains. For top coats, the minwax water based poly is nice though. I like to spray my top coats now
Hi what type of wood did you use? That looks like pine to me
Yep just pine wood