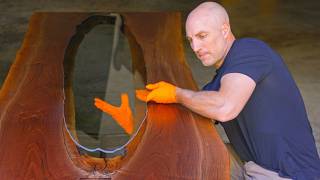
A new way to curve wood

Vložit
- čas přidán 21. 06. 2024
- Want to add a new dimension to your builds? 3 ways to make curves from beginner to pro.
Jesus' original video - • Make JAW DROPPING Floa...
Buy his shelves - www.etsy.com/shop/JARMade?ref...
🔴Affiliate Links
Scrolling Blade - geni.us/CsM5pwx
Drill Spindle Sander - geni.us/KXo0lB
Small Spindle Sander - geni.us/0JwQRAy
Carpet Tape - geni.us/Wv1vQIq
Flush Trim Bit - geni.us/A0EAB
Dewalt Router - geni.us/HE2TBdr
¼ Spiral Upcut Bit - geni.us/XTPO
Tapered Bit - geni.us/rA1SI
🔴Support LSWW
Merchandise: www.lincolnstwoodworks.com/st...
Stickers: www.lincolnstwoodworks.com/st...
Plans: www.lincolnstwoodworks.com/st...
Subscribe: / @lincolnstww
🔴Follow us on Instagram: / lincolnst.woodworks


Top Tip - @9:35 Clamp the speed square the other way around, so the point is *towards* you. The overhang will help you align the router before it engages with the wood.
Yeah you either get more room up front or when exiting. I like it exiting personally, less seems to go wrong
My father was a Pattern Maker. He made patterns out of wood which would be used to make casts for the final metal/iron etc piece to be made. Most of the pieces he made were gears for large machines and pieces for train engines.
Eventually his entire career was made obsolete by the late 70’s. Unfortunately none our family thought that he could use his amazing woodworking skills to create pieces of art.
The gears he made were beautifully stained and laquered and perfectly round in accordance to specifications. His skill was amazing. He died almost 25 years ago and I miss him every day.
An odd side tangent, but that small pizza table isn't to prevent the pizza from moving perse, it is to prevent the lid from slumping into the cheesy. When you stick a hot pizza in a cardboard box, the steam makes the cardboard flimsy, and that allows it to sag onto the top of your pizza. Therefore, Carmela Vitale invented the plastic table, actually known as a pizza saver. to prevent this from happening while working for Domino's.
Yeah because it's cheaper to chunk a piece of plastic at it rather than using higher quality cardboard boxes.
You know that most of the rest of the world I've seen don't have it at all. They either don't have pizzas quite so large, or thicker cardboard. The table is very american.
@SquintyGears it actually is cheaper, I take it you don't know much about economics. And you're damn right it's American, you're welcome
@@larshoneytoast722 I literally said it's cheaper. everything I said was completely literal. so yeah I am damn right...
I had to go reread myself, but no I didn't put even a hint of sarcasm.
I don't know what mindspace you where in but... it's alright dude, just straight facts here. nothing to stress about.
@SquintyGears ok then the rest of your comment was even more pointless lol and you're still welcome
@@SquintyGears We have them in New Zealand.
3:00 if you take that strip of wood & cut a small notch/hole in the center of each end. Thread a string into those notches/holes you can tension the string to the curve you want. AKA a bow ruler or drawing bow.
To me, this is one of your finest videos. I like learning techniques I can use. Your teaching approach is engaging and entertaining without being over the top. It takes effort for work like this to come across effortlessly and I appreciate what you do.
This is BY FAR the most straight forward, no nonsense woodworking channel i have found to date. And yes it is funny as well.
Another "gotcha" for new woodworkers (and probably why they gripe about accuracy on their jigsaw) is to know to turn off the orbital feature. It's great if you are on a job site notching 2x4s quickly and don't care about getting a clean and splinter-free cut but terrible if you are trying to sneak up on a curve you marked out.
To help out the spiral router bit, you could take a partial pass with the table saw first, only going about a third to half depth. Should remove a lot of the stress on the bit. Would take some trial and error though to figure out how deep to cut
That would work, I think, but the hassle of having to align on each slot again with the router bit seems like it would be slow and aggravating. I was going to suggest to John that instead of using the fixed base on the router, he use the plunge base, and it has the "rotating steps" to do several partial passes and therefore relieve the stress on the router bit. That's what I would have done, anyway.
@@wackojacko1997 I agree with it being a lot of work to do, but if it saves the bit, probably worth it. Whether you’re using the table saw or plunge router, you’d need a very reliable jig to ensure you’re lining up each cut repeatedly
what wacko jacko said. You have essentially no margin for error if make relief cuts with the table saw. Asking for a disaster
@@wackojacko1997 thats definitely the way to do it. A lot of people don't have a plunge base so I always like to show the most basic way if possible.
Pine wood isn't boring😂
Pine is fine.
Of course it isn’t. That’s what a drill press is for. 😂
@@HarisWoodshop❤❤
I love that shelf and you explain the process well for this novice who pretends to be a pro! 😂 I always enjoy your videos!
Glad you like them!
Great video Jon definitely going to give the last one a try. Thanks for sharing.
Thank you for teaching us these skills without the expensive tools! You obviously know who your audience is!!
I've watched quite a lot of your videos, now, that one made me subscribe to your channel. I like your style, and the information is always a good thing.
I dont have any woodworking tools (yet) but watching your videos has always been entertaining, thank you. I hope in the future I can put some of these techniques to use.
Thank you very much!
Amazing result with the last one.
really enjoy the videos and the learning of new ideas - the many laughs doesn't hurt either - Keep up the great work!!
Jon, I'm a Jewish woodworker too and I loved your reference. (So is Tamara at 3x3 Custom and I gotta believe so is Jonathan Katz-Moses with a name like that). I hope you're making a living at this! How about another Millennial vs. Boomer video with your neighbor? -- those were so much fun to watch! Keep up the great work. P.S. I bought one of those shirts you're wearing and I love it.
“Fellow Jews know what’s up there” 😂 YUP!
Fantastic, I use those pizza savers pointy side up to support things Ive oiled or varnished etc. They leave only the tiniest imperfections, move em over a bit for second coat....done...
Just the best tightest accurate videos, and no need to go " oh...if I buy a $100000 Festool thingy Ill be as good as this guy ( not) - Bruce J. - NZ
Thanks Bruce!
This is probably the best technique for bending I've ever seen. Thanks for the video!!!
I think that shelf at the end you made would be a great below a wall hung TV console station. Of course, dimensions being the appropriate size to mount to a wall to hold something like a game console, some remotes, etc.
I liked how you added Baymax to the shelf. I am satisfied with my care.
Where did you dee Baymax? (Lol). I have him in my wood shop as well 😂
@@christopherchapman8893 The inlay at the end looks like Baymax's eyes.
Love all of your videos and absolutely love slab stitcher. Great family and great products!
Great video. This is very smart indeed. I have some ideas in mind for shaped wood, and I will keep this in mind for certain. Scott from Japan
I always wanted to steam bend. I love the idea not to build a steam box. Will be trying that for sure also the router bit is a crazy good idea.
Thanks! Great video and looking forward to using that bending technique.
Love your ability to laugh at yourself! 👏 Keep up the great work!
Very interesting and helpful. Thanks.
I always love listening to your videos. Great tips and inspirations
Great video, I will try this one day, after I get through the other 20+ projects on my honey-do list.
When using the router for a circle, I like to make the several depth passes over-sized by 1/4 of the router diameter. Then do a full depth pass at the correct diameter, removing the small amount of material cleans up the smoother edge without needing to sand. The final pass will remove any router bit score line left by the shallow passes.
I wasn't getting top energy, colour me a surprised rainbow. Great tips in this video though 😉
Well played
When cutting a circle, after completing each pass, I like to return in the opposite direction. It keeps the cord from twisting up on itself. Like yours did🙂
Love that baiting.... Thanks for the call out during Pride month!
"If I were a smart man...' I see what you did there ;)
Great stuff as always Jon.. Keep it up!
Thanks for this video. It turned out very well.
This was a great video and u did great again
Hilarious! Great job on this video. Hope vacation was nice!
Thanks for another helpful video, LSW! I always enjoy the self-deprecating humor. :-)
I wonder if a slight tilt on the table saw might get the same results as that specialty router bit. It would require 2 passes, but with a sled it would be easy to just flip the board around and turn one angled cut into a V-groove. Might be worth a try. Either way, keep up the goodwoodwork!
Thank you for the superb content and ever-helpful tips couched in wry humor. It’s a delight hearing your thought process and getting ideas for process unencumbered by the limitations of a small (or in my case, entirely portable/storable) shop. I doubt I will ever own a jointer or giant band saw but I certainly want to make good things. That portable spindle sander (sand crawler?) isn’t a bad idea! #stayjustproudoftheline
Thank you kindly!
Amazing skills, and awesome job.
Really, really helpful tips. Thank you.
Great tips plus a few Dad jokes always makes for good content thanks for sharing
Not contradicting anything among the recommendations, but if you’re just starting out, note you can get a decent WEN oscillating spindle sander for less than a hundred bucks on sale. (The few-hundred dollar models mentioned in the vid are obviously bigger and more robust and the drill attachment is handy to have regardless.) You can also easily inset the WEN into a bench. Izzy has a great vid on it from a few years back.
Love this video as I do all your videos. Thanks for all the knowledge share!
Nicely done.
Good tips, thanks!
Love your channel and videos and I understand the challenge with getting new content ideas. Your channel is one of the more creative ones. Lately tho I see a trend, for a whole month I see everyone is bending wood, next month everyone is building a workbench, next month everyone is doing some experiment…
Thanks, I think it’s mostly confirmation bias. I shot this over a month ago. And the next 5 videos are either in the works/already planned
Have to say, I look forward to your videos, keep being you!
Thanks for sharing
Love the human touch - we all make mistakes - meh. Keep moving forward. Beautiful curves by the way! I wonder if that curve technique would be strong enough to be used as a kitchen cabinet bottom, or even cabinet doors, or both. 🖖
You work well with your curved wood. :)
If you’re planning on doing a lot of wood bending, then a jig that the router slides in to make the kerf cuts would go a long way in preventing it from wandering.
Kat-Moses tools has a trim router table that includes the 3x3 Custom trim router multi-jig set for about $200 total. Gives you an edge guide, circle cutting, and many other tricks all in one, plus a router plate that also acts as the table's router plate so switching between table and hand routing is easy and fast.
The trim router table is easy to build yourself from scrap wood. Plus plans are all over CZcams if you need help. Tamar also has cheap if not free plans to build her jig. John is trying to help save money, so why waste $200 by giving it to km!
Thanks for the video. I’ve been thinking about trying some curved wood applications but just haven’t made that leap yet. Did you sand the inside curve of that shelf with the same spindle sander set up as you used earlier in the video? Also, if the curve was needed to create a 90 degree angle, say for a chair arm rest that also serves as the chair leg, would the depth of the cut using the tapering bit be shallower?
Great video
actually saw the cnc router bit trick on Josh Wright's channel. Then came across Jose's videos. I'll be making a monitor stand (wide enough to slide keyboard under).
I love it.... great video
Well, I just learned I’ve been driving wrong. Thanks Jon!
that last one is gold for me personally
FWIW, the process you talk about, using the screws/nails to put in "posts", then using a thin strip of wood (or metal can do it, too, if it's flexible enough) is called "making a spline curve". If you look up *spline curve* on _Wikipedia,_ that'll give you any more explanation you may want, but just knowing what the term is can be useful -- for example, if you wanted to search on how to make a more complex spline curve, you now know the search term to use. ;-)
Interesting curve technique. Surprised no one thought of it before your compatriot. Well, likely someone did, but didn't share it sufficiently. ;-)
Alex Holmes. This channel. Terrific
I didn’t see the online kerf cutting calculator you mentioned in the description. Can you post it?
Always enjoy your videos, thanks for the content that you produce. Sorry to be a buzz kill, but I think that the kerf cuts are telegraphing through the surface of the material. It seems to be more noticeable after the finish was applied. I wonder if experimenting with shallower kerfs would eliminate this issue, while still being able to bend to the same radius, possibly with steaming longer, as per the aforementioned Bourbon Moth video?
Excellent little Pride month shout out :) Great video overall, this one's getting bookmarked.
Thanks!
Thank you very much!
Awesome stuff!
One question, any way to accomplish this without the staggered flat sections being apparent in the curve? Or can that only be done with steam bent laminations?
I was going to ask the same thing. It negates a an old school method by not actually being a perfect curve. That curve cannot be sanded to be perfect. The material will become too thin.
This might be a case of a little knowledge being a dangerous thing on my part, but I am concerned about that sanding attachment on the drill. I know drill press bearings aren't designed to take forces in that direction, and over time, you'll destroy the machine or at least need to replace the bearings. I would expect a hand drill to have similar issues.
Interesting point there. I may have lucked out. I have used my drill press to turn small handles/pulls for drawers and lids. I just bought round dowel stock in brass, copper, even titanium, and I would use files, hack saw blades and Micro Mesh to finish them off. They turned out great, but now I'm wondering if I did more harm than good to my press....?
Those plastic trays in pizza boxes are so that the lid won’t smush onto the pizza so you can stack boxes
“A stool for your stool” 😂😂😂
I’m way too old to be stuck in the 7th grade!!
Great video, thanks for sharing!
"JB Smoove". Nice!
So I’m wanting to kerf bend hickory (not quite as bent as you bent your walnut but definitely curved) which is perhaps denser than maple so bummer about the cnc bit but I’d rather hear it from you than learn the hard way! I’ll have to accept the ugly kerfs plus I’ll have a top on my curves so it should hide the worst of it. There’s a gorgeous mid mod shelf sold on Pinterest that has hidden pegs to hold towels (if you turned your bent walnut where the grain shows long ways is closer to what I’m thinking) only this inspiration doesn’t have a top to set things on so mine will be slightly different but one thing that makes this inspiration so pretty are the curved sides that die into the back where it’s hung so I’ll make table saw kerf bending work I just hope the hickory will comply🤞🏼. Random, I don’t know if anyone else has dealt with this but YT unsubscribed me from nearly all my woodworking channels I love! I wondered why there weren’t any new updates but my subscription page is flooded with left wing channels I don’t watch, won’t watch and it pisses me off YT would do that
I can't believe I've never heard of those jigsaw blades before.
5 64ths?
I'm shocked that Americans ever finish high school math with that insane system.
My wife would like to hear more about making my wood less boring.
How to tell if the curve you drew is "fair"? You get down and look along the line like it was a road. Any imperfections will be immediately apparent. (Taught to me by lofting draughtsman at GE.)
"How was the vacation?"
***
"Glad to hear it."
“a stool for your stools” 😂
Did you have a tip for good caster wheels? I remember some woodworker promoting some in some video, I think it was you.
Where can I find one if those router base plates that extends more over the workpiece?
Hi Jon. I was wondering how you deal with wood moisture. We are both in South Carolina. I’m starting to make projects out of dimensional lumber mostly from a big box. There isn’t much else around me . Any thoughts on moisture in wood in our high humidity area?
Hi, a different John here dropping in to answer your question! I used to live about 30 minutes from where Jon lives, and now I'm just outside of Houston, so I know a thing or two about woodworking in humid climates!
My suggestion is to buy the lumber a couple weeks before you plan to build your project. Stack the lumber in the shop with little strips of wood between each board to allow air movement on all sides. This is called "stickering" the lumber. Let it sit in your shop for a week or two to adjust to the new climate before you start working on the project.
When you can, get to a hardwood lumber dealer to get lumber that has been properly dried and much easier and enjoyable to work with, there are several in that area! Hope that helps!
4:49 happy pride everybody hahahahaha
Medium Density Fibreboard - 3/4 x 49 x 97 Model $67 .. Langley BC HomeDepo.. solid wood cost less to use as a template
Those things on pizzas aren't for stop them from moving around it's to prevent the lid from pressing down on the pizza if you stack them since the heat comming of it will soften the paper in the lid when many warm pizzas in boxes are stacked together.
7:40 You should probably switch to metric, it's a superiour system overall ;P
3:50 Put the tape across your T-Shirt first and that will knock down the adhesive strength. Talc or cornstarch if you're snooty, but cotton lint works fine for me.
Always used the same trick. Your t-shirt is always on hand. 👍
That bending technique is still used to make braces on acoustic guitars.
6:44 What about turning the legs upside down and cut the top part in an 5-10 degree angle? Seems better to me!
How did you manage to release a wood bending video the same day as Bourbon Moth?
5/64"... It just amazes me how inferior, I mean imperial users cope with this. You gain more respect from me every time I see you using this system and don't mess up. Seriously : respect 👌🏻
7:43 "Save it metric people" when 5/64" is almost exactly 2mm (too close to matter) is hilarious!
127/640 of a centimetre to be exact.
Oh metric people, does he mean the rest of the civilised world? Heh heh.
@@demonicsquid7217 😂
Oh...I thought this might have shown wood that can be easily bent & twisted after exposure to 150 psi NH3 gas at 70°F in a chamber; 30 min exposure per 0.25" thickness; not to over expose lest the pore structure begins to collapse, similar to steam treatment.
It looks okay
the little table in the pizza is to stop it from getting squished, not to stop it from moving.
Bourbon moth just posted a video about bending wood today too lol
Yes, but did it catch on fire? 😅
So is this wood bending video the precursor to finally making a hockey stick?
The reveal at 6:25 🤣
@ 8:43 🤣🤣🤣
Had to do a double take on this one!
2:48 the tool is best used to template something that is already curved. Not to establish a new curve.
no the pros are still doing it right, the problem with the kerf bend as you see at the end is that it doesn't give you a smooth bend you end up with facets, to make that bend I would do it 1/16 veneer glued around a form, you could also steam bend it but it would be tricky to get the compression strap tight and around it,.
“A lot of people make the mistake of staring at the blade while cutting….” Actually, that is a mistake a lot do in painting as well. When you stare at your hand/blade the normal flow function followed by your eyes, will make you slightly verve around, never straight.
I was a master painter, and always taught my apprentice to look ahead, or to the line where you want the paint to go, never at their hand or brush. Crisp lines adjacent to ceilings, trim, or walls, and of course, the second cut will add and fix if it is light. Except of course when you are doing detailed work.
Same principle in cutting, except if you are using a stationary mechanical round bladed saw, which is common sense. Just remember, to avoid mistakes or worse, your hands will follow your eyes.
Thank you for this tip. I struggle cutting a straight line. I struggle painting and drawing a straight line too. I will definitely use this info.