This is SLA type 3D printer not Laser Projected ones... Great project !!!!!!!!!!!!!!!! I keep my finger cross. For png you need to see work of person "that project" on You tube. I hope i help U ♥
As mentioned by Marcin Witkowski above, this is an SLA printer, not a DLP printer. DLP uses a micro mirror array to focus and refract the light source, much like in video projection. Aside from that, thank you very much for providing a detailed tutorial for this build! And please include an air filter for VOCs in your build chassis for your health and ours - don't buy into the hype of some of the resins that refuse or redact their SDS!
I like the fact you are building your own tools. I have mechanic for 30 years and most of the specialty tools that are necessary for certain jobs and the tool is $500-2500 that you won’t use that much. After seeing a picture of the tool and the knowledge of what it exactly does. I will use welder and other stuff to create my tools. My favorite was a top dead center holder and it was just a metal cylinder of a specific diameter. Was $199 made it in under 10 minutes out of scrap metal.
@@SeanHodgins just watched the video and is basically the same concept, si awesome. Maybe you will make a second version with a better stepper motor :) I've seen a project called lite3D that is also based on Arduino. Now that I've started I don't see this project that difficult anymore and I think I can get decent results and even pass to a bigger screen. I would like to have some monochromatic LCDs compatible with Arduino but I couldn't find one...Keep up your good work and thanks for your comments :)
You might want to keep the backlight layer that is closest to the screen, it is a fresnel lens (they "align" light), wich will probably lead to reducing needed UV exposure time.
It has long since been a pet peeve of mine ... when people recommend IrfanView. I have nothing against IrfanView, but I prefer XnView, yet nobody ever seems to mention it. XnView has a great 'batch processing' feature built in. (The same guy also offers his dedicated 'XnConvert' program.) However, if you want to include 'image conversion' functionality in your applications (what Electronoobs wants to do) ... ImageMagick might be the more professional approach. It is basically a library with a ton of language interfaces. (A bit of a learning curve though.) All of these are free and 'cross platform' solutions.
Accouple of things i would change, 1: I would make it easier to drive the displays by using AV Screens (yes there lower resolution but there also alot cheaper) 2: i would stack 2 of the transparent LCDs on top of each other for better UV blockage (Especially for tiny display like that one there is some noticeable light leakage) 3: arduino is good but i feel like it could benefit from the more accurate timers on a RPI Pico Instead plus there more in stock 4:S and finally id add a slight diffuser on the UV LEDs as ehile it would work some areas would cure faster than others leaving some oddly placed layers
1. For mass image conversion, use IrfanView, it has the best batch image converter, and I've been using it for over a decade. (I'm a software developer, but why waste time re-coding the wheel.) 2. I'm usually the person yelling at the screen saying, "you don't need an RPi for this, use an Arduino", but I think in this case, the project could be greatly simplified with an RPi ZeroW; you can get one of the off the shelves mini HDMI displays (like all the hand held emulators are using), it has plenty of storage space, and you can ssh your files to the device via Wi-Fi (potentially slicing on the device). My $0.02.
Pi can drive a lot of different kinds of displays. If you don't mind sacrificing most GPIO, it will drive a 565 RGB screen as well, see DPI display interface. You can get a 3.5" 640x480 screen with 0.1mm pixel size, as opposed to 0.22mm pixel size of the 1.8" LCD in this project, or the 0.15mm size of the 2.2" 320x240 LCD that also works with Arduino. Unfortunately they're not quite as cheap. There's a non open source project NanoDLP for the purpose. I might try to code up something else, it seems the GPU is useful for the slicing, if using the Pi! You can use the stencil buffer to find the intersection between a slicing plane and a model. There's no reason to preslice on the device at all, you might as well just render the layers as-needed during printing.
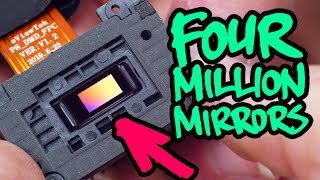
okay love the project however. This is and LCD printer, unless you plan on using a projector. digital light processing (DLP) uses a digital light projector to cure the resin. It flashes images of whole layers onto the bottom of the vat. Light is selectively directed using a digital micromirror device (DMD), which is a component consisting of hundreds of thousands of tiny mirrors.
Very cool project! Have you considered using an ESP32 to drive the LCD instead? The time to a full screen BMP is much faster than a Uno. And you can also display JPG using the TFT_eSPI library. The ESP32 dev boards should have sufficient GPIOs to drive all the accessories.
I've seen that quite a few people have suggested image converters, but let's throw another one in the suggestions: FastStone Photo Resizer. Does batch convert easily, and you don't need to resize the pictures anyway, it does conversions between formats only if you want.
Excellent video! I'd like to build a very small, compact resin printer since I travel every week for work. Something small enough to keep in my luggage comfortably.... but able to print a volume of perhaps 2" x 2" x 2" (50mm x 50mm x 50mm for you metric ppl, roughly). Being able to burn time in hotel rooms printing minis would be a joy.
Hi, I noticed you have irfanview installed (by icons). So, the irfanview is the easiest way to batch convert all pictures. In the File menu is "Batch conversion/rename". That's exactly what you're looking for.
@electronoobs Yes my friend, that's what "batch" is referring to. When you "batch" convert, you are converting multiple files. I have used Photoshop to batch convert & resize a folder full of images
@@ELECTRONOOBS Yes, sure. Just select a folder, click "Add all", choose Output format, Output directory and click "Start Batch". In Your case dont use advanced options (checkbox under Output format), this is for resizing, croping, and many other adjustments.
Thank you for this Video, I want to ask you a question what if I want to make a larger 3d printer with LCD (5.5 in) can this schematic work with this LCD or there will be differences? if there are differences can you tell me what are they? Thanks.
one question what makes this a DLP when it doesn't even have DLP mirror assembly but instead used lcd mask? however i look at this project it is not dlp but sla-lcd based printer project 2nd question why you don't use batch conversion for your images using irfan view you already using, you literally need to click 5 times to convert all the png's to bmp's or any other format
To convert all your png images to bmp, just use the batch conversion built in to irfanview (from the thumbnails of your image files, it appears you already have it installed).
Paint Shop Pro has a batch convert function, you can probably even find a free copy of the old share ware version. I'm still running version 6 from 1999, and I was first using it on windows 3.1, got it from a CD that came with a computer mag and have been using it every since. anyways withit you can select a source folder and destination or set to same as source and select the output format. I used to use it to convert BMP files from CDs to JPG.
Re: BMP conversion - there are many programs that can batch convert files for you. I usually use photoshop. I think ACDSee can do it, but there are many others. It's a pretty common need for people who work with graphics a lot.
Have the 3w Led's,lens, the 15 inch monitor, nema motors, leadscrews, arduino. Just need to 3d design some pieces, make the led matrix (scale dc power) and assembly to try! Please, make the design parametric!
Techsmith Snagit can be used to batch image convert all your images to bmp in one pass. Just select all the images and use the batch image converter, leave them all at 100% scale and at the save step choose bmp and it will do the rest.
I know I'm late here (and that your request for a better way to convert the images to BMP might be a ploy to get comments), but you can use ImageMagick via the terminal. Simply using mogrify -format bmp -path ./converted *.png would convert all the PNG files in the current directory, and write the BMPs to the directory "converted" (must already exist). If you want to overwrite the files, omit the path argument.
There are many batch image converters you can use. I use Faststone photo resizer, you can batch import and set the software just to change the image format.
You can use java (or any language that works with png and BMP images) to convert to BMP (Load image -> paint to canvas -> save as BMP). {I have a java program, if you want}. Or just create an action of "save as BMP" in Photoshop, then file -> automate -> batch -> select folder and action.
A few questions 1: does any of this require me to use PCB way 2: if so can you link the file or what ever I need to submit to them. 3: what component is for the lights (the orangeish board) 4: when will you release part 2? 5: i will attempt to make it so please link everything i need and need to know thank you
Probably solved by now, but i use a program called Irfanview, for viewing pictures. it also has a batch convert feature. and you can tell it to convert all pictures in a folder and save to a different folder as .bmp
To convert the PNG to BMP, you could use a shell script that loops through the files and the ImageMagick command "convert". It would look something like this on Linux: for f in *.png; do convert $f -type Bilevel "${f%.*}.bmp"; done
That is pretty awesome. I've been thinking of building a PCB maker that uses UV sensitive boards to make DIY PCB's. The only thing that has stopped me is LCD size and low resolution of the screen.
I´m currently on a project to build a printer with a 40" TV. Sometimes you´ll find one with broken backlight on eBay. Even a new 4K TV is really cheap as you don´t have to buy the expensive branded products. My Problem is to get a correct lightsource. As the PCB from the display is folded behind the backlight and divided into a horizontally and vertically part, connectet with an FFC. When i remove the foil of the original backlight i have the PCB directly in front of the light source. Another option for you is maybe to use a laptop display with a driver from ebay. :)
The slicer code is not in PHP, it's Javascript, I had a look into it, saving directly as BMP is not that easy, I searched a bit and found a function that someone wrote that can convert PNG to BMP before exporting, I tried it out and it works but it's really slow, every slice takes about a second to convert, also the exported image is 32-bit BMP not 24-bit, I'm not sure if the LCD library will work with it normally, If you wanna give it a try let me know.


Arduino Course (Spanish): bit.ly/3ldW6kO
Follow me on FACEBOOK for more: facebook.com/Electronoobs
Help me on Patreon: www.patreon.com/ELECTRONOOBS
Please make constant current led driver ( PT4115 )
This is SLA type 3D printer not Laser Projected ones...
Great project !!!!!!!!!!!!!!!!
I keep my finger cross.
For png you need to see work of person "that project" on You tube.
I hope i help U
♥
You can use IrfanWiev to do a Batch format change.
As mentioned by Marcin Witkowski above, this is an SLA printer, not a DLP printer. DLP uses a micro mirror array to focus and refract the light source, much like in video projection. Aside from that, thank you very much for providing a detailed tutorial for this build! And please include an air filter for VOCs in your build chassis for your health and ours - don't buy into the hype of some of the resins that refuse or redact their SDS!
I like the fact you are building your own tools. I have mechanic for 30 years and most of the specialty tools that are necessary for certain jobs and the tool is $500-2500 that you won’t use that much. After seeing a picture of the tool and the knowledge of what it exactly does. I will use welder and other stuff to create my tools. My favorite was a top dead center holder and it was just a metal cylinder of a specific diameter. Was $199 made it in under 10 minutes out of scrap metal.
Can't wait for part 2, seriously considering building one. Thanks for all the inspiration!!
Monochrome light filter: Ive heard that it has a longer life span than the rgb version
I've left my project for too long... 🤣 Can't wait to see how yours turns out!
You both are great geniuses. I like your content very much.
Are you working on something similar?
@@ELECTRONOOBS I made the Christmas ornament 3D printer a couple years ago, but I wanted to update it and make it into a more generic tiny printer.
@@SeanHodgins just watched the video and is basically the same concept, si awesome. Maybe you will make a second version with a better stepper motor :) I've seen a project called lite3D that is also based on Arduino. Now that I've started I don't see this project that difficult anymore and I think I can get decent results and even pass to a bigger screen. I would like to have some monochromatic LCDs compatible with Arduino but I couldn't find one...Keep up your good work and thanks for your comments :)
Story of my life 😂
You might want to keep the backlight layer that is closest to the screen, it is a fresnel lens (they "align" light), wich will probably lead to reducing needed UV exposure time.
Yes for sure I'm considering some sort of focus lens or something. Thank you!
Use ImageJ. You can write simple macro to convert folders of images to another format. Just google "imagej png to bmp".
BRB, need to disassemble my 27" monitor. ;)
i cant wait to see next part
perfect, would there be a part two? assembling the mechanism
Try IrfanView. It has a batch converter function. You should be able to batch convert your png files into bmp with it.
It has long since been a pet peeve of mine ... when people recommend IrfanView. I have nothing against IrfanView, but I prefer XnView, yet nobody ever seems to mention it. XnView has a great 'batch processing' feature built in. (The same guy also offers his dedicated 'XnConvert' program.)
However, if you want to include 'image conversion' functionality in your applications (what Electronoobs wants to do) ... ImageMagick might be the more professional approach. It is basically a library with a ton of language interfaces. (A bit of a learning curve though.)
All of these are free and 'cross platform' solutions.
yeah, or FastStone Image Viewer, which is a better viewer overall and also has convenient editing/conversion tools built-in.
FastStone and XnView came to mind for me.
Accouple of things i would change, 1: I would make it easier to drive the displays by using AV Screens (yes there lower resolution but there also alot cheaper) 2: i would stack 2 of the transparent LCDs on top of each other for better UV blockage (Especially for tiny display like that one there is some noticeable light leakage) 3: arduino is good but i feel like it could benefit from the more accurate timers on a RPI Pico Instead plus there more in stock 4:S and finally id add a slight diffuser on the UV LEDs as ehile it would work some areas would cure faster than others leaving some oddly placed layers
Wickedly interesting, even though I dont really like the resin printer type, this video has definitely caught my attention🤔
Awesome !!
I’m ready for project to continue !!! Awesome work I plan on building
1. For mass image conversion, use IrfanView, it has the best batch image converter, and I've been using it for over a decade. (I'm a software developer, but why waste time re-coding the wheel.)
2. I'm usually the person yelling at the screen saying, "you don't need an RPi for this, use an Arduino", but I think in this case, the project could be greatly simplified with an RPi ZeroW; you can get one of the off the shelves mini HDMI displays (like all the hand held emulators are using), it has plenty of storage space, and you can ssh your files to the device via Wi-Fi (potentially slicing on the device). My $0.02.
Pi can drive a lot of different kinds of displays. If you don't mind sacrificing most GPIO, it will drive a 565 RGB screen as well, see DPI display interface. You can get a 3.5" 640x480 screen with 0.1mm pixel size, as opposed to 0.22mm pixel size of the 1.8" LCD in this project, or the 0.15mm size of the 2.2" 320x240 LCD that also works with Arduino. Unfortunately they're not quite as cheap.
There's a non open source project NanoDLP for the purpose. I might try to code up something else, it seems the GPU is useful for the slicing, if using the Pi! You can use the stencil buffer to find the intersection between a slicing plane and a model. There's no reason to preslice on the device at all, you might as well just render the layers as-needed during printing.
Amazing work!! I can see people making armies of these to prints small parts
Bărbați-vă videoclipurile Inspirați-mă foarte mult !!! Continuați și inspirați-ne.
if you install imagemagick you can run "mogrify -format bmp *.png" and it'll do them all. I tested this just now on Windows 10 with 10 pngs.
This is the answer. It'll do all files in the folder and make .bmp copies.
imagemagik.org/script/mogrify.php for all the options.
okay love the project however. This is and LCD printer, unless you plan on using a projector. digital light processing (DLP) uses a digital light projector to cure the resin. It flashes images of whole layers onto the bottom of the vat. Light is selectively directed using a digital micromirror device (DMD), which is a component consisting of hundreds of thousands of tiny mirrors.
Digital Light Processing is just a trademark for a projection technology not a printing technology.
Finally a 3d printer i can afford to build
Versatile, cheap, open source machine. Cant wait for part two
Very cool project! Have you considered using an ESP32 to drive the LCD instead? The time to a full screen BMP is much faster than a Uno. And you can also display JPG using the TFT_eSPI library. The ESP32 dev boards should have sufficient GPIOs to drive all the accessories.
This is a great idea
I've seen that quite a few people have suggested image converters, but let's throw another one in the suggestions: FastStone Photo Resizer. Does batch convert easily, and you don't need to resize the pictures anyway, it does conversions between formats only if you want.
Excellent video! I'd like to build a very small, compact resin printer since I travel every week for work. Something small enough to keep in my luggage comfortably.... but able to print a volume of perhaps 2" x 2" x 2" (50mm x 50mm x 50mm for you metric ppl, roughly).
Being able to burn time in hotel rooms printing minis would be a joy.
You can use a python script which you can automate to run as soon as the png is created and saved and then convert all the images into bmp.
Hi, I noticed you have irfanview installed (by icons). So, the irfanview is the easiest way to batch convert all pictures. In the File menu is "Batch conversion/rename". That's exactly what you're looking for.
Oh, thanks. But can I convert all of them at the same time? We are talking about thousands of pictures... One by one would be a lifetime.
@electronoobs Yes my friend, that's what "batch" is referring to.
When you "batch" convert, you are converting multiple files. I have used Photoshop to batch convert & resize a folder full of images
@@ELECTRONOOBS Yes, sure. Just select a folder, click "Add all", choose Output format, Output directory and click "Start Batch". In Your case dont use advanced options (checkbox under Output format), this is for resizing, croping, and many other adjustments.
I met Irfan, cool Bosnian guy.
Amazing
Bro ,i am waiting next project ,this prroject full fadu ( full awesome) take care , you are every project awesome, you
excellent project, cant wait for part two, three and four :)
Awesome project. Waiting for part 2
can you suggest an higher resolution lcd which can handle UV light and easy to disassemble and interface.
I didn't know the mechanism was so simple.
Hi. Amazing project! I can’t find the next part of video. Did you share it?
Thank you for this Video,
I want to ask you a question what if I want to make a larger 3d printer with LCD (5.5 in) can this schematic work with this LCD or there will be differences? if there are differences can you tell me what are they?
Thanks.
one question
what makes this a DLP when it doesn't even have DLP mirror assembly but instead used lcd mask?
however i look at this project it is not dlp but sla-lcd based printer project
2nd question
why you don't use batch conversion for your images using irfan view you already using, you literally need to click 5 times to convert all the png's to bmp's or any other format
To convert all your png images to bmp, just use the batch conversion built in to irfanview (from the thumbnails of your image files, it appears you already have it installed).
Still w8ing for part 2
Although I'll never make it but it should fun to see if it works..... can't wait to see the next part.
Hmm, I don't bleieve this is the DLP method but still really cool
Paint Shop Pro has a batch convert function, you can probably even find a free copy of the old share ware version. I'm still running version 6 from 1999, and I was first using it on windows 3.1, got it from a CD that came with a computer mag and have been using it every since. anyways withit you can select a source folder and destination or set to same as source and select the output format. I used to use it to convert BMP files from CDs to JPG.
Amazingly informative ! Breaks it down so nicely.
When you will make second part of this video ?
I had no idea how a resin printer works. I had the same f idea while my wife was using uv to harden the gel on her nails.
Re: BMP conversion - there are many programs that can batch convert files for you. I usually use photoshop. I think ACDSee can do it, but there are many others. It's a pretty common need for people who work with graphics a lot.
Is it possible to Collage multipal screens together to make one large 3d printer?
Would be cool to make super big parts.
i have an old 7 inch chinese tablet, do you think its posible to use that screen instead?
dlp? i thought they used mirrors?
Great work man! But this is not a DLP printer right? It's more of an LCD
That's super cool idea. Can't wait for next part.
5:49 there online converters and olso app where you can just select all pictures and convert them.
adobe photoshop has a mass image converter. I am sure many other programs have it as well.
why is it called a DLP Resin Printer when its using a LCD screen for creating the mask?
Maybe you can increase the Resolution by using the rgb subpixels?
Have the 3w Led's,lens, the 15 inch monitor, nema motors, leadscrews, arduino.
Just need to 3d design some pieces, make the led matrix (scale dc power) and assembly to try!
Please, make the design parametric!
Techsmith Snagit can be used to batch image convert all your images to bmp in one pass. Just select all the images and use the batch image converter, leave them all at 100% scale and at the save step choose bmp and it will do the rest.
Python Image Library (PIL) is really easy to use and would be a good place to start if you want to convert a bunch of pngs to bmp.
Dang, beat me to it. I posted a link to a thread that has some example code.
I know I'm late here (and that your request for a better way to convert the images to BMP might be a ploy to get comments), but you can use ImageMagick via the terminal. Simply using
mogrify -format bmp -path ./converted *.png
would convert all the PNG files in the current directory, and write the BMPs to the directory "converted" (must already exist). If you want to overwrite the files, omit the path argument.
Great idea i'm excited to see your success.
By the way, I'm setting up the XY control for my column drill table.
Thank you very much for your ideas.
This is a brilliant video. I want to follow along and build my own printer
There are many batch image converters you can use. I use Faststone photo resizer, you can batch import and set the software just to change the image format.
And this project, how is it? I would like to see part two!
You can use java (or any language that works with png and BMP images) to convert to BMP (Load image -> paint to canvas -> save as BMP). {I have a java program, if you want}.
Or just create an action of "save as BMP" in Photoshop, then file -> automate -> batch -> select folder and action.
Maybe use chitbox? And there's a open source msla which runs on Arduino fully,I can send the link .
justo te hice la pregunta xD, no vi que ya lo estabas haciendo, genial!
Awesome im so excited to see how this turns out
A few questions 1: does any of this require me to use PCB way
2: if so can you link the file or what ever I need to submit to them.
3: what component is for the lights (the orangeish board)
4: when will you release part 2?
5: i will attempt to make it so please link everything i need and need to know
thank you
Simply Crazy 🤪 I've subscribed to see the next episode , thank you guys
wtf
That is so creative
Try Irfanview or ImageMagick for batch conversion of images. Cheers!
Can you make an ESP32 FDM 3d printer for next project?
Ok bro. Good luck...
i know it's an old topic but can i used an lcd desktop screen as the main mask for the lcd and used 3 watts comb led as uv souce
Se ve genial y prometedor, pero al notar que vas a usar luz UV para la resina pense: no tienes en mente hacer una insoladora UV para hacer PCBs?
Can you not just change the led of the back lighting with uv led of same physical format? Just my 2 cents.
where is the second part ?
btw, cool video mate
how we can make polarizer lense for projector ?????? they exist before exact transperent lcd in 3lcd projector.
Probably solved by now, but i use a program called Irfanview, for viewing pictures. it also has a batch convert feature. and you can tell it to convert all pictures in a folder and save to a different folder as .bmp
Really cool, as always! Just take care, uv light is a powerful and dangerous radiation, even when it comes from small leds..
super bro, it is a cool project
Why not use the batch converter from ifranview to concert alle images in one turn?
Nice project, i will waiting for the progress, thanks for share
maybe retain the diffusion layer of the screen, if it lets the UV through you will get a more even exposure.
To convert the PNG to BMP, you could use a shell script that loops through the files and the ImageMagick command "convert". It would look something like this on Linux:
for f in *.png; do convert $f -type Bilevel "${f%.*}.bmp"; done
Pls show esc caliberation of arduino nano drone pls
ImageMagick should be able to save/convert BPM files directly from PHP..
The mighty internal Irfanview batch converter should do the job. 😎From the Thumbnail gallery (press T) to the batch converter its much easier.
isn't part 2 out yet?
Why don't you connect the lcd directly into the laptop?
Hi 👋
Can you post the continued videos about this?
This is really cool and i want to build one for myself
What if we use transparent screen for PCB manufacturing ? 🤔
Nice project.
Try to make diy dot metrix printer
Awesome , can't wait for the next part
to convert all photos from PNG to BMP use photoshop and record action then call this action from File-> Automate-> Batch
Super! Thank you very much!
Ubuntu has a bunch of really good command line converters. You could use an esp32 with TJpg_Decoder, with TFT_eSPI to do this.
That is pretty awesome.
I've been thinking of building a PCB maker that uses UV sensitive boards to make DIY PCB's.
The only thing that has stopped me is LCD size and low resolution of the screen.
I´m currently on a project to build a printer with a 40" TV. Sometimes you´ll find one with broken backlight on eBay. Even a new 4K TV is really cheap as you don´t have to buy the expensive branded products. My Problem is to get a correct lightsource. As the PCB from the display is folded behind the backlight and divided into a horizontally and vertically part, connectet with an FFC. When i remove the foil of the original backlight i have the PCB directly in front of the light source. Another option for you is maybe to use a laptop display with a driver from ebay. :)
The slicer code is not in PHP, it's Javascript, I had a look into it, saving directly as BMP is not that easy, I searched a bit and found a function that someone wrote that can convert PNG to BMP before exporting, I tried it out and it works but it's really slow, every slice takes about a second to convert, also the exported image is 32-bit BMP not 24-bit, I'm not sure if the LCD library will work with it normally, If you wanna give it a try let me know.
Pls put a video for air mouse using mpu either wire or wireless
From a bit of looking around seems online file converters are most recommended
Use that diffuser sheets on uv light so that uv light distributed evenly
You are very Hardworking