How to Build a Wooden Gate (Double) That Won't Sag!!

Vložit
- čas přidán 4. 09. 2024
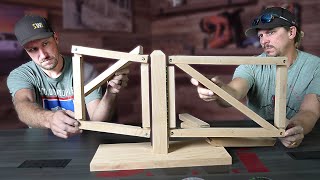
- See how I built my 12 ft wooden gate so that it doesn't sag! Have you wondered how to build a gate that will last? Here's the place to start! Whenever we bought this house both gates were in a state of disrepair. I don't like doing things twice, so making sure that I do it right the first time is worth the extra time and effort. See how the blend of notching, gluing, and screwing the frame can add strength, rigidity, and prove the test of time for you! Thank you for joining me for Rutter Renovations!


Like others I did this and it worked great. All my neighbors thought I was a fence pro lol
Awesome! Way to go!😊👍
Dude ive been puttinf off replacing my termites gate made of 2x3s for years. Termites have it to dangling pieces. This is so much easier than metal. Cant wait to get some kilm dried 2x4s and make a frame and paint or stain it.
Awesome! Best of luck with your project!
nice work!! I am a picky contractor with over 20 years experience hanging gates and fence..
well done !!!! so much bad info on youtube thank god this guy nailed it!!!!
Thanks Bill! Definitely appreciate the positive feedback, especially from someone with your experience!👍😊
Glue and screw...well done!
Thanks!
Hi there, I had to replace a gate and followed your guide exactly. It was easy and in one day, I now have a wonderful functioning double gate. Thank you for posting this and making the instructions clear and easy to follow!
Thanks for the feedback Brendan! Glad it was helpful!
Thank you for the tutorial. Just replaced our sagging, worn out gates. Wish I could send you a picture 🙂
Awesome! Way to go!!
A critical element that you left out is the hinges and handing the gate!!! JEEEZE dude, so important.
I will cover that in my updated video! Thank you for the tip!
Thanks for this video. I had a poorly constructed gate in our back yard that I replaced after watching. Couldn’t be any happier. It is much stronger and much lighter. Thanks again
Thanks for the comment Christopher! I’m glad it’s working great for you too! Way to take on the project!💪
Finally after hours of videos! Yours is to the point and seems easy!! I need to build a fence and I'm so glad I found your video!
Thanks for the positive feedback! I hope your gate and fence turn out great!
Love that gate. Exactly what I need to do in my driveway. Thx greetings from LA
Which LA? Lower Alabama, Louisiana, or Los Angeles?😁
@@rutterrealtygc LA= Los Angeles
La= Louisiana
I'm tackling my almost exact same project tomorrow. Your video is jit (just in time). Thank you for sharing young man.🙏👍😍
Thank you for the comment!
Like the video, gonna be doing this soon myself. Want my smoker and enclosed trailer on the inside of my gate. Cant wait to get it done.
Awesome! Best of luck on your project!!
Loved the gate, gave me what I needed to know to get mine started. Appreciate your time and effort.
Thanks! About to post an updated video this week!
Thanks for the good explanation of how to. i will post a before and after of my project.
Awesome! Best of luck!!
I’m about to do mine, like the way you can’t tell it’s a gate from the street side. Looks good
Thank so much! Best of luck with your project!
Excellent video thanks for guiding me in my own process of making a wide gate
Thanks Dan! I hope it turned out great!!
Hi i m about to do my gate. Is only 10 feet. Wide. Tnks for the advice I dont have a table saw. I can do it with a skillsaw plus chisel i guess Ur advice is great Wish i could put pics and maybe i ll do a video a and upload on my channel ......tnk u. I start and work with real carpenters from N Carolina i think they are the best also from Ohio...tnk u. Miss my dad he was the best carpenter he built our humble home in Guatemala in the 70 s but our best carpenter is Jesus A en be bless nice home
Awesome! Best of luck on your project!
Thanks for your fast reply, going to try this on my sons gate.
I hope it turns out great! Definitely make sure you have good posts in (larger than 4x4).😊👍
Or I’ve seen 2 4x4 posts stacked against each other as well. I just feel like 1 4x4 just isn’t sufficient for this big of a gate.
Really Great! I just lack the tools to do the first cuts into each end . i was hoping for the simplest ever. maybe i can make it work, Handymen are not cheap!
This is true!
❤ simple is best, hope you keep them coated with good preservatives
I unfortunately didn’t coat my fence boards! Lol I need to though!
Having a solid level surface really helps
Yeah, it’s not exactly level, but definitely better than some others I’ve seen!
thanks for the video. I'd be interested in seeing close-ups of how you handled around the post. Especially where boards are placed, both on front and side of the post and the gate right against the post.
I’m about to make another video for the fence on the other side of my house.👍😊 I’ll make it more detailed!
What dimension lumber was used in that gate you think?
Ha ha love the way you answer the nay sayers, 😂 brilliant simple video, there's a lot of knockers out there keep up the good work.
Thanks John. Feel free to check out my updated gate video with more explanation! 😊
I needed to see how u attached frames to those end poles!!
Updated vid:How to Build a Wooden Double Gate That Won't Sag!!
czcams.com/video/lnKZmgu5gYM/video.html
Very informative. Thank you. My greetings from Greece
Thanks! Greetings!!😊
Thanks...just mirrors my own simple way of doing things. The pocket jigs are GREAT for joining wood. Will watch more of your videos...woodworking should be fun and not technical beyond the majority of us. This was fun, I did exactly like you did and it turned out great.
Love it! Thanks for the feedback!!
Great Looking double fence gate.
Thanks Don B!😊
Awesome! Yeah, I bought mine used and rehung them and adapted them to my opening. At the time I did not have a credit card. Got one now so I will be building a new gate the right way.
Nice!! 👍😊
This is exaxtly what I was looking for. Thank you. Subscribed
Thank you! Glad it helped!!
Thank you. Exactly what i needed....will be trying to do one just like it.
You are welcome! Thank you for the comment and best of luck on your project!
Neat way to guild a bate !
Thanks Z Ack.👍😊
Excellent job
Thanks!
Tks for this video.Great job.
The show or videos are great’ to achieve some great ideas. TY
Thanks I hope your project is great!
Looks solid!
Thanks! I hope that yours turns out great!
WOW! OUTSTANDING VIDEO!!! Thank You so much for taking the time to do this video and sharing it, AWESOME JOB! PLEASE stay healthy and safe out there!
Thanks!👍😊
good job my brother
Thanks Doberman Gang.😊
This is the easiest to follow along video for what I need to accomplish! Thanks so much!
Thank you! Best of luck with your project!
Great job ....I'm making a new shed door , this video has really helped 👍
Awesome! Glad it helped!!
Love what you did, you built a light, yet sturdy frame. Buy NOT using heavy metal frames, you have taken a huge load of the posts, which is where gates often fail.
I would recommend a long flange hinge that attaches to each rail. Connecting the rail directly to the post with a long flange gate hinge is critical. I always do this, and I have large gates that still operate after 20 years.
The biggest issue with gates, is no matter how well, and light you build them, they will cause posts to lean, and therefore your posts need to be deeper, thicker, or other wise reinforced.
Yes! I’m actually going to update my hinges soon. I used what I had, but you’re right, bigger/longer hinges would be ideal! The hinges are actually too close to the edge of my 6x6 post and because of the post’s age, it can cause them to split if too near the edge.
Yes Nice job I will do mine like this,thanks for sahring your talent.
Thank you for the comment! Best of luck on your projects!
Nice, straight-to-the-point video. Liked!
Thanks Bucket List!👍😊
Nice, I need to do a gate to get my dump trailer in and out. Right now I am removing a panel. With 1/2" clearance in each side.
That has helped me. Thank you.
Thank you and you’re welcome!! Best of luck with your project!!
Great video. I just subbed. I didn’t have a problem with the music. I thought the track and levels were good, however, if you take people’s suggestions and get rid of the music, I’m a huge fan of that sped up sound of hammers and drills and stuff. Maybe That makes me a ASMR fan, idk. Either way, keep up the great work!
Thanks J! ;)
Nice build!
Thanks Dwane.👍😊
I really liked the way you notched out the frame. it adds so much more support. I've also been looking to this with fence posts. yes you heard me right. but the only problem with that, is it's too time consuming and I cant charge my customers that much. no offense, but what I mean by that, is this took you like 3 days to this double gate. I LOVE the idea, but most people are not gonna want to pay for that labor. Very good idea tho
JR Stags Thanks! It really would only take two days (if you want the glue to set before installing). I hear you though! Not really feasible for someone doing it for a living unless they want to charge a ton. Where would you notch out the posts? Where the hinges go?
@@rutterrealtygc I meant like on the fence part, not the gate. like when you build a whole fence instead of toe nailing the runners to the studs, notch em out. Kinda like you would do a deck or pergola
JR Stags Gotcha!!
Looks good man!
Thanks! It turned out well!
@@rutterrealtygc I’m installing my privacy fence as we speak lol. I’ll build the gates tomorrow.
Excellent thanks
Thanks! About to post an updated video with more detail this week!
My son bought 6x6 post for gate post.
Nice!👍
Thank you!!
You’re welcome!
Thanks you for idea 💡
You’re welcome! Best of luck on your project!
Great video... Can I do that but instead of diagonal I want to go across to match my fence and then put up green wire to keep our dogs in :)
A 90 degree angle will not hold the weight of the fence like a 45 degree angle braced from the bottom of the hinge side to the top of the outside of the frame. Think of it this way... try holding the hood of your car open with your arms extended straight out... then lift the hood of your car up and prop it up with your arm at a 45 degree angle. Which one was easier to hold the weight of the hood? Sorry, but that's the best analogy I have for that question. : )
very nice!
Awesome !!!!!
Thank you!👍😊
Good info. Thanks!
Thank YOU for the feedback!
Thank's! Now i can complete my project. I was worried about the sagging. Love the way you fence your property over there. Over here in Sweden, you need a building permit if it's a certain hight, like yours.
Thanks for the comment! If I had to add a note, the posts should be 6x6 instead of 4x4's. Otherwise, the posts themselves can move, causing the gate to scrape the ground.
you need a permit here for anything over 6ft typically. My county is unincorporated so 7ft is our code - lucky me!
Great job Ryan. I enjoyed that. Im thinking of something similar and this has made my mind. Thanks mate,,👍
Thanks for the comment Chris! I’m glad it helped you out!
Yall and your outdoor half lap joints. Lemme know if you get any more longevity than a mitre joint with some deck nails. Would love to see it work better, but u have my doubts considering wood movement with crossing grains out in the elements. In ND, you'd see cracks the first year with outdoor crossing grains. Just a guess though. Excellent videos.
Thanks for the comment. Still going strong!
only thing... The Kreg Blue Screws ( if they are cannot always tell) they are not for treated wood or exterior use. not trolling it is fromexperence
GOOD TIPS
Thanks A!👍
That joinery is commonly known s a half lap joint.
Nice n simple
Thanks Vanessalinh Nguyen!👍😊
Yep. That's how ya do it. 👍👏
Thanks Samuel!😊
great thanks mate.
You’re welcome! Best of luck!
Will do this too. Thanks. But how van you lock it from the outside or the inside?
The lock was flipped on this gate so you couldn’t access any screws on the latch and you throw a lock on it so it couldn’t be opened if desired. I’m about to publish a new video with more details.👍
Great Job 👍
Journey Ortize Thanks Journey!
I Hope you never get snow with that little gap on the ground
😆 If we ever get that much snow on the Gulf Coast, I don’t think we’ll want to go outside to open the gate!😆
surely a mortise and tenon would have been a better choice of joint? peg it too so no need for screws? just a thought but thanks for taking the time to upload
Both suggestions would be a good choice. There’s always more than one way to do wood work (some better and even stronger than others). Most of my videos cater to the “average Joe” using minimal effort, time, and tools with great results. At the end of the day, the gate is strong, doesn’t sag, and holds my weight when I stand on it without sagging. That’s the goal, but I’m sure your suggestions would surely achieve the same results!👍😊 Thanks for the suggestions!
quality content! Thank you so much! Gave me a few ideas =)
Great video. Could i go two more feet ya think. Very helpful my friend
Great question! I personally haven't added an extra two feet, but it should bear the weight, because I've stood on my gates (where they meet) to undo my latch on the other side and it still held my weight fine. Something to consider is having larger posts (6x6 or larger) to support the weight of your gates, so they don't lean with the weight of your gates.
Ryan Rutter thank you very much for responding. I’m starting mine very soon
Would you recommend 6x6” posts when installing a gate that size? I have a neighbor that had someone replace his double gate. They used 2x3” non treated boards and a Z brace on the wrong side. Completely destroyed now and he was wanted me to replace it for him. Also and idea of what I should be charging him if he buys all the material. I’m not a licensed contractor but I Do my research and take pride in my work. I don’t want to overcharge him but it also is a lot of labor.
Great video by the way👍🏼👍🏼👍🏼
Thanks for the feedback. New construction charges $500 for a double gate, so subtract the materials and there you go. Keep in mind that a contractor isn’t going to take the time to build your gate like this though. The number that came to my mind was $200-$250. I’d recommend 6x6 minimum! Maybe even 8x8. Make sure the posts are secure in the ground with cement or after you add the weight of the gates the posts can move! Best of luck to you and your project!😊👍
Absolutely use 6"×6" posts. I wouldn't hesitate to let the posts set in concrete for 24 - 48 hours before adding the weight of the gate. Especially for a gate with 5' leafs or bigger.
If you are removing the existing posts, I would add $50 per post. These can be a pain in the butt because the existing concrete must be removed if you are going back in the same place.
Good luck!
Why do folks need a background of music that near is the same as the talking ? Some of us have some sort of hearing issues which make it a very irritating proces of trying to seperate the noise. I couldnt finish the video.
Thanks for your feedback George! I’ll look into adding subtitles like I have on my other videos!👍😊
Solid music. Solid video
@@rutterrealtygc no subtitles needed, just kill the music while you're talking.
Dave Dammit word. I’ll keep that in mind or turn the music down!😉
@@rutterrealtygcTurn it off!
Any reason no one uses a power planer instead of multiple cuts and a chisel? Have seen this method a couple different videos and all use cuts and chisel
Great question. I would assume it is because most people don't have a power planer and the videos are meant to help people create something with tools they most likely already have like a circular saw. Also, you won't know where to stop with a power planer and you can set your depth with a saw.
Stevie wonder make them ? bottom of the gates look like the iris sea
😆 feel free to cut yours straight!👍😊
My husband is going to do this too. But he wants to lock the gate with a key is there anything you recommend for my hubby to do so he is able to lock the gate from the outside?
Many latches give you the ability to put a padlock through a hole so that the latch will not physically open without the padlock being removed.
Thank u I will let him know I was not sure but thank u godbless
Very helpful video, thank you, but please omit the background music - it distracts from your video and makes it difficult for some people to hear your voice.
Yes, I know. CZcams won’t allow me to redo the audio. 😏 Otherwise, I would redo it. Thanks for the feedback!
The gates are sagginh (margin at bottom is wider )even before cladding goes on when cladding is on margin at bottom will get wider and at top will get narrower top should always have adjustable hinge because 80 to 90% of all gates will sag and anybody who thinks they won’t doesn’t know what they’re talking about and before anybody says different I’ve been in the business for 52 years
willie doyle Thanks for your input. As stated in a previous comment, “Wood rots, stone crumbles, and metal rusts/corrodes, but the point of this video is to help people who are building gates on a budget, to get the maximum rigidity from using only wood.” Nothing withstands the test of time. Our fence/gate is doing great and even holds steady when I’m standing on it and swinging it open. Maybe in time the carpenter bees will eat holes in it or maybe it will rot altogether. However, the average homeowner sells in 5-10 years, so at that point, this gate’s functionality shouldn’t be my concern anymore (sorry for any additional owners, but as you/we said, wood won’t last forever). If I wanted something that will last even longer and wanted to up my budget 💵, I’d get a metal gate kit. Though, that’s not what this video is about. Keep sharing your 52 years of experience with others, because it is much valued!😊
I seen the gap difference as well .
Kick ass
Hi Ryan, Great Video. I was wondering why the bracing has to touch both the sides in the corner? Does it have to be always less than 45 deg with plumb?
I put it against both sides in the corner so it would have more surface area to be firmly planted against without moving. I’m not sure I know what you’re asking with your second question.😬
Wow that's an awesome job. I subscribed to see what else you are going to come up with. This is perfect for me. My span is going to be 17 ft. I am using two sections of 8 foot wide left over from my privacy fence cut in half horizontally to 36". adjusted to block the entrance to my driveway. It will be very heavy , but the post's are well seated into the ground. What Hardware would you recommend for opening and closing the gate 180 degrees. I would like Wheels because the driveway is concrete all the way across 60 ft L x18 ft.w. I look forward to doing this since I come from a builder family I'm sure I can handle it. I have every tool under the sun , but it's been a while since I made a heavy piece of furniture; soooo any words of wisdom? You made that so professionally. Thank you in advance. Sorry for such a long message
Hey "Sugar Free" and thank you for the comment. 17ft is a very large span. Someone previously asked about building an 18ft span and whether to use 2x4's or 2x6's and I responded, " I honestly couldn’t tell you what would be best. My first thought is that, although the 2x6 seems like the strong option, it’s also going to add additional weight on your joints. If it were me, I’d be very picky with my 2x6’s, finding ones that are lighter in weight than the other treated lumber that are still saturated from being treated. I’d honestly be inclined to get a quote for what it would cost to make the framework out of metal with that size or maybe even contact an friend who’s an engineer for their thoughts. Sorry that isn’t really much help. Anybody else have any input?" If you are going to be placing wheels on the gate(s), then the extra length won't matter as much because you are going to have the end of the gate supported by the wheels on the ground as well. As far as hinges are concerned, I would look for a longer hinge that will extend from the post, far out on the gate (supporting the weight of the gate as far out as possible). I hope that helps!
@@rutterrealtygc thank you Ryan. That is an awesome answer the posts are already in the ground ; those are 4x4s of pressure-treated lumber . I'm just looking for input On hinges and Hardware. I appreciate what you said because you actually said what I was thinking. That was the nicest longest message I've ever received and I apologize. I enjoyed watching your video so much I've shared it and watched it again .
@Sugar Free Thanks Sugar Free. I will note, if you are putting that large of a fence you definitely want to use larger than 4x4 posts or you can put two 4x4 posts together (as I've seen some do). However, I feel like a larger 6x6 post or 8x8 post would be more sufficient for your application. We are using 6x6 posts and honestly we should have replaced them before the gates were hung because they are dried out from when they were installed and starting to split because the hinges are two close to the outside of the post (hand to face emoji inserted here). Find hinges that will rest near the center of the post when installed, because of the for-mentioned problem. Best of luck to your projects!!
hey, it's doc tony!!
Doc Tony? The chiropractic lawyer? lol
@@rutterrealtygc yeah, the way you point your fingers like a gun just like him, its hysterical.
@@Lesscoelectronics :) lol!
@@rutterrealtygc we call him doc nipples
Dave Dammit 🤣What?!
Just wanted to say thanks for the video, was able to use the concept to rebuild a sagging 14" double gate. Just wished I knew what latches you used that are on the upper gates?
I believe I posted a link previously in the comments, but most importantly, make sure the the hinges reach close to the center of the gate frame and center of the post (so not close to the edge) to prevent splitting. 👍
Would you clarify how you cut each picket length to clear the ground?
Probably the best thing to do would be to lay a 2x4 underneath the gate where the boards will rest so they’ll have some clearance. I actually just used my foot as the spacer, but a straight 2x4 will achieve a better look for sure.😁
Hey Ryan! Great explanation and great video overall. I hate to give unsolicited criticism but your content is otherwise so good I feel compelled to; I almost quit watching this video because the music is irritating and drowns out your voice entirely at some points. Glad I stuck it out because the information was worth it. Maybe turn the music track way down on future vids. Looking forward to watching them! Bought a house a few months ago and I have a lot of projects to do. I appreciate your lessons.
Hey Leigh Green! Thanks for the criticism. This was one of my first videos and I TOTALLY understand! Unfortunately, CZcams will not let me put a new audio track over the video or I’d be HAPPY to fix the audio levels. Maybe one day they will allow uploaders to do that. I might upload a new video altogether and then place a link pointing people to the new video from here!👍 Thanks again and have a great Sunday!
@@rutterrealtygc you bet man! Keep up the great work.
Hello I want to start a carrier as a handyman. I want to get some experience before I apply for jobs because everybody wants experienced workers. How can I do this? Should I go to school? If yes, do you know any school in Miami, if not anywhere in the US? Thx
I have no idea. I guess you could start at a trade school. I don’t know what’s available in Miami.🤷♂️
Did you use 2x4's to replace?
and your cross brace.... 2x4 as well? would a 2x6 add even more strength?
All boards for the frame were 2x4s. I wanted to keep it as light as possible, so I didn't use 2x6s. It might have more strength with 2x6, but it is going to be heavier for sure.
You should let us know how you make a notch for the gate....
But nice job.
I tagged another video within the video.👍 Look for the info bar to pop up in that section.😊
Where are the hinges what kind of hinge
I have more details on the hinges in this video: czcams.com/video/lnKZmgu5gYM/video.html
I wonder how the glue holds up if you’re using treated wood. I’ve built decks with super tight butt joints and a month later there’s 1/4” gaps or more. Do you let it dry out first?
Ideally, it would be nice to use dry timber, but treated wood is rarely dry at the yard. I used treated lumber with Titebond Ultimate and mine has held up fine. Here is my updated video if you would like it! czcams.com/video/lnKZmgu5gYM/video.html
There are a couple of flaws in this plan. Half lap joints you made are really strong but, you made them in 2 x 4 material. You should have used a 2 x 6 at a minimum in the vertical (hinge) board. A 2 x 4 will never be as strong as a bigger wider board. Secondly you made this from treated pine. I did too. Mine does not sag years later. Instead it twisted so that the top does not align. I used half lap joints and Kreg heavy duty screws. Use cedar.
Sorry yours twisted! Try and pick dry ones or use cedar next time!😊👍 My 2x4s worked great too.👍
Be nice to watch the video without music in the background. Folks with hearing loss has trouble hearing the meat of the subject
Here's an updated video with better sound: czcams.com/video/lnKZmgu5gYM/video.html
Thanks for video, I'm going to model my fence gates after this. Just have one question, what size pocket hole screws did you use for the cross braces? I saw 1 1/4" on the box but was wondering if you used larger for 1
1/2" thickness material of gate? Thanks!
I used 1 1/4”, but you could use longer. I just used what I had on hand. 😊 The ones I used also weren’t exterior screws, but I’d recommend using exterior screws. You could even use regular exterior screw and just use the jig to make the pocket holes.👍
@@rutterrealtygc thanks for the response! I ended up using 2 1/2" exterior pocket screws and worked like a charm. Thanks again
Very good video, but the music is a little bit too loud while you talk sometimes. But, hey, not complaining at all, appreciate it very much
You are absolutely correct! I am going to do another video for the other side of the house and I will definitely correct that! Thank you for the feedback!
If you are using pressure treated wood you will always have problems. First off its usually wet and that means it's going to shrink. No matter how accurate your joints are the wood will eventually shrink and pull the joints apart even it they are glued. The constant getting wet and drying out in the sun and heat will cause the wood to warp. Pressure treated wood is terrible to use for a gate.
Wood rots, metal rusts, rock crumbles... nothing lasts forever... 😊 The purpose of this video is just to show people how they can build a gate that will last longer than most traditional ways of assembling a gate. 👍
What size screw did you use for the frame and what size wood? 2x4 or 2x6?
2x4 frame. 1.25” screw.
This one will eventually sag due to the angle of the cross support. It's too horizontal and any downward pressure is just going to make it fold and eventually not work. This method work but not at that angle. With the dimensions of the frame he built, the cross support should've spanned 3/4 of the way. In other words, your cross support can't be wider than it is tall.
The cross support’s strength and rigidity comes from its inability to move and support downward pressure. Having a stopping point (going all the way to the hinged portion of the frame) ensures that any excess weight that would attempt to move the cross support/ break its hold to the framing (it were only attached half way down the frame as you suggest) will maintain a second support (the side of the frame as well as the bottom of the frame). Like previously stated in the comments, all wooden gates, due to the nature/material of their construction, will eventually sag. Wood will rot, metal will rust, but in the end this is a great way to build a wooden gate that spans a 12 foot distance and doesn’t sag (even with me standing on the end on one side). The average person lives in their house for 7-10 years. This construction should definitely make it through those times. I’m sure there are hundreds of ways to construct a wooden gate. This is just one. The best of luck to you and your future builds!
Do you have a video for where the gates connect to the post ect..?? Thanks
We are about to redo another double gate and will make a more detailed video with those steps included. 👍 Sorry, I don’t have one currently. What’s your questions though? I might be able to answer it.👍
@@rutterrealtygc Like how the posts are in place and how the gates connect to the posts..Thanks
How u cut them like that where u glue them
czcams.com/video/5fke-PxLYK0/video.html
Anyway to get a parts list for this? Appreciate it
The rectangle frames were comprised of 8 - 2x4x8s and the cross support pieces were 2x4x8s as well. So, 10 total for the frame. 30 pickets. 5lb box of 1 1/2” exterior screws for pickets and frame assembly. Wood glue. Hinges. Lag bolts for hinges and latch.