Get free plans for this project here: ibuildit.ca/projects/how-to-make-a-corner-clamp/ Unlike most of the ones you can buy, this one puts the clamping force exactly where it’s needed: across the miter, pushing it tightly closed. And you can make it in an afternoon from scraps and hardware you may already have.
Not that I don't like hearing your voice or thought process, this video clearly speaks for itself. Love the style and format great video and build. I know you need likes and comments to drive revenue. I feel it's a shame that the algorithm lord's force content creators to use terrible thumb nail to attract attention. I like how nearly most of you put out doesn't resemble click bait. From one professional to another, thank you so much for what you do.
Beautiful video... I found it really relaxing so I watched it again.... and then once more. That's a super clamp and well within the capability of an amateur, like me. Great job.
I love the way you solve problems and then share your solution with us on CZcams. Your clamps are well-designed and easy to make, even if you are a beginner woodworker.
Great design and of course video. Took us back a bit at a time you where filming your video’s without talking. Loved how you incorporated the shadows. This video should do well, if you need a corner clamp this is it and everyone can make this. Well done John.👍
This is great news. 'I Build It' has gotten the software update for darkmode. Back in the day before people had all these options for lighting there were guys in their home shop with a single 60 watt bulb hanging from a wire and that was it. Nice corner clamp. I'm gonna make one today. Thanks for putting it out there.
An excellent plan and a beautiful video. You make this build look easy with few measuring marks. A note for beginners, take your time and use straight edges/squares to produce the very precise angles required--especially with the glue up (which can easily slide) and the bolts for the sliding part of the square (which need to be right in the center). Getting things precisely centered and squared will be the key to making this great piece.
Simple yet the best corner clamp I have ever seen. I love the shadow lighting effect of the video itself. Really draws the focus to where it needs to be to see and understand what you are doing. It's also just a really cool affect.
John, I sure hope you feel appreciated. You are a very talented carpenter/woodworker, and a very talented video producer. You are truly an artist, and I for one, greatly appreciate the content you provide. Thank you sir!
I like this design a lot, but I would suggest cutting a bevel on the corner of the square block closest to the joint. Don't want any squeeze-out to glue my project to this jig.
I'll have to make a few of these. if I were to make any modification to this design, it would be to carve a channel beneath where the mitered joint is to rest, as clearance for any glue squeeze-out. I would also wax that whole thing to prevent bonding the workpiece to the tool, and to ease clean-up.
Watching John work is like watching a very good artist paint a masterpiece. Every move is a delight and carefully, thoughtfully made. When he shares plans, with many at no charge, I rejoice and hope that someday I might reach John’s level of proficiency. I work wood with that hope. Thank you, Mr. Heisz.
Thanks for being an honest woodworker and allowing us to see the oops. The Noir style scares me though (don't like to not being able to see the blade). You always have great ideas for shop jigs.
To really put a scare into people this year, kids have decided to go door to door without masks! They say "Treat or I'll cough in your direction!" Terrifying!
Wait wait wait. I thought you weren't building any more clamps! 😋🙃 This is a great solution! I've never been happy with most of the store bought corner clamps that don't actually add pressure to the joint.
I love the concept, especially the idea that you just need two kerfs’ worth of play for the outside clamps. Smart. I could’ve used a little more light to see what you were doing. But it was dramatic.
this is one of my favorites John. Clearly you know your craft as a master woodworker, but you also elevated the lighting & different camera angles to an elegant art video - my hat is off to you sir! ps - I had to re-watch the video to figure out how the jaws move when you tighten up the wingnut- amazing!
WOW JOHN....THAT BROUGHT ME BACK TO YOUR WOOD VISE BUILD WITH NO NARRATION. AND THE LIGHTING WAS INTERESTING. IT MADE ME FOCUS MORE SPECIFICALLY AS I WATCHED. YOU HAVE A TALENT!!
I started to build one this morning. I also like the videography and editing you are doing lately. I am going to borrow some of those techniques for my videos!
I made 4 of these and like them a lot. I found them a bit cumbersome to store though so I bored recesses for the wingnuts in the moving blocks. The wingnuts are still easy to access and now the clamps stack nicely.
Love it. great job on the filming. Would love to see you do a video for your scrap bin channel on your editing process. May the algorithm bless you on this day my child
Great project, yes, that's awesome... But can we talk about the level of edition this man has for a moment? This video is just something wonderful bc of the project and bc of the edition... I just Love it.
I think I would nip off the corners of the moving block to stop glue squeeze out from getting onto it and so that it wouldn't interfere with clamping (potentially)
zOmG iT's SuPeR dAnGeRoUs to use you're table saw in the dark!!!1! That should about cover it I think. Neat project, can't wait to get back home from travelling and try it out! Thanks again Mr. Heisz.
I have "Liked" a lot of your videos over the years, however, this one is especially good. Great production, shots, and edit. Real fun and a nice change (not that you need to change). Keep up the good work.
Loved the shadow of the table saw blade. Very Halloween appropriate. Great video work, and the audio perfect too, that router noise could easily have been set too loud but it was just spot on. Impressive. And the clamp too, of course.
Really enjoyed the style of this video. Well shot and edited. Something about the sound of the tools with cool lighting. Great jig too, but I think that goes without saying.
Nice clamp, and great idea! In my case, I would make the bottom a kind of 'U' shape, and the diamond piece would have a flat side. That way, I could use an ordinary clamp on it to apply a lot more pressure if needed. I'm certainly going to steal this idea.
Cool design, John. I'm thinking here that you could try and put a wide piece of ply going through the square block like a mortise so that it slides inside of that groove and use just a single screw to hold the block in place.
If I'm visualizing this correctly then you could put a positive stop (possibly with a v-cut in it) at the point where the two halves of the miter joint meet. That would make alignment easier before the inside-corner clamp-block is brought in, or so I'd think. The outer corner should always meet at the same point in the clamp, regardless of the thickness of the material being used, no? I'll have to try to make one of these, it looks very useful and elegantly simple. Thanks for the video!
Slick! More cool stuff to do with all the offcuts and scraps of plywood I've got kicking around the place. :) My only suggestion would be to replace the wingnuts with threaded knobs - easier on the fingers.
This would be a useful cnc project … crank out a few. Looks like it works really well. This looks to support much wider stock than store bought corner clamps.
The lighting makes it feel like you woke up at 3am with the idea in your head so snuck out to the workshop to make it, keeping the lights out for discretion, but not giving a damn bout the noise
Love the design and execution. Really liked the lighting choices and final edit. Well done. I'm sure others have and will make comment on what you "should" do but it's your channel and I feel privileged to enjoy it. Thank you John.


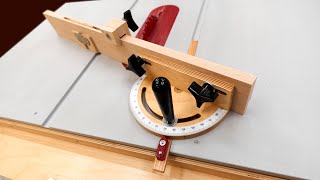


Get free plans for this project here: ibuildit.ca/projects/how-to-make-a-corner-clamp/
Unlike most of the ones you can buy, this one puts the clamping force exactly where it’s needed: across the miter, pushing it tightly closed. And you can make it in an afternoon from scraps and hardware you may already have.
You keep doing ingenious things we should have thought of, but didn’t. Thank you for thinking for us!
Tip: cut 1/4" off the corner of the square. Then if glue squeezes out of the joint it won't stick to the inside clamp any more.
Not that I don't like hearing your voice or thought process, this video clearly speaks for itself. Love the style and format great video and build. I know you need likes and comments to drive revenue. I feel it's a shame that the algorithm lord's force content creators to use terrible thumb nail to attract attention. I like how nearly most of you put out doesn't resemble click bait. From one professional to another, thank you so much for what you do.
Beautiful video... I found it really relaxing so I watched it again.... and then once more. That's a super clamp and well within the capability of an amateur, like me. Great job.
Thank Brendan :)
I love the way you solve problems and then share your solution with us on CZcams. Your clamps are well-designed and easy to make, even if you are a beginner woodworker.
Great design and of course video. Took us back a bit at a time you where filming your video’s without talking. Loved how you incorporated the shadows. This video should do well, if you need a corner clamp this is it and everyone can make this. Well done John.👍
great clamp...made it....now one of the most used clamps in my shop. R. Prieto style cinematography mesmerizing. best video on yt.
Love the cinematography of this video!
This is great news. 'I Build It' has gotten the software update for darkmode.
Back in the day before people had all these options for lighting there were guys in their home shop with a single 60 watt bulb hanging from a wire and that was it.
Nice corner clamp. I'm gonna make one today. Thanks for putting it out there.
Being Halloween, and seeing the lighting effects, I kept wondering when we would see a fake finger and a lot of blood.
The engineering that goes into your builds is inspiring.
An excellent plan and a beautiful video. You make this build look easy with few measuring marks. A note for beginners, take your time and use straight edges/squares to produce the very precise angles required--especially with the glue up (which can easily slide) and the bolts for the sliding part of the square (which need to be right in the center). Getting things precisely centered and squared will be the key to making this great piece.
Lighting is very cool and relaxing.
The design - first one I've seen that actually puts pressure on the joint.
John Heisz is awesome.
Your my favorite "dangerous woodworker" on CZcams. Thanks for the always amazing content!
Never disappointed, great content! When I saw the lighting, made me smile. Thanks for the plans.
Without light, no need guard :-D
Simple yet the best corner clamp I have ever seen. I love the shadow lighting effect of the video itself. Really draws the focus to where it needs to be to see and understand what you are doing. It's also just a really cool affect.
I like the Heisz Noir style. I like the clamp idea too.
You're a clever S.O.B, John. Thanks for taking the time to make plans
John, I sure hope you feel appreciated. You are a very talented carpenter/woodworker, and a very talented video producer. You are truly an artist, and I for one, greatly appreciate the content you provide. Thank you sir!
I like this design a lot, but I would suggest cutting a bevel on the corner of the square block closest to the joint. Don't want any squeeze-out to glue my project to this jig.
Exactly my thought.
Either a bevel or a semi circle would work nicely. I agree.
I'll have to make a few of these.
if I were to make any modification to this design, it would be to carve a channel beneath where the mitered joint is to rest, as clearance for any glue squeeze-out. I would also wax that whole thing to prevent bonding the workpiece to the tool, and to ease clean-up.
Awesome!
After a 20+ year hiatus from woodworking, I'm getting back into it and credit you for the motivation. Please keep sharing with us.
Watching John work is like watching a very good artist paint a masterpiece. Every move is a delight and carefully, thoughtfully made. When he shares plans, with many at no charge, I rejoice and hope that someday I might reach John’s level of proficiency. I work wood with that hope. Thank you, Mr. Heisz.
It's projects like this that inspire me to get back in the shop. Ingenious clamping method at the pointed side.
Thanks for being an honest woodworker and allowing us to see the oops. The Noir style scares me though (don't like to not being able to see the blade). You always have great ideas for shop jigs.
The shadow lighting and the interesting camera shots (foreground/background) made for a great video.
Love it, that you change your light and video style, once in a while.
Congrats on one million subs, I have been watching you for years and you deserve it. I always learn something when I watch your videos
Great project John. Fantastic videography and edit.
Kind of an artsy fartsy video, John. Very nice. Thanks for the plans.
Love the way you filmed this one. The shadows add a beautiful element.
Nice Film Noir at Chez Heisz. Happy Hallowe'en, John.
To really put a scare into people this year, kids have decided to go door to door without masks! They say "Treat or I'll cough in your direction!" Terrifying!
Love my Sunday morning treats from John. Going to the shop to replicate this now!
Wait wait wait. I thought you weren't building any more clamps! 😋🙃
This is a great solution! I've never been happy with most of the store bought corner clamps that don't actually add pressure to the joint.
I love the concept, especially the idea that you just need two kerfs’ worth of play for the outside clamps. Smart. I could’ve used a little more light to see what you were doing. But it was dramatic.
Love the new format. The shadows enhance your project, which is pretty incredible to.
Just noticed that your Ultimate F Style Clamp Plans are there now as well - COOL!, once I get where I can get them bought and downoaded, I'm on it !!
Nice filmography STYLE! Almost should've been Black and white!
this is one of my favorites John. Clearly you know your craft as a master woodworker, but you also elevated the lighting & different camera angles to an elegant art video - my hat is off to you sir! ps - I had to re-watch the video to figure out how the jaws move when you tighten up the wingnut- amazing!
This isnt a woodworking video, this is art
Like the new clamp.....it just makes sense
That's lovely looking ply
WOW JOHN....THAT BROUGHT ME BACK TO YOUR WOOD VISE BUILD WITH NO NARRATION. AND THE LIGHTING WAS INTERESTING. IT MADE ME FOCUS MORE SPECIFICALLY AS I WATCHED. YOU HAVE A TALENT!!
Interesting camera angles and lighting.
Nice job, Thanks for the free plans John, greetings from Portugal
That would have to be the best corner clamp I've seen. Nice video work too.
A much better solution than anything I have ever used. Why didn't I think of this ... or why didn't you do this video sooner?!
Woodworking After Dark, with John Heisz. Cool video, great clamp.
Keep the dramatic lighting up, it just brings a certain added beauty to your already outstanding craftmenship
A brilliant film noir change of pace.
I like that idea. I'm going to make 4 of them . this summer I'll be putting my new table saw to good use.
i am really agree with you john , its the very best way to do it !!!
je suis vraiment d'accord avec vous , c'est la meilleure methode pour ca
like it man;;no words just live action;;;lol;;no bs to cloud your brain from the work being done;;;;
Excellent work again with some great thinking and wood shop action - so the time spent in the basement just works for you so keep it up
I started to build one this morning. I also like the videography and editing you are doing lately. I am going to borrow some of those techniques for my videos!
This is a really unique clamp! Very smart. Enjoyed your editing thoroughly as well. Can always count on you for interesting ideas!
It's always been my dream to have a woodshop where I work in low-light conditions.
I made 4 of these and like them a lot. I found them a bit cumbersome to store though so I bored recesses for the wingnuts in the moving blocks. The wingnuts are still easy to access and now the clamps stack nicely.
VERY nice- For a minute, I thought you had brought in This Old Tony. (He has a very similar style with his videos.)
Love it. great job on the filming.
Would love to see you do a video for your scrap bin channel on your editing process.
May the algorithm bless you on this day my child
Very cool! Thanks for sharing. The dramatic angles and lighting makes me think of a Hitchcock movie. 👍🏼
Great project! Now added to my to do list.
Thanks John!
Great project, yes, that's awesome... But can we talk about the level of edition this man has for a moment? This video is just something wonderful bc of the project and bc of the edition... I just Love it.
I think I would nip off the corners of the moving block to stop glue squeeze out from getting onto it and so that it wouldn't interfere with clamping (potentially)
zOmG iT's SuPeR dAnGeRoUs to use you're table saw in the dark!!!1!
That should about cover it I think. Neat project, can't wait to get back home from travelling and try it out! Thanks again Mr. Heisz.
Excellent! I really learn a lot from your posts. Thanks, John/
Definitely adding this to my list of John-jigs to make
I came for the project and stayed for the comments! 🤡👍🏼 I love this style John.
Love it! The filming looked very Avant-garde.
Clever, straightforward, effective! Very nice
I have "Liked" a lot of your videos over the years, however, this one is especially good. Great production, shots, and edit. Real fun and a nice change (not that you need to change). Keep up the good work.
Bloody amazing in its simplicity and ingenuity !
Loved the shadow of the table saw blade. Very Halloween appropriate. Great video work, and the audio perfect too, that router noise could easily have been set too loud but it was just spot on. Impressive. And the clamp too, of course.
Clever design! Very nice.
Really enjoyed the style of this video. Well shot and edited. Something about the sound of the tools with cool lighting. Great jig too, but I think that goes without saying.
Nice clamp, and great idea! In my case, I would make the bottom a kind of 'U' shape, and the diamond piece would have a flat side. That way, I could use an ordinary clamp on it to apply a lot more pressure if needed. I'm certainly going to steal this idea.
No wonder that chap made you a pusher stick! Eep!
This leaves me speechless.
Artistic this morning, beautiful images, great project, well done again John
Cool design, John. I'm thinking here that you could try and put a wide piece of ply going through the square block like a mortise so that it slides inside of that groove and use just a single screw to hold the block in place.
Thank you for your mentoring in all your projects! I'm always inspired! You are my reference! Thank you!
Thank you John!
Very nice John!
If I'm visualizing this correctly then you could put a positive stop (possibly with a v-cut in it) at the point where the two halves of the miter joint meet. That would make alignment easier before the inside-corner clamp-block is brought in, or so I'd think. The outer corner should always meet at the same point in the clamp, regardless of the thickness of the material being used, no?
I'll have to try to make one of these, it looks very useful and elegantly simple. Thanks for the video!
Slick! More cool stuff to do with all the offcuts and scraps of plywood I've got kicking around the place. :) My only suggestion would be to replace the wingnuts with threaded knobs - easier on the fingers.
Very smart, I like the style, the perfect end for a noisy/busy day for me.
Yet again a clever idea presented beautifully.
Thanks for sharing those tips and the make!
That was some nifty camera work john. Excellent corner clamp build.
Looks like you were having fun with lighting and camera angles!
This would be a useful cnc project … crank out a few. Looks like it works really well. This looks to support much wider stock than store bought corner clamps.
Amazing video! Your filming turned super pro super quick!
Awesome clamp!
Loving the This old Tony filter but maybe turn the lights up a bit so can clearly see your amazing skills
The lighting makes it feel like you woke up at 3am with the idea in your head so snuck out to the workshop to make it, keeping the lights out for discretion, but not giving a damn bout the noise
As always,,,Nice John! And I'm Liking the different camera angles/views in this one!👍🏻👍🏻
you make it look so easy. thank you for all your projects.
Love the design and execution. Really liked the lighting choices and final edit. Well done. I'm sure others have and will make comment on what you "should" do but it's your channel and I feel privileged to enjoy it. Thank you John.
Loved the video. Great idea. Simple but really does the job. Keep the videos coming John 👍🏻
Very artistic John. Thanks!