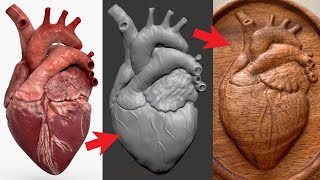
Interesting approach. I solved this issue myself rendering height maps and then extruding them from planes. The good side is that you don't destroy your models and can easily change anything - you just need a new render. The downside is that you are limited by the 8-bit (16, in the best case) of color for the height.
Brilliant tutorial, amazing what you can learn in 20 minutes. Love the way you resolve undercuts. As a by the by, if you hadn't resolved the undercut. With CnC users and the software that creates the GCode it would automatically ignore the undercuts and all cuts would be straight according to the flute (cutter shape). Beauty of this now is you can make an alpha and use it with CnC, Laser etc.. The issue of undercuts of course with 3d resin printers if you try to make a mould depending on the undercut you could be in a lot of strife. Striking a coin wouldn't work, pouring or cold casting it could be an interesting effect. I was going about this in the wrong way, I was positioning models then trying to take make an alpha, then trying to flatten which was just not working right. The other issue was of course maintaining detail which you have in your tutorial. Thank you for taking the time and effort!!! Look forward to seeing some more tips and tricks!! Amazing!! ty again!!
Bonjour et merci pour votre tutoriel qui est complet et très bien. Est-il possible de faire la même chose avec Blender et quels outils utiliser. Merci de votre réponse. Bien cordialement.


i use this video so many times for my 3d printing modle. thank you
i have come back to this video so many times. you explain well and this video has a lot of good methods in it.
Thank you so much for this! It's the answer to what I've been looking for for weeks
the best tuto for this
Great video, congrats....!, tks a lot
Interesting approach. I solved this issue myself rendering height maps and then extruding them from planes. The good side is that you don't destroy your models and can easily change anything - you just need a new render.
The downside is that you are limited by the 8-bit (16, in the best case) of color for the height.
Brilliant tutorial, amazing what you can learn in 20 minutes. Love the way you resolve undercuts. As a by the by, if you hadn't resolved the undercut. With CnC users and the software that creates the GCode it would automatically ignore the undercuts and all cuts would be straight according to the flute (cutter shape). Beauty of this now is you can make an alpha and use it with CnC, Laser etc.. The issue of undercuts of course with 3d resin printers if you try to make a mould depending on the undercut you could be in a lot of strife. Striking a coin wouldn't work, pouring or cold casting it could be an interesting effect.
I was going about this in the wrong way, I was positioning models then trying to take make an alpha, then trying to flatten which was just not working right. The other issue was of course maintaining detail which you have in your tutorial. Thank you for taking the time and effort!!! Look forward to seeing some more tips and tricks!!
Amazing!! ty again!!
very cool man. Thanks!
awesome video
Thank you
Beautiful, thanks
what a greatt tutoriaal
blender's basrelief generator does that automatically .
Apparently what you get with that is not a 3d model but just a picture
How do I get the numbered floor pattern?
Bonjour et merci pour votre tutoriel qui est complet et très bien. Est-il possible de faire la même chose avec Blender et quels outils utiliser. Merci de votre réponse. Bien cordialement.