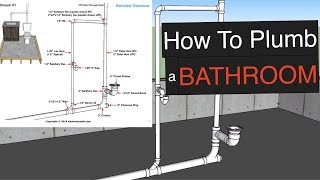
How To Plumb A Bathroom In 20 Minutes! - Beginners Guide

Vložit
- čas přidán 10. 06. 2024
- In this video I show how to plumb a bathroom. I show how to plumb a sink, toliet, and shower drains and vents for beginners. I use PVC pipe for all my drain lines. I show how to glue together the PVC pipe using primer and PVC cement.
🟡 Check out my Amazon store! 👉 www.amazon.com/shop/theexcell... . Here you will find tools and supplies used in my videos. (DISCLAIMER- I am an Amazon affiliate. I get a small commission that help support the channel at no extra cost to you)
My plumbing supplies and tools amzn.to/3J5dQf4
Heavy Duty Clear PVC Cement amzn.to/3GXVZFi
Purple Primer amzn.to/3e97cXg
1/2” And 3/4” Copper Crimp Ring Tool amzn.to/3GXV6MY
PEX Pipe Cutter amzn.to/3J3iaLR
IRWIN SPEEDBOR Drill Bit amzn.to/3yJ5QM1
Ridgid 18V Tool Combo Kit (5 Piece) amzn.to/3FbRJl3
My Tool Belt Setup amzn.to/32kmcyz
Tool Belt amzn.to/3E4v1Kc
Hammer amzn.to/3E8kldp
Tape Measure amzn.to/3J68hNx
Speed Square amzn.to/3J0cPoF
Chalk Box amzn.to/3p9ziYv
Utility Knife amzn.to/3ecJPM9
🔴 Subscribe for more home building tips to save a TON of money here:
czcams.com/users/theexcellentlabore...
Disclaimer: This video is all based on my personal opinion and is for entertainment purposes ONLY. I am not a financial advisor, CPA, attorney, tax advisor, electrician, plumber, housing contractor, designer, or any type of profession to give advice. I am just a consumer sharing my experiences and research. If you do need knowledge for those types of things, I will advise you to seek help for those professionals. - Jak na to + styl


Check out my Amazon store for plumbing supplies! www.amazon.com/shop/theexcellentlaborer?listId=2WE10066WHEK7&ref=idea_share_inf
I really like the way you take your time and explain things thoroughly. This was a really helpful video. Thank you so much for sharing
Please where is the next video
The video where the toilet vent was connected under the subfloor
Thank you
Hey this is just my opinion. Don't knock the toilet flange center out and leave it in the drain for future problems. I was just at a Ladies house that had one stuck in her drain. Good thing my camera seen it and I was able to fish it out
Didn't you say 34" shower?
@@kaboom362Z
You absolutely do the best job of anyone out there of explaining what you're doing step-by-step. Incredible how much I learn from your vids ! Thank you ! !
Thank you so much! I’m glad I can help you with this tutorial. Good luck with your project!
This is an excellent video. I'm a licensed plumber and I wish people would watch this video before attempting to build their own plumbing systems.
I've been watching some of the other videos on the channel and learning lots. I figured I'd watch this one to nitpick a lil since I'm a licensed plumber and honestly some of the tips here are incredible. The hole saw sizing to be used for the toilet AND the shower. I honestly never even considered that. The wood spacer on the toilet flange is an amazing idea that plumbers in my area don't do and we regularly have leaks on wax seals because the face of their flange isn't the 1/8" - 1/4" above the finished floor.
I think it's neat how you individually vent the toilet because that's a more commonly accepting practice across different states and codes even though wet venting is a common practice in some areas. You really set the viewer up for success with that one. It'd be worth adding a bit on how the shower was vented.
I wouldn't recommend flushing the flange test plug down the drain though. We get a few calls about those getting stuck in odd places here and there and it always feels kinda silly to have to tell people that large plastic flaps don't always travel down the drain very well. Fish it out with an extra long pair of needle nose pliers. Drill it out with a hole saw or rip the tab on top in a twisting motion and it should come out.
Other than that and a few personal preferences on finish pipes I've gotta say you know plumbing better than some plumbers I know and I've been doing this for about 10 years.
If you know the other trades about as well as you know plumbing, I feel pretty confident you've taught me enough to build my own house properly or at least close enough for the inspectors to correct me on just minor things.
Thank you.
You are right, it's always easier to grasp something when you have prior knowledge or understand the process a little
I've only watched a few of your videos so far, but I am so glad I came across your channel. My oldest son and I are trying to finish out the interior of our tiny cabin and need guidance! Your videos explain everything so we'll and they are appreciated.
I am an older woman desperate to learn how to do home repairs myself. Your videos have helped me immensely. The way you teach makes it easy for me to believe I can do it. That remains to be seen but whatever happens, thanks so much
Same boat, good luck fellow old lady! 😊
The first step is research
If you plan on using a trim kit on the toilet supply please keep it higher than 6".
Thanks,
from trim carpenters everywhere installing common 5.5" baseboard.
Finally a well done, simple, easy to understand ,video without some annoying soundtrack blasting in the background, thank you!
By far the best video I’ve watched on the topic! Not only are You a master of your craft, but you are also a great teacher. Thank you! 👍🏼👍🏼
I like that you say why youre doing something or what something does helps me remeber and understand thanks Pal ... Youre a good teacher
One of the very best How To videos I've ever seen. Thanks for putting it up. Will be doing a bathroom soon and your instructions here will be invaluable.
very thorough explanation of procedures.. this video gave me, a DIY'er, the confidence to tackle a bathroom addition on my own. THANKS!
It’s one thing to know what you’re doing but to explain it and teach the way you do. A lot of tradesmen could learn a lot on how to train their helpers. Thanks man! I’ve learned a lot!
I really like watching your videos explaining everything in detail helping me decide to renovate my bathrooms God bless you.
Thank you for these videos as they help so much to prevent mistakes. But all your walls are wood. We in South Africa have brick walls.
Thank you for making this very informative video! I will definitely be watching it a few more time before and during my cabin install.
I appreciate you sharing your knowledge and in particular providing information regarding distance between the various hole spacing. Thank Bud!
Great video! For those who are laying out its always a good idea to send a screw into the floor either on drill point or right beside it to ensure there's nothing structural in the way
Hey Jesse! I appreciate you commenting on my video. Stay tuned for more!
@@TheExcellentLaborer how do u vent the pipe thru the roof, u have video on that? also can you show how u connected pipes under the house??
@@TheExcellentLaborer you can have the vent horizontal running toward toilet vent? Whee about shower vent?
Thanks a lot for producing such a simple and very explainable video. Well done 👏🏾👍🏾
Thank you Josh, for your well detailed videos from start to finish.
Thank you Josh. Of all the video on CZcams I’ve watched none ever mention how far the bath tub drain should be from the wall? Either side of the tub, whether perpendicular or parallel to the wall. Thank you so much!
I’m glad I could be helpful. I try to make my videos thorough. Good luck on your project!
Very good explanation of the process.
Thanks for pulling all the spec you need for a project. Saved me from not having to look at so many video.
Awesome! No annoying background music!
This is my GO TO video for roughing out a bathroom!! Thanks simple, no loud music and to the point
I’m a certified industrial chemical plumber, we often use pvc for its chemical resistance. You cannot let the primer fully dry. The pipe and fitting must both be tacky when you apply the glue or you will not get a full chemical reaction. Also it isn’t dry fitting anymore once you wet the pipe with primer, all that twisting and pulling on the primed fittings is disturbing the primed surfaces
Makes sense to me… good tip
This guy has a lot to learn please read my comment what i have tolled him?
That makes sense because I was confused when he said dry fit it but he applied the primer. For sure will remember this thx bro. 🙏
@@tonyantonov947 *told him. You have some things to learn as well.
Oatey says you have to glue the primer within 5 minutes, it's still "wet" that long they say but I wouldn't let it go that long or anywhere near it.
Super good video. Excellent 👌. Thank you! 🎉🎉
Very good instruction I enjoy watching and learn from it
TEL-You are a Great Teacher.
Thanks for taking your time to teach us how to do it.
You are so talented. I enjoy watching your videos. Keep up the good work.
VERY helpful.................building a tiny home here on the Big Island of Hawaii.
This was so super helpful.
My husband and I are building a house(he’s a plumber) and I want to educate myself so I can be as helpful as possible!
Thank you for posting!
Ur a great wife
Ditto. How’s it going?
You are just wonderful! I have learned so much and saved so much money just by watching you. ❤❤❤
Thanks for letting me know. I’m glad I can help you out! Good luck with the rest of your projects!
You are the best brother.I
Thank you so much! I appreciate you watching my videos!
Thank you for you time for showing plumbing ideas
You are very welcome!
Thank you for all the awesome information on plumbing this bathroom.
Very informative thanks great work now I know what I need to do Respect! From Texas!
Such a great, clear presentation
Thank you Marc! I hope it is helpful for you. Take care!
Very good explanation how to installation of the sewer pipe.
Sir you really have developed a lot of knowledge and skills! Much respect! your videos are excellent!
Thank you so much! Stay tuned for more!
Not all his knowledge is up to code. Read Oatey's instructions on using primer and glue. "Dry fitting" should be done dry, BEFORE applying primer!!!!!!!!!!!!
This was such an awesome video thank you for taking the time to make this for us
No problem Austin!
outstanding video!
we are currently remodeling a cottage on the property, with some substantial relocations. This info will come in handy for sure!
Good choice on sub flooring.
JUST AMAZING VIDEO, IT'LL HELP ME FEED MY FAMILY!
Josh thanks for share this is a lot of helpful for us ❤ I see some time they don't know how you show up this way for me fast and easy way I need to be
Amazing video😄thanks really helped👍🏻
Thank you, very nice vedio with nice illustration.
Very good clear information
Id rather see the vanity supply going through the wall , it makes installing or replacing the vanity much easier and also stays out of the way of the flooring.
Yeah I thought that was strange too. You only see that in really old buildings.
You have a lot to learn! I'm gonna leave it at that
Saludos Josh gracias x compartir exelentes videos muchos calurosos abrazos a la familia bendiciones desde indianapolis Indiana 🇬🇹
Hey Jonathan! Thanks for watching. Indiana is a nice place. Stay tuned!!
Great work. Thank you so much for sharing.
Great information.... great presentation.
Wow, i guess i have to implement this method
Thankyou I appreciate your time, skill and pointers (tips) you break it down to make it easier for beginners cheers
No problem! Thanks for watching Paul!
Really helpful, thank you. I imagine this is significantly more difficult in a home that’s already built, instead of a new construction. Im trying to figure out how to convert an existing closet into a bathroom. :)
You are welcome. Yes new construction is easier than remodeling. Thanks for watching!
You just gotta take down some Seetrock it aint that much harder.
Except when you're dealing with a concrete slab below. @@mordystrum
Really really great videos! Thanks!
Great idea for toilet flange.
Thank you!
Thanks for your help..
Thank you very much. Very informative.
Wow so nice job.
Thank you really I always learning something from you , 👍
Great video. For those looking to DIY, be sure to buy purple primer and not the clear stuff. That is how the inspector knows the pipes were primed.
Thank you! That is correct. Inspectors look for the purple primer. Thanks for watching!
WE SHOW YOU SOME TRICKS ON OUR CHANNEL TOO!
Or pay off inspector a little better...
Good job I am from Jamaica
Thank you from the USA!
Thank's my friend, very instructive your video....!
Great idea
REALLY NICE WORK MAN 👌🏿
Thank you!
Great job brother I like that
Great job thanks 👍
It's a completely different game under the house crawling with all material and tools plus running and connecting all the drains and proper fall etc
The rules definitely change 😂😂 lol
Very good explein
Very informative. Thanks a lot
I’m glad I can help you! Thank you!
Spot on demo vid... excellent presentation...
I appreciate that. Thanks for watching!
Very well done. Excellent video!
I appreciate that!
Well Done!
Very detail instructions. 👍
I appreciate your comment and thanks for watching!
very nice
Amazing job
Thank you!
MUCHAS GRACIAS. MUY BUENOS VIDEOS .
Great video, I live in San Francisco in an old building and it's about to have most of it's plumbing replaced. PVC seems to be the way to go for outflow./drainage
Great Video!
I really appreciate your tutorials. Very precise and informative 👌👍👏😀
Although not always correct!! Read Oatey's instructions on using PVC primer and glue rather than following this guy's example. He does it very wrong!!! "dry fitting" should be done BEFORE applying primer, and glue MUST be applied in under 5 minutes after primer application.
Thank you! You’re the man!
Thank you, Sean!
I have used a jig saw to cut the hole in the floor. Takes some time, but it worked.
Thank you. Loved the video. Refacing a 1963 Rambler. If you have any renovation videos send my way please.
Thanks
Great job Josh
Thank you Ken!
Damn Josh, you do everything!
Awesome video!
Thanks for watching!
This was awesome! Thanks
I appreciate that Jean! Good luck with your project!
Muy bien gracias
You freaking awesome. I just paid a fortune to a dum**s plumber. Could've done it all myself.
Great job.
Thank you! Cheers!
Excelente my brother 👍
You got my subscription and like!
Do yourself a favor and buy some Milwaukee hole saws with a quick release mandrall. When its time to remove the wood scrap from the hole saw, just first pull back the quick release by hand, pop the drill into reverse holding the saw by hand to unscrew the saw from the mandrall, and then use the tip of the pilot bit to push out the circular wood scrap. I spent many years the hard way removing cores with whatever was nearby. So much easier and professional now.
10/10, thank you!
well done!
Is toliet French for toilet?🤣
I love your videos, very thorough
Well done thank you love the facts and information
Appreciated!