Thanks George! Those things are sweet. I use packing tape along the faces of the cauls that touch the glue and that makes it super easy to clean up. I used to use parallel clamps along the panel, but also clamp cauls to provide the downward pressure. These things do all of that work in one setup! They have a pretty specific use-case for panel glue-ups, but I use them regularly.
New subscriber, I'm glad you have found your channel, love your sense of humor, I'll also add to what someone else said, keep your mistakes in your videos. We all make them and seeing how you work thru them builds character. Best wishes to your channel!!!! Great work
Thanks, Tracy! I appreciate the support! It’s been a great first year and I’m excited about some projects I’ve been commissioned for in early 2024. There will be mistakes!
I really enjoy the authenticity you are bringing to your chanel. You're in a similar space with a similar buildout as me. It's going to be refreshing watching your videos. Can't wait to see more.
Keep any mistakes you make in. That's a relatable feature people like. Math has always been challenging for me, so you can find work around it if need be, but there are apps for everything and calculators for this type of math too. Beautiful boards! Love the pattern especially!! Hey, I would love to hear your opinion on some of the larger tools you have like the Rikon bandsaw(a10"?), using a 6" benchtop jointer, Rigid benchtop sander, and is a large belt sander necessary for the shop. Perhaps worked into a future video? A pro tip from me- wipe off the glue before it starts to set. I keep a pile of old tee shirts cut up into a pox. 12x12 squares, seams, and all spritz it lightly with H2O and wipe as much off then. Or put a strip of wax paper between the clamp's two surfaces and the glue. If using waterproof glue it won't wash off the rags but regularly does. I wash them in the shop sink, or you can just throw them out. I ask my extended family to save their old tee or on dollar day at Goodwill I will buy some and it only takes a few minutes to cut them up. Generic baby wipes are also good, but I try to use something reusable.
Great tip! I have used the wiping method in the past, but I think I gave up after I wiped glue on a piece that was hard to sand and it made the finish blotchy because of glue smears I couldn’t see. Though for this cutting board, that would work great. I like your idea of a tool review video. I don’t think I would ever say I “need” these big tools, but by golly if they aren’t fun (and save so much time!).
Nice video. Perfectly illustrates why I don't make cutting boards myself. I don't have a drum sander, and sanding the "bejeebers" out of anything with an ROS doesn't appeal to me at all, lol. I'll get one someday and make a few then. Your's look great! I like that pattern. When I do make some, I'll make them like these.
Ha, when I was 10 yrs old, my grampa started me off in the wood shop HAND SANDING. He figured if I could last through sanding boards for a cabinet, I would stay in the hobby. Well, I'm 60 and I still hand sand small items, but have upgraded to random orbital sanders over the years. I understood the lesson and when I ask my grampa if he had any more for me to do after I finished the cabinet boards, he knew then I would make a fine woodworker. If there is a will, there is a way.
@@crossgrainwoodproductsltd9230 well said! I’ve also made sure that I could cut my teeth the hard way before “earning” the tool upgrade. Your Grandpa sounds like a very wise man.
Don't get me wrong, like most I started out hand sanding. But as I get older (50), i start getting cramps and arthritis related issues in my hands doing stuff like that for long periods, so I have to work around that however I can. Also, woodworking has evolved into a business for me, and time is money in a business, so you have to find ways to do things more efficiently to keep the business going. I'm all for starting with the basics, but I'm ok with evolving with the technology, too.
Glad to come across your video. First attempt making an end grain. Quick question, instead of cutting and gluing twice, couldn't one just cut the boards on the ends, 1.5 inch thick and glue up?
There is definitely no wrong way to do it if the product turns out! However, the two- cut process is what allows you to make a pattern of small block, checker patterns. If you tried to assemble, glue and clamp all of those small cubes together you’d lose your marbles (and in the end there would be gaps - which looks bad and also breeds bacteria in cutting boards). Cutting strips one way and then flipping them on end to cut strips the other way allows for a “clamp’able” board. I implore you to try it though and see what process works for you!
Those look really nice! Have you ever had an end grain board move on you after you've done the final glue up and sanding? I made a maple board (about 2.25" thick) which I flattened with my router sled (don't have a drum sander) and sanded. After a few days, it rocks corner to corner. Did I just wait too long to oil it? Will adding the moisture by oiling it cause the wood to sort of "move back" to where it was before, or would you recommend re-flattening before oiling?
Yes! It’s very frustrating when wood moves on you. It could be the moisture added from the oil - never thought about that. To fix a slight wobble, I’ve stuck sandpaper to a flat MDF backer board (MDF stays very flat usually). I use spray adhesive to stick to the back of the sandpaper. Then I run the cutting board back and forth over that flat reference until I shave it down enough to remove the wobble. The quicker way is to put rubber feet on your board. With very slight wobbles, sometimes you can even it out by how tight or loose you screw the rubber feet in to remove the wobble. A washer under one of the rubber feet can sometimes remove the wobble as well. Good luck!
Awesome video and I love the design. Gonna make one for my niece’s wedding. I do have a couple questions. 1. If your finished board is 12”x approximately 16”, why did you cut boards 36” long? 2. Why did you cut boards 4” wide? I may have missed something or just confused on some things.
Yeah, the initial glue up has to be 36” long because after it dries I cross-cut that long panel into pieces to use for the end grain. There are two glue ups. You determine how thick you want you finished board (I chose 1.25” thick). Then you cut pieces from your initial panel 1,25” wide (because you flip them sideways). 36 / 1,25” = ~28 crosscut pieces, but those pieces are only 3/4” wide now because they are flipped on their side. So that next glue up turns that 36” panel (which was 3/4” thick) into a ~16-17” board (that is 1.25” thick). It would be longer if you didn’t lose so much sawdust from each cut (you have to factor in the 1/8” of board that you lose after every crosscut).
The wider strips I cut were just used to lay flat side to side with other boards for the design. The initial 36” panels in still only 3/4” thick, but you could use 4” boards or 2” boards or whatever you want (they just lay flat and glue up side by side). These boards just have to be the same thickness so that you have a smooth panel before you can move to the next step.
Thanks Alex! I have two different sets (both sets are great, but I recommend picking a brand and sticking with it because I can’t easily interchange both sets without slight misalignments). I have some from peach tree woodworking off Amazon and the other set was Wood River brand from Woodcraft Supply. Here’s the Amazon link: Peachtree Woodworking Supply 2 Pack of 4 Way Pressure Clamps For Clamping Panels - Using Pressure From All Four Directions. Ideal For Woodworkers and Cabinet and Furniture Makers www.amazon.com/dp/B08D1LTF65/ref=cm_sw_r_cp_api_i_K6KK50E29QGB5YZE30NQ?_encoding=UTF8&psc=1
So we’re each of your slats 4” wide and the Purple Heart 1 3/4”? They look smaller in the video? It came out great! You sanded through how many grits? 80,120,150, 220?
Yes, they were different widths. The key is that everything is the same thickness before you do your glue up. They can be different widths - just changes the design. Does that help?
@@kandiecandelaria3134 If you are using a random orbital sander after your final glue-up, I would probably start with 80 to knock down any dried glue, then 120, 150, (180 if you have it - not a super popular grit), 220, 240, 320. Some people stop at 220, but I like it polished smooth.
Last question to keep puduk from getting dark from mineral oil do you tend to sand it to a higher grit like 400 or 600 to close the pours some so the color pops?
@@kandiecandelaria3134 Not a bad idea - but I think mineral oil is going to soak in the same no matter what. Padouk will still get darker with mineral oil. Maybe try Tried and True finish. - it’s a polymerized linseed and beeswax blend that is 100% natural and food safe, but might not darken as much as straight mineral oil.
Oh interesting! Purple Heart can burn easily with high speed sanding or from saw marks (especially from routers). My guess is that the discoloring is from slight burning. You should be a able to sand off the discolored areas with a whole lot of sanding. I would use a less aggressive sanding so as not to further discolor it (something like a random orbital sander). Let me know if that helps!
Yes - I’m fact, I put packing tape over the bottom of the cauls so that the glue doesn’t stick. I can usually scrape the cauls clean as long as I do it immediately after unclamping. I recommend heavy-duty packing tape as it’s more tear resistant to the scraping. I’ve used them for years on the same strip of tape!
I ripped a 2x4 in half to use as the cauls (that you screw the clamp teeth into). I then covered the faces of those 2x4’s with clear packing tape so that the glue won’t stick. They work great!
@@viracocha03 My pleasure - thanks for watching. Hit me up with any questions. What kinds of projects are you going to tackle first? I’d love to hear about it!
Nice channel, suggest that you get rid of the music, you will never get the right combination of music to please everyone. So better to have the sound of the machines. Just a thought, keep up the good work.
Thanks for watching - I think you’re absolutely right in that I won’t please everyone. I’m probably not going to get rid of music entirely as it gives me joy, but I think I’m going to tone it down - maybe pick a song per video and use it sparingly.


Sweet Lord 😮 those turned out FANTASTIC !!
Wow, thanks!
Awwww puppy!
Those turned out beautiful! 👍🏻👍🏻
Thanks @65MK ! I appreciate it!
Awesome video mate. Turned out great
Thank you!
Awesome work friend! Keep this up! I know making and editing these videos takes a TON of time. We really appreciate it.
Wow, thank you! I really appreciate the encouragement! It means a lot.
Good video, thanks. I really like the clamps.
Thanks George! Those things are sweet. I use packing tape along the faces of the cauls that touch the glue and that makes it super easy to clean up. I used to use parallel clamps along the panel, but also clamp cauls to provide the downward pressure. These things do all of that work in one setup! They have a pretty specific use-case for panel glue-ups, but I use them regularly.
Beautiful and awesome teaching with humor. Thanks
Thanks for the encouragement! I appreciate that!
New subscriber, I'm glad you have found your channel, love your sense of humor, I'll also add to what someone else said, keep your mistakes in your videos. We all make them and seeing how you work thru them builds character. Best wishes to your channel!!!! Great work
Thanks, Tracy! I appreciate the support! It’s been a great first year and I’m excited about some projects I’ve been commissioned for in early 2024. There will be mistakes!
I really enjoy the authenticity you are bringing to your chanel. You're in a similar space with a similar buildout as me. It's going to be refreshing watching your videos. Can't wait to see more.
Thanks Dustin!
I seen the golden!! Subscribed...From MN
Awesome! Welcome to the channel! Thanks!
100th Subscriber! Wishing you continued Success!
Amazing! Thanks for subscribing!! You win!!!
Keep any mistakes you make in. That's a relatable feature people like. Math has always been challenging for me, so you can find work around it if need be, but there are apps for everything and calculators for this type of math too. Beautiful boards! Love the pattern especially!!
Hey, I would love to hear your opinion on some of the larger tools you have like the Rikon bandsaw(a10"?), using a 6" benchtop jointer, Rigid benchtop sander, and is a large belt sander necessary for the shop. Perhaps worked into a future video?
A pro tip from me- wipe off the glue before it starts to set. I keep a pile of old tee shirts cut up into a pox. 12x12 squares, seams, and all spritz it lightly with H2O and wipe as much off then. Or put a strip of wax paper between the clamp's two surfaces and the glue. If using waterproof glue it won't wash off the rags but regularly does. I wash them in the shop sink, or you can just throw them out. I ask my extended family to save their old tee or on dollar day at Goodwill I will buy some and it only takes a few minutes to cut them up. Generic baby wipes are also good, but I try to use something reusable.
Great tip! I have used the wiping method in the past, but I think I gave up after I wiped glue on a piece that was hard to sand and it made the finish blotchy because of glue smears I couldn’t see. Though for this cutting board, that would work great. I like your idea of a tool review video. I don’t think I would ever say I “need” these big tools, but by golly if they aren’t fun (and save so much time!).
Nice video. Perfectly illustrates why I don't make cutting boards myself. I don't have a drum sander, and sanding the "bejeebers" out of anything with an ROS doesn't appeal to me at all, lol. I'll get one someday and make a few then. Your's look great! I like that pattern. When I do make some, I'll make them like these.
Thank you sir! The drum sander is a game changer - buts it’s possible without one!
Ha, when I was 10 yrs old, my grampa started me off in the wood shop HAND SANDING. He figured if I could last through sanding boards for a cabinet, I would stay in the hobby. Well, I'm 60 and I still hand sand small items, but have upgraded to random orbital sanders over the years. I understood the lesson and when I ask my grampa if he had any more for me to do after I finished the cabinet boards, he knew then I would make a fine woodworker. If there is a will, there is a way.
@@crossgrainwoodproductsltd9230 well said! I’ve also made sure that I could cut my teeth the hard way before “earning” the tool upgrade. Your Grandpa sounds like a very wise man.
Don't get me wrong, like most I started out hand sanding. But as I get older (50), i start getting cramps and arthritis related issues in my hands doing stuff like that for long periods, so I have to work around that however I can. Also, woodworking has evolved into a business for me, and time is money in a business, so you have to find ways to do things more efficiently to keep the business going. I'm all for starting with the basics, but I'm ok with evolving with the technology, too.
awesome
Thanks, Jim!
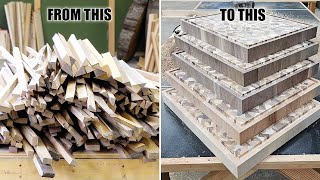
Glad to come across your video. First attempt making an end grain. Quick question, instead of cutting and gluing twice, couldn't one just cut the boards on the ends, 1.5 inch thick and glue up?
There is definitely no wrong way to do it if the product turns out! However, the two- cut process is what allows you to make a pattern of small block, checker patterns. If you tried to assemble, glue and clamp all of those small cubes together you’d lose your marbles (and in the end there would be gaps - which looks bad and also breeds bacteria in cutting boards). Cutting strips one way and then flipping them on end to cut strips the other way allows for a “clamp’able” board. I implore you to try it though and see what process works for you!
Those look really nice! Have you ever had an end grain board move on you after you've done the final glue up and sanding? I made a maple board (about 2.25" thick) which I flattened with my router sled (don't have a drum sander) and sanded. After a few days, it rocks corner to corner. Did I just wait too long to oil it? Will adding the moisture by oiling it cause the wood to sort of "move back" to where it was before, or would you recommend re-flattening before oiling?
Yes! It’s very frustrating when wood moves on you. It could be the moisture added from the oil - never thought about that. To fix a slight wobble, I’ve stuck sandpaper to a flat MDF backer board (MDF stays very flat usually). I use spray adhesive to stick to the back of the sandpaper. Then I run the cutting board back and forth over that flat reference until I shave it down enough to remove the wobble. The quicker way is to put rubber feet on your board. With very slight wobbles, sometimes you can even it out by how tight or loose you screw the rubber feet in to remove the wobble. A washer under one of the rubber feet can sometimes remove the wobble as well. Good luck!
Awesome video and I love the design. Gonna make one for my niece’s wedding. I do have a couple questions.
1. If your finished board is 12”x approximately 16”, why did you cut boards 36” long?
2. Why did you cut boards 4” wide?
I may have missed something or just confused on some things.
I may have figured it out. Were those sizes to make the 2 boards?
Yeah, the initial glue up has to be 36” long because after it dries I cross-cut that long panel into pieces to use for the end grain. There are two glue ups. You determine how thick you want you finished board (I chose 1.25” thick). Then you cut pieces from your initial panel 1,25” wide (because you flip them sideways). 36 / 1,25” = ~28 crosscut pieces, but those pieces are only 3/4” wide now because they are flipped on their side. So that next glue up turns that 36” panel (which was 3/4” thick) into a ~16-17” board (that is 1.25” thick). It would be longer if you didn’t lose so much sawdust from each cut (you have to factor in the 1/8” of board that you lose after every crosscut).
The wider strips I cut were just used to lay flat side to side with other boards for the design. The initial 36” panels in still only 3/4” thick, but you could use 4” boards or 2” boards or whatever you want (they just lay flat and glue up side by side). These boards just have to be the same thickness so that you have a smooth panel before you can move to the next step.
@@TenThousandMakes thanks for reply. Maybe 5 mins after I sent comments, my brain decided to work and light bulb turned on.
Great video! Where do you find those clamps?
Thanks Alex! I have two different sets (both sets are great, but I recommend picking a brand and sticking with it because I can’t easily interchange both sets without slight misalignments). I have some from peach tree woodworking off Amazon and the other set was Wood River brand from Woodcraft Supply. Here’s the Amazon link:
Peachtree Woodworking Supply 2 Pack of 4 Way Pressure Clamps For Clamping Panels - Using Pressure From All Four Directions. Ideal For Woodworkers and Cabinet and Furniture Makers www.amazon.com/dp/B08D1LTF65/ref=cm_sw_r_cp_api_i_K6KK50E29QGB5YZE30NQ?_encoding=UTF8&psc=1
Woodcraft link: www.woodcraft.com/products/woodriver-clamping-system?via=573621f469702d06760016cd%2C576328a869702d20ec000b2f
So we’re each of your slats 4” wide and the Purple Heart 1 3/4”? They look smaller in the video? It came out great! You sanded through how many grits? 80,120,150, 220?
Yes, they were different widths. The key is that everything is the same thickness before you do your glue up. They can be different widths - just changes the design. Does that help?
Yes thanks what about the sanding grits?
@@kandiecandelaria3134 If you are using a random orbital sander after your final glue-up, I would probably start with 80 to knock down any dried glue, then 120, 150, (180 if you have it - not a super popular grit), 220, 240, 320. Some people stop at 220, but I like it polished smooth.
Last question to keep puduk from getting dark from mineral oil do you tend to sand it to a higher grit like 400 or 600 to close the pours some so the color pops?
@@kandiecandelaria3134 Not a bad idea - but I think mineral oil is going to soak in the same no matter what. Padouk will still get darker with mineral oil. Maybe try Tried and True finish. - it’s a polymerized linseed and beeswax blend that is 100% natural and food safe, but might not darken as much as straight mineral oil.
Great video , I did a board like yours after watching but my purple heart turned brown? Any help would be great. Thanks
Oh interesting! Purple Heart can burn easily with high speed sanding or from saw marks (especially from routers). My guess is that the discoloring is from slight burning. You should be a able to sand off the discolored areas with a whole lot of sanding. I would use a less aggressive sanding so as not to further discolor it (something like a random orbital sander). Let me know if that helps!
Did you put anything on the cauls for the second glue up?
Yes - I’m fact, I put packing tape over the bottom of the cauls so that the glue doesn’t stick. I can usually scrape the cauls clean as long as I do it immediately after unclamping. I recommend heavy-duty packing tape as it’s more tear resistant to the scraping. I’ve used them for years on the same strip of tape!
@@TenThousandMakes Thanks, that "clears" that up.
What are those clamps you used?
You can find them in a few places online, but these are an example from Woodcraft: www.woodcraft.com/products/woodriver-clamping-system
I ripped a 2x4 in half to use as the cauls (that you screw the clamp teeth into). I then covered the faces of those 2x4’s with clear packing tape so that the glue won’t stick. They work great!
@@TenThousandMakes Those look really nice to use. I'm new to wood working and had never seen them before.. Thank you for the response and the link.
@@viracocha03 My pleasure - thanks for watching. Hit me up with any questions. What kinds of projects are you going to tackle first? I’d love to hear about it!
Nice channel, suggest that you get rid of the music, you will never get the right combination of music to please everyone. So better to have the sound of the machines. Just a thought, keep up the good work.
Thanks for watching - I think you’re absolutely right in that I won’t please everyone. I’m probably not going to get rid of music entirely as it gives me joy, but I think I’m going to tone it down - maybe pick a song per video and use it sparingly.
Music is way too loud....so unnecessary
In the words of the inimitable Jay-Z, “now why you fronting on me, is that necessary?”