Amazing 2D adjustment Router jig

Vložit
- čas přidán 19. 01. 2022
- Plan is here
jisaku-koubou.com/downloads/2...
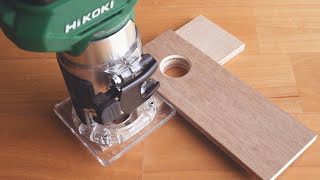
I made a rail guide for the router.
This can be used to machine simple and accurate grooves.
These can be used to machine grooves that support cabinet shelves and box dividers.
Also, by removing the adjusting screw, it can be used as a simple straight cutting jig. - Jak na to + styl


😊 This is my new happy place. No blah blah or action noise or sound music or stupid thumbs up. Simply pure Japanese genius handicraft. Kudos! And a big thank you.
A real relief not to have a shouted commentary with music or 'jokes' to distract: nothing unnecessary about any of these videos, simple, precise and relaxing.
cuz dude’s Azn, bruh
As always: yet another "Absolutely Brilliant" from "JSK". For he is truly a "CUT" above. And one of his greatest features is: NO audio (except for soft sounds from his tools) and no "ego faces"; bragging what "they" have done.
Thank you kind Sir; for sharing your innate talents with us; in an awesome humble way. It doesn't get any better than that!
He? Sir?
I'm pretty sure this is a woman in the video :)
@@agentrapper Oh really? I can assure you that the builder IS a man. This can be proved in the very rare times; when they show his face. But you will see it; if you look at a number of his video's.
A master at work. I enjoy watching you make the different accessories for the shop and how much it helps us in our everyday woodworking projects. Thank you for sharing.
You have some of the coolest tools available. And homemade. Even cooler!
So many doubts and questions answered in this video, yet not a word spoken. AWESOMENESS :) Not mentioning the fact that you saved me a lot of money. It's a beauty in its simplicity.
Nice improvements over the original design. Thanks for sharing!
Great build & that looks like an excellent router guide! 👍👍👏👏
どの動画を見ても何時も感心しております。後期高齢者ですが色々なジグが参考に成り作って楽しんで居ますが家内から後何年生きて使うのよ!と軽蔑の目で言われながらも零度近い寒空のしたで頑張っております。好きなことをやっていると寒さも感じません。
好きなことしていると寒さも忘れますよね。
特に冬場はモノづくりに集中していると体の芯から冷えて、普通のお風呂が熱くて入れないくらいに体が冷えることがありますが、不思議とそんな時に風邪をひいたことがありません。
好きなことを楽しむことが自身の免疫を最大限に活性化する秘訣だと思っています。
Постоянно восхищаюсь Вашей работой! Всё очень понятно показано. И без лишних слов. Спасибо! Жду новых идей. Удачи Вам!
Top
I really love the tools you created.. that wall mounted saw is the best and saves so much on space.
Hello sir
Toujours aussi ingénieux et très précis bravo à vous continuez de nous faire plaisir
Merci👍👍👍
If your goal is to show people what precision is all about - You nailed it. With one jig you solved so many issues - Incredible and thank you for sharing yours amazing skills.
yeah
Brilliant jig, man! Fantastic work! 😃
I definitely need to make something like that!!!
Stay safe there with your family! 🖖😊
😊👍
You do such an awesome job!!!! Love watching.
Excelente proyecto muy bien desarrollado y mejor ejecutado , la súper/guía para el router , gracias por compartir tanta creatividad y conocimientos , un saludo cordial y por supuesto un gran like desde Narón , Galicia (España) 🤓 🛠️
Verdaderamente majestuoso. Es un placer ver esas manos creando aplicaciones valiosísimas . MAESTRO
Me asombra la limpieza en cada proyecto que sube MAESTRO pero sobre todo lo que nos ayuda con todos estos proyectos gracias
Wonderfull work, as always!
Unglaublich mit wie viel Ruhe sie jede vorichtumg bauen die sehr hilfreich zeitsparend sind habe sie abonniert klasse
FANTASTIC JOBS. SUCH PRECISE WORK CAN ONLY BE DONE BY A MASTER .
Desde España, ¡gracias por compartir tu trabajo y las sugerencias adicionales que muestras en el vídeo!
¡Internet es una hermosa herramienta!
Excelente trabajo, muy exacto. Muy limpio. Gracias por compartir sus ideas.
Best and most practical jig , thank you so much. Excellence personified. I was thinking of adding phenolic plastic to the edges on both sides of the router guide to increase lubricity and longevity. Well done my friend 👍
Wow, excellent craftswomanship😮 Very inspiring, ty!
So clean and really awesome skills 👍
A design as simple as it is remarkable. Always clean and precise work. And a beautifully produced video. Thank you for your work and this precious sharing.
Where do you find those nifty buttons to choose the length of the screw? I had never seen them before.
Toujours aussi agréable à regarder👏 👨🦽💨
Absolutely brilliant I'm sure he must be a master carpenter. Jack in Ireland
Great idea, well done! thanks for sharing! Greetings from Germany, Robert
I hope you will share my videos with your friends!
Come sempre , OTTIMO LAVORO !!!!
Complimenti e Grazie !!!
g t
This guy is just brilliant!
Another very useful jig to make. Thank you for your excellent video, sharing your great ideas and wonderful skill. 👍
😊😊👍
Отличная приспособа. Обязательно сделаю такую.
FELICITATIONS POUR VOS REALISATIONS. IDEES INCROYABLES. TRES BELLES PRISES DE VUES.TRAVAIL TRES SOIGNE
ON NE SE LASSE DE VOUS VOIR TRAVAILLER 👍👍👍👍👍
Да. Просто и очень удобно. Надо сделать такую каретку. Спасибо!
You rock, tho silent; we hear you loud and clear. Awesome skills
Perfection as always Great Job sir!
That is quite brilliant, thanks for sharing.
Estaba pensando cómo hacer una guía para el router y esta es la que más me gusta. Felicidades!
😊😊👍
This is simply genius!!!
Great design - I will build it for myself :)
Very nice work !!!! Thank for this video.......Friendship to France
Great job!👍
Отлично, спасибо! Буду и себе такую делать для своего ДеВалта
Perfect as always
Unbelievable wish we all had the same skills. All of your videos are inspiring ty.👍🇬🇧
😊😊👍
Nice work Friend! Thank you for sharing with us!💖👍😎JP
Great jig!
今回もありがとうございます。👏👏👏
Tolle und einfach Vorrichtung zum fräsen
Brilliant, Thank you for sharing
Awesome jig 👏
Masterful!
Excellent as always
No Sawstop? No Woodpeckers? What a joy to watch.
Супер.спасибо за видео урок.
Nice ideas.👍👍👍
I always thumbs up before watching JSK videos.
Same here... He is the master of neaty tools and jigs... 🙌🙌🙌🥳🥳🥳🙌🙌🙌
Another quality solution.
Nice work,
Great work sir
Another excellent design and build from a very innovative and skilled craftsman. This is the best jig of this type I have seen. The end stops are a good idea and give control of the length of the cut. そのような熟練した熟練した職人 ありがとう
*craftswoman😜
@@agentrapper Sorry, no offense intended. But I believe this is a man. Can you prove otherwise?
@@bobd. No, I based it on the female hands, arms and the nail polish. But someone else claims it's a man, and that you see him on rare occasions :)
Thank you. I don't understand the last segment, but if I watch this a few more times it'll probably jell.
Muito bom seus trabalhos 🇧🇷🇧🇷
It was a very good lesson.
Nice! Thanks
Grazie Maestro.
Nice jig 👍👍
Yeah, when the the short sides are too small to have adjustment rails of their own you just add a little pin of scrap wood and all is well in town again, right? So simple and so brilliant !!!
Excellent.!!!
Great work. I did one of those, too. There are two things I want to mention:
1. 1:01 Did you stick the T-slot rails to the boards only with two-sided sticky tape? No screws? No glue? Will that hold over time?
2. 1:21 I will have to redo my jig because I (like you) used the FLAT side of the router base to set the width of the boards. But when I move the router and twist it just a little bit it moved the router bit away from the board / the guide rail and moves it into the other board (when I do narrow slots) which destroyed the edge of the other board of my jig and made the slot ugly. It would be better to use the ROUND part of the router base to set the width of the boards. So if one twists the router a little whilst moving, the distance to the guiding rail still stays the same thus it does not mess up the cut.
Love your channel. Thx 4 sharing.
Greetings from Switzerland 🇨🇭
No - don't use the base at all. use a pattern bit instead. Makes for a smaller and more versatile jig and maintains accuracy regardless of router orientation. Of course this means accurately zeroing the base. But you should do that anyway.
@@jimspence0 Well, it will not work in my case. The pattern bit has a given depth and all the pattern bits I have will go right through the board (workpiece). And I would have to pre-drill a hole because I am not sure if my pattern bits are made for drilling, too. If I just want to make a groove (like for a shelf), I am better of with a basic router bit just as shown in the video.
Some routers do have a D-shape foot, so one side will always have a wider overhang from cutter to foot-edge, so you would indeed need to match the made edges to their own side of the router. Either way, doing as JSK has done, and marking the boards and the router will keep it happy. Even my lil Ryobi 18v Trim Router has a tiny overhang on one side, so I would still mark my boards etc.
Also worth noting is that the cutter bit that is used to trim the boards to size at 1:24 and 2:24 is the same bit (or size) nthat must always be used with the jig. If you want to cut trenches with a wider bit, you need a new pair of boards, or re-cut them with the bigger bit
I too wondered about fastening the channels to the boards, newer T-20 tracks are already drilled and countersunk for this, and maybe M5 insert nuts in the 9mm MDF would be wise.
And hey, lets work on banning the word 'Dado' in this context, and 'Rabbets'. Trenches and Rebates, please
Let's not give in to the 'muricans
nice.. Thanks for sharing...
Very nice jig. I’m sad that you just posted 10 minutes ago and now I have to wait awhile before your next video.
AWSOME BROTHER
Super 👍
Thank you prouf
Exlent yuor jops.good lauk dear.
Think that this will be useful. I used ceiling fan blades for bases & cherry for brackets.
Nice!
You it's the best..👍👍
When JSK pulls the backing off double-stick tape it looks ASMR. When I do that, it looks comical.
In Japan they seem to have a considerably higher grade of double sided tape!
A bit late to the party ....
With regards to the comment below about always using the round edge of the router against the fence .... I'd disagree with you there, as there is no guarantee that the round edge is equidistant at all points (if you were to inadvertently rotate the router while you are cutting), whereas the distance using the straight edge is constant!!
With a few modifications the jig could also be used to cut out most four sided shapes, i.e. parallelogram, rhombus, trapezoid etc .... although I don't know how useful this would be!
Your approach to design and execution is amazing ... away to look at the rest of your creations :)
Great router
Атлична. Спасиба. 5+
I love it, but I think you could answer many questions on the Heart Sutra, why O Sensei believed in loving kindness, etc., etc.
thanks~
you should use the round edge of your router against the fence, not the straight side of the router.
三夾板之神!
hola el video está muy bueno, me encanto
primero en comentar:🤜🤛👍👏👊
Fantastic...when I look your videos... Ideas...skills... just wanna go down and start working on :-) !!! One question: I understand could be difficult, but at least here in Italy it's difficult sometimes find good and quality tools...expecially in latest years with Amazon and Leroy and some others...we find only poor ones and low quality. Could you also provide some link that maybe could be useful also in other countries to buy some food stuff? For example some nice metal squares you often use ... looks quite precise and reliable... Could be nice know where to buy... Thank you so very much and greetings from Italy :-)
برافو عليك تحيتي لك
That was amazing bro
Thats true bro
yeah bro
1:25 better to use the rounded edge of router base against the guide instead
Thanks a lot for your videos. Very professional and knowledgeable.
Such a request to you - where can I buy such "Plastic Thumb Screw" as you use in your projects.
Is there a link to aliexpress?
Thank you.
sweet!
Waiting for the day he shows us how to sharpen compression bits.
Amigo como haces esos Cortes rectos sin sierra
Thanks for demonstrating yet another simple, elegant and thoughtfully designed jig! One question: In the last step, you added thin strips of MDF to create "end stops" to limit router travel so that slots, mortises, or stopped dadoes could be accurately cut. Those strips are the same width as the router bit used in the demonstration, but wider strips could used to accommodate a wider bit, or if end stops were not needed, the strips could easily be removed. Is that why they are held in place with tape instead of glue?
@Carl Gradolph Hi Carl. A wider bit can not be used because it would ruin the first cut done to the MDF base, and make it narrower. If you then wanted to revert to the thinner bit, you wouldn't have the reference edge for positioning the vertical element of your dado joint. So once you choose a certain bit diameter and cut the MDF, you always have to use the same bit. And something else, the thin strips of MDF are not the actual end stops, they are only a reference for positioning the cross pieces. The actual stop is the cross piece against the router base, but maybe you knew this already.
прикольно в мое время начало столярных работ такого инструмента небыло,вот попробуи стамесочкой и кияночкой вот тогда будеш гуд а так я у себя в сарае нехуже делаю без всяких причендалов