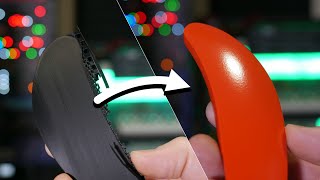
Smooth 3D Printed Parts Without Sanding! Acetone Vapor Smoothing ABS

Vložit
- čas přidán 10. 09. 2024
- Love the channel? Consider supporting me on Patreon:
www.patreon.co...
In this video we take a look at the process of vapor smoothing a 3d printed part. This can be done for both ABS as well as ASA and gives some very impressive results. In this video we will take a look at what is required for the process as well as what the results are. Vapor smoothing ABS prints is not to difficult and you can get great results with very low cost.
(´∀`)♡ As an Amazon Associate I earn from qualifying purchases:
Buy now on Amazon: amzn.to/2jQAOgV
Subscribe To My 3d Printing Blog! :
Lets Get Social!
Facebook: / dopesoner930
Twitter: / dopesoner930
Instagram: / modbotarmy
Twitch: / dopesoner930


I 've been doing this for about five years. I do the hot acetone method. I've had no problems with it, just make sure you do it outside or in the garage. I use a rice cooker with a wire basket. You can put nuts and bolts through the wire to support your objects touching the object as little as possible. Every support will leave a mark. I put the object(s) in the basket and carefully lower it into the cooker. Pour a small amount of acetone down the side. It's trial and error how much to add but a couple of desert spoons would be a guide. Place the lid on the cooker. If it's glass all the better because you can watch the process. Turn the cooker on and watch the acetone start to sizzle and boil. I start my timer (in my head) when it's sizzling and 10 -15 seconds after that should be enough. If you look in you can see the vapour rise up the print leaving a glossy surface as it does. Remove the lid and see if it's what you want. If it's a little underdone put the lid back on for a few seconds. When your satisfied carefully remove the basket and put it somewhere safe for a while. Touching the print before it is fully hardened will mark it. Enjoy your excellent print.
Did this over a decade ago. Tip: Test the amount of time with failed prints and make a note on how much time smooths the parts. Next project, using acetone to glue different ABS parts together. My setup is with a deep fryer, a square picture frame glass for the print to be on and 4 little half inch blocks to keep the glass raised off the bottom to keep the glass raised. Only turn on for 10 seconds (or until you see the vapor fumes start) with the lid on. Wait 30 seconds, maybe more or less depending on amount smoothing you want. Test it first with broken failed prints to get the timing down. I do this outside or in the garage for ventilation and away from any open flame. For safety I also have a 3M organic vapor mask.
Benefits of heating it so the fumes reach evenly to the top and the bottom of the print.
years later, let me add another pro tip, poke holes in the bottom of the paint can or container being used. use more sticks to raise the model higher up. soak a single paper towel with the acetone. poke holes in the lid as well. hot glue a seal around the fan to the lid, place the soaked paper towel on the lid in just 1 or 2 layers, then place the sticks down, the opject on the sticks, the container over top of the object and connect it to the lid. turn the fan on to be at 500 rpms roughly. so it's a light breeze but not much. the airflow helps more the fumes around and not settle. like a convection oven. bakes evenly around the outsides and leave though the vent at the top (technically the bottom) of the pain can that's over the object. its fed around the object and then congested into a center point for it's exhaust.
I tried all the vapor smoothing methods. Simplest way to get a perfect surface is quite simple. Just dump the part in acetone just for a second and than give it a shake to get rid of any drops. Hang I on a string and let it dry.
does that smooth it too much? Or destroy the part?
I haven't printed anything of this size, but I've also only had my Ender 3 Pro up and running for a few weeks.
My son mentioned vapor smoothing to me a few days ago and I actually did an experiment with a D&D miniature figure I printed at 1.2 with Inland PLA+. I didn't even have full acetone, but used nail polish remover. I poured the nail polish remover in a bowl, raised the mini up on an old shot glass, and then put another glass over top of the whole thing and left it for a couple of hours.
Even in a couple of hours, it looked promising. That hardness of the PLA had softened and I could see the features softening a bit too. It was a one-off print, so I decided to throw caution to the wind and just let it go overnight.
By morning, it was really impressive. It wasn't nearly as shiny as the ABS and acetone, but the harshness of the layer lines had diminished, and it didn't have as much gloss as the fresh-printed PLA had. All in all, it was a good experiment.
I'm going to repeat the process soon and combine your method, using real acetone. With this being my first 3D printer, I wasn't ready to jump straight into a resin printer, but with this little experiment, my 3D miniatures might just be comparable.
Interesting. I have not heard of people using it with PLA. If you do end up experimenting more with pure acetone please share what your experience is like. Would be awesome to be able to get something close or at least something that it a step in the right direction.
Thank you for watching as well as for the detailed comment. Welcome to the hobby :)
I use a large glass vase (regular cylinder ones) and use a silicone lid to cover. I use magnets on in side and out to hold paper towels with acetone. I also hang the item down instead.
The magnets was something I was going to do but ended up not. Hanging upside down sounds like a brilliant idea. I think that would have helped me get a more even smoothing.
ABS pros - sands well, it can be smooth with acetone , heat resistant . Cons - warps like crazi if not all requirements are taken to print it, and it smels a bit
ABS is simply not a modern material anymore. If they find a method to smooth PLA like that, which is not extremly harmful, I would celebrate. A LOT! :D
True, ABS is not really a nice material, and not a really healthy one either.
Chloroform..
Yeah, I agree. There are alot of people that use it still though. Especially for printing out Automotive parts. Its high thermal resistance makes it perfect. I would love for a simple method for PLA!
1 year late, but ASA is a nice material for prints. I print atm only in ASA even if i dont need its properties.
What makes ABS outdated? It's literally one of the most used and cost effective materials. What would be a better alternative with same benefits and same cost?
I tired this with ABS+ and it was a lot harder to get good results. It works great with regular ABS
A glass aquarium with acetone in a glass bowl and small computer fan to keep it moving around items. That was you can see when to stop ??
Thomas, did you ever try this? Sounds perfect?
Which brand of abs do u use
Esun is not melt properly
is acetone nail polish remover smooth the abs?
Have you ever flocked your parts after printing? You will get a nice and velvet like surface.
Thanks for the video!
How would you compare this method and the Polysher/PolySmooth?
I have not used it first hand but if you do not need the strength or thermal resistance that ABS offers the PolySmooth box is a pretty awesome solution.
i bet you can sand some spots and then toss it in the vapor chamber
Thanks for sharing👍😀
I wonder if heating causes warping
Very cool 😎👍
Me a welder, acetone is dangerous, i use that stuff like water
Lmao same, I even wash my hands with it to get grease off.
Any tricks like this for PLA or PETG?
I wish! The only things I have seen it coating it with an epoxy or material such as XTC or 3DGloop
Dope tee shirt
I followed all your steps but the brakes on my car are still rough :(
In seriousness though I just tried this on a test model - I used a pot on the stove with super low heat and a few tablespoons of acetone. The pot had a clear lid so I could watch the process and it literally only took 45 seconds before I had to open the lid to remove the model. Came out awesome! Thanks!