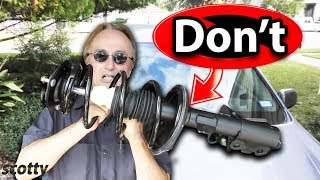
How to Replace Struts for a Nissan Frontier/Xterra (2008-2014)

Vložit
- čas přidán 25. 12. 2021
- We are going over the steps to swap out the complete strut assembly for a 2009 Nissan Frontier.
Errata (12-30-21): Step 24 is suppose to be 67 ft-lb, NOT 14 ft-lb (Bad Copy/Paste Error)
1. Tools - 0:08
2. Step 1 (Mark Lower Control Arm Level) - 0:46
3. Step 2 (Loosen Lug Nuts) - 1:12
4. Step 3 (Lift Vehicle) - 1:24
5. Step 4 (Remove Wheels) - 1:53
6. Step 5 (Lubricate Nuts and Bolts) - 2:08
7. Step 6 (Support Control Arm) - 2:28
8. Step 7 (Remove Stabilizer Bar Link - DS) - 2:36
9. Step 8 (Remove Stabilizer Bar Link - PS) - 4:07
10. Step 9 (Rotate Stabilizer Bar) - 4:20
11. Step 10 (Remove Lower Mounting Bolt) - 4:26
12. Step 11 (Remove Upper Mounting Nuts) - 5:22
13. Step 12 (Remove Strut Assembly - DS) - 5:47
14. Step 13 (Lubricate Strut Bushing - DS) - 6:10
15. Step 14 (Install Strut Assembly - DS) - 6:30
16. Step 15 (Install Lower Mounting Bolt) - 6:44
17. Step 16 (Install Upper Mounting Nuts) - 7:06
18. Step 17 (Install Lower Mounting Nut) - 7:40
19. Step 18 (Torque Upper Mounting Nuts) - 8:02
20. Step 19 (Mark Upper Mounting Nuts) - 8:30
21. Step 20 (Replace PS Strut Assembly) - 8:43
22. Step 21 (Install Stabilizer Bar Links) - 11:06
23. Step 22 (Return Stabilizer Bar Position) - 11:25
24. Step 23 (Torque Upper Stabilizer Bar Link Nuts) - 11:46
25. Step 24 (Torque Lower Stabilizer Bar Link Nuts) - 11:57
26. Step 25 (Mark Stabilizer Bar Link Nuts) - 12:01
27. Step 26 (Level Lower Control Arm - DS) - 12:15
28. Step 27 (Torque Lower Mounting Bolt - DS) - 12:29
29. Step 28 (Mark Lower Mounting Bolt - DS) - 12:47
30. Step 29 (Level Lower Control Arm - PS) - 12:50
31. Step 30 (Torque Lower Mounting Bolt - PS) - 12:55
32. Step 31 (Mark Lower Mounting Bolt - PS) - 13:09
33. Step 32 (Install Wheels) - 13:14
34. Step 33 (Lower Vehicle) - 13:28
35. Step 34 (Torque Lug Nuts) - 13:34
DS = Driver Side
PS = Passenger Side
Products Used:
This video contains affiliate links for which I may receive compensation.
MonroeRoadMatic Complete Strut Assembly - shop.advanceautoparts.com/p/m...
Synthetic Grease - amzn.to/3HzwZnx
Semi-Permanent Threadlock - www.harborfreight.com/02-oz-r...
Penetrant Spray - www.harborfreight.com/11-oz-s...
Paint Marker Pens - amzn.to/345kuTd
Tools:
1/2" Torque Wrench (14-155 ft-lb)
1/2" Breaker Bar
1/4" Socket Wrench
1/2" Socket Wrench
14mm Socket
17mm Socket
19mm Socket
21mm Socket
14mm Wrench
17mm Wrench
19mm Wrench
1/2" Extensions
Semi-Permanent Threadlock
Grease
Penetrating Oil
Paint Marker Pen (Optional)
Service Jacks & Jack Stands
Disclaimer: Content produced from Mcgurr Entertainment is for entertainment purposes only. This information is not endorsed by any agency/company (such as Ford) and is intended as an entertainment. Mcgurr Entertainment assumes no liability for property damage or injury incurred as a result of any of the information contained in this video. All content on CZcams is provided in good faith, however we make no representation or warranty of any kind, express or implied, regarding the accuracy, adequacy, validity, reliability, availability or completeness of any information on CZcams. Use this information at your own risk.
#StrutAssembly #FrontierStruts - Auta a dopravní prostředky


This is the best video I’ve seen to help me get ready to switch my struts. Excellent step by step. Thank you for showing both sides, instead of saying just repeat what I’m doing on the other side. Plus, showing the paint marker and why it is so important in the end. On a final note, the difference between a true professional and anyone else is the attention to details. The bushing grease. I haven’t seen anyone else use that in their videos and I wouldn’t had even considered it. It’s the little things the make a professionals quality over just getting the job done type of worker. Thanks again for the great video.
Thank you very much. I appreciate the kind words, It really does mean a lot.
Well I completed the shocks and struts over the weekend and because this is the first time I've done it it took me about 3 hours. The only thing that was different from your video what's the new struts have a bearing on the bottom and no rubber bushing. That was a little confusing until I read the documentation. I guess it's a new thing now LOL thank you for your hard work on this video
I'm very glad it worked out for you!!! Great job and kudos!!
@@mcgurrentertainment hey man I have a question for you. Have you ever seen front struts that don't have the bottom rubber bushings? Those are the ones that you said should be greased when installing. The ones I install did not have those just a place for the bolt to go through and just what seemed to be a couple small bearings
I've seen struts like that, it's normal.
Hey man, just wanted to show my gratitude for such an informative video! Got some Monroe aftermarket’s I scooped up from RockAuto 140 for the pair. Put them on easily thanks to this video. Thanks for the help! Couldn’t have done it without you. Next up for me are the end-links to the stabilizer bar , and lower and upper control arm (bushing) replacement. I truly appreciate you spreading your knowledge in such a palatable manner. Have a great one, you earned it.
I would also like to add - make sure there are no aftermarket strut spacers on before you remove the strut (purchased used @ 124,000)😂 almost lost an eye and a couple fingers when the shock flew down because of the pressure from the spacer. I decided to not put them back on and it rides much better as well as ride height being even.
Thank you very much. I'm very glad it helped.
Hands down ,This is the best instructional video I have ever seen on YT. TY !!
Wow, that's a huge compliment. Thank you very much.
Nice video. Gives me good guidance on what I need to do for my '09 Frontier. But for God's sake, somebody get this man an impact gun.
Lol... Thank you for the support. I do have one, I swear 😆.
Thanks for making this video. I have to replace my struts due to tire cupping. You are an awesome instructor. Great job!
Thank you very much. It really does mean a lot!!!!
Great tutorial. Probably just saved me a couple hours. Only thing I would add is have a can of fluid film or similar handy. Good time to brush off some rust and try to preserve the truck.
Thank you very much, and that is a great idea as well.
Good video, thanks for the lower control arm information and then final torque
Thank you very much for the positive feedback 😀 . I'm glad the video helped.
Thank you thanks for the great camera angles!
Thank you so much! Even if I can't get the husband to do this, at least I know what's involved if I have to take it to a shop.
You're very welcome. It's not a difficult job. And thank you for the positive feedback
Great video. Just did mine but I also did my rear shocks that were xyz to break loose the bolts. Truck rides a lot better and smoother
That's awesome. I'm glad the video helped. 😃
Great video!
Thank you very much. I appreciate the support.
Good video. Thanks for the video
Thank you very much 😊
Replaced front parts ,had it aligned ran great, now steering wheel vibrates when I hit 60-70 mp ,now tire on drive side show more wear in middle of tire help😎. Thanks for any help
It's hard to determine without looking at it. Middle tire wear can be cause by over inflation. Vibrations could be a number of issues; wheel balance, bearings, bushings, a number of suspension parts. Were you having these issues before the Strut replacement?
thanks dude, I'm pretty confident now.
Thank you for the support
@@mcgurrentertainment yeah man! I wasn’t expecting this level of production honestly. I thought I was about to get a shaky phone camera video explaining this. The least I could do is show some support for the time it took you to actually change it, edit it and teach us along the way!
Thank you very much, it really does mean a lot.
Nice informative video. Can you replace mine 2011 Frontier.
I'm also considering replacing ball joints if and when I get new struts. I don't know why they don't come with greasables now days? I don't know if I have what it take to replace then one may own
Thank you. Lol, Sadly, I won't be able to do that.
Ball Joints aren't too bad. May need some elbow grease.
My sway bar is in the way of me tightening & tourqing my bottom shock mount. Can I move, loosen sway bar & then tighten shock mounts???
Yes.
Would it be a similar procedure with a 2009 Nissan Xterra? If so where can I both rear and front parts! Thank you!
Yes, it is similar. You can get the parts from your local auto parts store (or online). You can just buy a set for the front and a set for the rear. It's fairly inexpensive.
I have a 2010 Nissan Frontier 2.5l 4 cylinder. If I’m changing the struts and decide to add a simple 2 in lift kit. Would these same steps still apply?
I don't recall off the top of my head. I know some of the steps are similar. However, there are likely extra steps, such as extended brake hose installation.
Well I see a little bit different between the strut the old one come with the dust cover and the new one come without the dust cover so I don't think it's going to last very long the new one
Good attention to detail. Well, at least we can make a good experiment out of this. When these are due for replacement, I'll try out the dust cover version and track the service time. I think that would be good information to share.
Ty so much for the video
I'm glad you enjoyed it. 😃
Hey. My front sway bar is not easy to turn out of the way. Hopefully I'll be finished by tonight.
You got this!!!
@@mcgurrentertainment Hey. Having issues tightening bottom shock mount. Sway bar in the way. Can I tightening bottom shock mount 1st & do sway bar last?
That shouldn't be an issue as long as they're torque down at the correct level.
Hey I'm not sure if you are still replying to this video or not but to be clear, you have the jack under the lower control arm while removing the old strut, then it's not there when installing the new one? What is supporting that side of the truck when you move control arm to fit the new strut and at what point did you do that?
Step 3: we added Jack Stands
Hi after the struts installation you need to have wheel alignment?
No
Factory original lower control arm bolts have a tendency to seize up on these models. So not touching them would save customers or those watching from spending extra money on bolts and control arms.
The only lower control arm bolts available for replacement are camber bolts.
This video doesn't loosen the lower control arm. I think you are referring to the Stabilizer Bar links. If so, these were the steps provided in my Service Manual as well as the Haynes Manual. With that being said, if you find an easier way to do the job, then that's awesome, and thank you for sharing.
@@mcgurrentertainment I missed that then lol
Question: is the raising of the arm to the original position before torqing down the bottom bolt required? What's the reasoning behind it?
Yes, because you do want to torque the bolt (and bushing) to the ideal level of the truck. Lifting it mimics the height once the truck is lower.
But if you mark it while it's on the ground with bad assemblies, wouldn't it be sitting lower than ideal height?
@@drewsenthused6079 excellent question. Would appreciate an answer to this! @mcgurrentertainment any thoughts?
Any tips on dealing with a stuck lower bolt . I got out my breaker bar and went to cranking but that thing is not moving. Not much room in there to cut the bolt .
Try using heat, like a heat gun. In the Altima video ( czcams.com/video/7KrNlU_aM4E/video.html ) I had to use heat to loosen the nut on the tie rod. Or try using WD-40 penetrating oil; sometimes, this helps.
@@mcgurrentertainment shortly after posting this comment and covering the bolts in pb buster I was able to get them loose. The really jackhammered them on at the factory .
Very nice. Hopefully, that's the only hiccup in the job.
Well thanks to you I work on my mustang and my X. Gonna change my struts and shocks here. Those arent available from advance anymore :( that price was amazing. Dumb question do shocks and struts always come together?
That's not a dumb question. If you are referring to the rear shocks and front struts, they can be purchased individually or as a set. If you are referring to the strut assembly (Coil Spring included), you can purchase them separately. However, for ease of installation and minor cost difference, it's ideal to obtain the Strut Assembly.
Will this fit a 2008 XTERRA Off-Road?@@mcgurrentertainment
According to AdvanceAuto, no. You would need Carquest Premium 28-710002
If you're ordering from Advance, use the coupon code "Chrisfix"
Help! My lower mounting bolt broke off inside the bushing!!!!!! Btw...my stabilizer bar did not move that easily. I had to remove the bottom nut of the bar and pry it open a little bit with a chisel to get it to move. It involved removing a lot of the front end plastic .....not fun.
I'm sorry to hear that. Were you able to remove the broken bolt? Punch and hammer, most likely?
@@mcgurrentertainment I tried, but the bolt itself is totally seized inside the bushing. I think my only option is to create a type of ball joint press to try to press it out with a vise. I cut the end off on one side. If that doesn’t work, I will need to take my saw and start chopping. I’m concerned about hitting that shock with my saw because I think it might be dangerous. Where do you think would be the best place to start cutting? I’m putting in a new strut assembly, but this is definitely not the way I wanted to go.
I understand your pain. Not everything goes according to plan. It's difficult to say where to cut without seeing it. Just try your best not to damage the surrounding suspension.
What happened when the spring is shot? Does marking the original level works still?
It doesn't have to be perfect. Just get it close.
What digital torque wrench are you using?
1/2 in. Drive 12.5-250 ft. lb. Digital Angle Torque Wrench - www.harborfreight.com/hand-tools/sockets-ratchets/torque-wrenches/12-in-drive-125-250-ft-lb-digital-angle-torque-wrench-64916.html
this is the best video so far on this subject. how long did this take you from start to finish?
Thank you very much. Without the camera in the way, maybe two hours. With camera, 4-5 hours.
@@mcgurrentertainment during your video you were saying that it's very important the torque that lower Bolt after making sure that's the white lines intersect with each other if you don't follow that procedure will it cause alignment problems
Tightening the bolt in its correct position is to prevent any damage done to the rubber bushing. If it's torqued while "hanging," it may cause tearing to the bushing when the vehicle is lowered to its normal level.
@@mcgurrentertainment I see that makes total sense. Thanks for making such detailed videos. I've been working on my 2015 Nissan Frontier since I bought it and the way you do your videos it's probably the best way I've ever seen. I'll be constantly checking back to see what else you come up with man
Thank you for the support
La suspension de Xterra y Frontier es la misma?
Similar procedure
So been watching and rewatching this video of yours and I am puzzled at why the torque value for the Upper and Lower Stabilizer Bar Link nuts are not the same. When you were doing the upper ones, it was 17mm socket and torque value of 67ft-lb, however, when you were tightening the lower one, same 17mm socket but torque value was 14ft-lb (at the 11:59 mark). Shouldn't they be the same ie. 67ft-lb. Did I miss something? Trying to get a clarification here. Otherwise, great video and good tip of the sharpie marking. Now that's what it's for!
Thank you. It is 67 ft-lb for both (per the Errata in the description). I'll see if I can add a blur to video to minimize confusion.
Gotch! Sorry, should have paid close attention to the errata. Was just engrossed in the video part! Thanks for clearing that up!
No worries
I have a 2012 frontier 2wd 2.5
Rear shocks were easy to replace but I am at a loss for replacing front struts.
Having any iasues?
@@mcgurrentertainment
My brother replaced my rear shocks this morning
My front struts were replaced by a former friend about a 100,000 miles ago. Currently have 205,000 on my truck now
No issues just wanted to replace them
Gotcha. It's not too difficult. If you have any questions, let me know
@@mcgurrentertainment
Thank you!
I'm in Louisiana, what state are you in ?
Va
The new coils have additional windings and raised my truck 2 inches. Make sure new coils match the original!
Good call
@@mcgurrentertainment I take it you didn't have any issues with ride height?
Correct. At the 6:00 mark, we compared the two.
@mcgurrentertainment your new coil looks different than the old one.
Same length. New one doesn't have a Strut cover.
You did not mention the white marking pen!?
On Step 26?
@@mcgurrentertainment lol