Electrolysis Rust Removal Tutorial

Vložit
- čas přidán 17. 08. 2020
- In this Electrolysis Rust Removal Tutorial I used an old rusty adjustable spanner just to demonstrate how efficient this method is, absolutely fantastic for home DIY use, work place or any restoration projects.
Enjoy the video and don't forget to Like, Subscribe or drop me a comment below ;-)
You are also welcome to visit my aluminum casting blog:
www.flamingfurnace.com/ - Jak na to + styl


Much helpful than other derusting videos
Like that video of a dude who got the polarity mixed up, ended up pulling his disc brake rotor out looking worse than when it went in and tried to play it off like it worked lmao
It's important to have good conductivity between the negative wire and the rusty item. The video shows bubbles on the hook but not many on the wrench probably because the rust on the wrench is preventing good conductivity with the hook. To improve the process scrape to bare metal where the negative current needs to flow. Also, on rusty pieces with two parts, like the wrench body and the movable jaw, current needs to flow to the movable jaw and may be inhibited by rust between the pieces. Either position a second negative wire or scrape some rust off to help improve conductivity between all the parts of the rusty item. Thanks for filming this!
Great tip thanks 👍🏻
Thank you for the practical, extra tips & suggestions.
Shouldn’t you add salt to the electrolysis water? Water is polar, and a very good insulator. Your electrolyte bath needs ions for conductivity, no?
Thank you for that sharp mind. Need more like you. If you piss people off with your brains. Good.
@@OnerousEthic That's what the washing soda is for, it works better than salt.
A very kind gentleman heard about me derusting tools and left a massive cardboard box filled with a solid mass of rust. He didn't say who he was, but left a note saying he moved house over a year ago and had all his hand tools and drill bits in another cardboard box under his workbench. His son painted the garage where these tools were and to air it out he left a window above the workbench open. It stayed that way for close to a year and every time it rained it would trickle down a couple of power cables which ran from near the window and laid across this box. Everything in that box literally rusted together into one lump of tools and rust. I used a hammer to break them apart and over 2 weeks I derusted them in a large plastic bath. Everything ended up completely free of rust and had a deep black sheen to them. Everything which was originally chromed lost their shine and I assume the chrome as well. Here I am 7 years further on and every item is still rust free. Oh yes, after derusting I sprayed them with a coat of WD40. Sidenote, After cleaning everything I discovered 2 antique American square shaped shifters dated 1920. There was also a set square covered in paint and rust, it finished up minus both the paint and the rust. I'm positive there was no way they would have turned out looking so good if I hadn't used electrolysis.
I searched 'Rust Removal by Electrolysis' on CZcams, and this video popped up as the first one for me, so I followed this tutorial to make the electrolyte from technical soda. However, I currently don't have a car battery charger in operation, so I used a 12V 2A transformer instead. Anyway, thanks for the video tutorial👍 And coincidentally, I have a very similar adjustable wrench for rust removal. 🙂
Right about 03:30, my experience has been that using a drill, dremel too, or bench grinder/brush and a steel brush, rather than a hand brush will produce a nice sheen on even badly pitted steel. It’s still pitted, but has a nice sheen. Just as an experiment, after the steel brush, I quickly gave it a quick pickling bath to ‘reactivate’ the surface, and thoroughly drying it with a shop vac and a blow dryer, I hit it with a self-etching, pit-filling spray on primer, a light sanding of only the exposed surfaces with 400 grit sandpaper, quick wipedown with tackcloth, on more coat of really thin primer, and a final couple of coats of really tough bright aluminum finish spray paint, and it not only looked a thousand percent better, it held up amazingly well under occasional use. It was a pair of vice-grips, and with normal lubrication and usage, the small amount of overspray on the threads and moving surfaces fell away and didn’t cause a problem. It wasn’t necessary, I just wanted to see if it would work. Nowadays, you can get super tough clear coats that come in specialized rattle-cans that apply 2-part epoxy-based coatings that are orders of magnitude harder and tougher than anything previously available in a spray can that could be used in such situations. A can of that stuff costs about the same as a new pair of vice-grips at Walmart lol, but cheap entertainment for weirdos like me… I get away with all kinds of stuff under the “proof of concept experiment” excuse. He-he …
I loved this video. To the point and very easy to follow. Usually I derust with my bench grinder, occasionally I use my angle grinder paired with my vice, but they are all out of operation while I build a new work bench, so I'll give this a shot. I'm considering using a 5 gallon bucket for larger items. Thanks for the lesson 👍👍👍
Thank you for not wasting my time, I got every question answered very quickly!
I had always been hesitant to try this tool i saw this video. I never thought about using a battery charger. It worked exactly like this video. Thanks
Incredible technique showcased in this rust restoration video! Truly inspiring and motivating me to kickstart my own channel. Big thanks for the valuable insight! 😊
Amazing! Very well explained and simple to implement... Thanks a lot guys.
Glad you liked it!
Very good video, and it is totally correct. This process is like magic for old rusty items. I use it frequently.
Are those 1x1 metal or wood sticks at each end?
this is the first time I see how to clean rust like this... wow, can you try this... the method shared is really good, friend
Very simple way to remove rust, thank you
After watching a number of tutorials on electrolytic de-rusting, I note a common error in terminology used. This is always in relation to a "sacrificial anode". NOTE: there is NO sacrificial anode in this process. To explain, let's for example look at nickel plating. A metal object (the cathode) to be plated is placed in a solution and a piece of nickel (the anode) is also placed in the solution. Current is then passed through the solution via the 2 electrodes. The piece of nickel is dissolved into the solution and transferred via the solution onto the part being plated. Because the nickel electrode gives itself up to the plating process, it is called a sacrificial electrode. With electrolytic de-rusting, rust is removed from the piece being de-rusted (the cathode) and deposited onto the anode. The anode does not give itself up to this process and therefore is NOT SACRIFICIAL. If anything, the part being de-rusted is the sacrificial electrode.
Dude, nice explanation thanks for it
My name's ddeez
I think people still call it sacrificial metal because you're not going to want it after this process. Like don't use your best pliers for the anode, use a throwaway bit. Something you can lose. Two different uses of the word sacrificial, both correct.
@@julietromeo872technically it won't rust away, rust will be added onto it.
@@tomchillen3039
Nuts?
Incredibly straight-forward and simple thank you :)
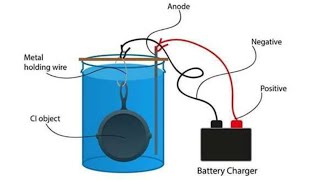
Washing soda
Positive to sacrificial scrap
Negative to item to be derusted
To optimise- cut up scrap metal tin or sheet and surround the item to be derusted. More surface area = more ion transfer.
You also get more black sludge with too high of a current.
Not tin! The sacrificial metal needs to be iron or steel. You realize that tin is an elemental metal, don't you? A "tin can" is a steel can with a thin plating of tin on the inside.
The fact Electrolysis is the same term that's used for permanent hair removal is also used for rust removal is incredibly reassuring
Yeah. I noticed the wrench didn't have any hair afterward.
@@Bluuplanet Bazilian Wrench
Thanks this was very helpful, but I would have loved to have seen the sanding/refinishing portion of the process.
Thank you for sharing your experience and knowledge
Great video, thank you! What kind of battery charger is that?
Thank you.
Ash from Scotland 🏴
I have some rust stopper that adds a cool patina look. However it kind of needs some rust to attach to. Areas I've cleaned off doesn't have the same effect. After this process id imagine the piece would be very vulnerable to new rust. Besides oil, any suggestions on a good product to apply to prevent new rust from forming?
Thanks a lot for this excellent video.
I have a battery charger AND BOOSTER (that can start a car with a flat battery), do you think t could be ok (I won't put the fault on you if it burns)?
And baking soda?
I haven't watched the full video yet 1:21, but you didn't give quantities, we can do around the same as we see.
Need a swimming pool, truck load of vinegar, and 30 battery chargers… IM DIPPIN MY WHOLE TRUCK! 😂😂
Don't do it, your car may be gone tomorrow, lol have a good day.
Great job. Congrats...
Awesome video. Watching the before and after while my
grill grate derust outside in a bath 😁😁😁
Great tutorial!
Thank you.
Nice, maybe you can switch the anode and cathode after cleaning to give it a nice clean shine?
나도 하나를 복원 중인데, 이 영상이 도움이 되었네요. 좋은영상 감사합니다. Good 🥰😍🤩🥰😍🤩
Great video😊!
Is better with magnesium crystals? I read the conductivity is incomparable have some expert confirm. Thanks
Did you add vinegar to water for the first bath, and did you add water to the second vinegar bath, did you do electroysis in the second bath or just bathing the piece to derust?
You don't need the vinegar. Just keep using electrolysis, it will do a better job than using vinegars. It will remove all of the rust completely. I see in the video there is still some rust remaining. Acid will promotes rerusting eventually. Oil helps but when it drys up or is removed by use it will quickly rerust. Don't use vinegar.
Carli are you Ukrainian by chance your surname is .
@@romanchomenko2912 I'm Romanian!
YES use vinegar.
Very fast and efficient rust removal!
Great Video
Which one is best for rust removal sand blasting or electrolysis 🤔
Is any of the pitting due to the electrolytic process or is it entirely due to the rust? I wonder if glass bead blasting would do a better job...
It helps to place several sacrificial anodes around the item to be cleaned . The greatest current flows to the closest part of the item to the anode . By having more anodes you get better overall coverage and it works faster.
Instead of oiling the tool after the derust process , you can spray it will a zinc rich coating. the surface of the steel is in perfect condition to take this kind of coating and it becomes very durable.
What’s the best metal to use as a sacrificial anode?
A lot of rust can be removed by simply immersing the spanner in vinegar overnight. If I was to do both which would I do first?
The vinegar is interesting . Looks like cola / soda . Nicely demonstrated and Thanks .
Thank you! Cheers!
So the wrench is hung on metal hooks at each end of the wrench. What are the hooks hanging on? 1x1 metal or wood sticks?
Thank you very much. Excellent demonstration. I would like to ask a question. Can electrolysis derusting be used to remove light rust from chrome finish bathroom/kitchen baskets/containers?
I have used this on chromed tools and it turns the surface black.
Its Magic! after steel brush, steel wool, acid washing… fgs a 5m HCL acid aka Muriatic acid soak would do it all without all that work! Or a long soak in evaporust or citric acid or edta. Wish you’d shown it just after removing and a water rinse only. Ive done a lot and get the same result from a bristle brush wheel and orange oil! Make my own penetrant from atf and lighter fluid to soak in first, which is far better than wd or a-z brand stinky perfumed diesel! Dry ice and lasers are amazing but costly. Nice demo
Very useful
Great video! Thank you for sharing! Do you think I can use a dead battery as a bridge to electrolysis from a charger?
Out of curiosity, what would accomplish by doing that?
Very nice
Good performance 😮
How does this exactly work? With nickel electroplating, the material of the Anode part will go onto the Cathode part. In this case, than i would say that the material of the sacrifical part (anode), wil cover your part (cathode). Why is the rust dissapearing this way?
Nicely done. Some of the comments are a little over-the-top, but great job. Thanks
Background music was awesome ❤
Thank you.
All good 👌👍
Great video. Going to do it myself
Can any oil be used? Like cooking oil??
Can the water just be flowed down any outdoor drain?
I am thinking this will work for bronze. What are you thinking?
Can u put gears with synchros in them?
Could stainless steel be used as the sacrificial piece I wonder?
Thanks and thanks nice and succinct 😎
Do not have any chrome, copper, or stainless steel touching the solution as it makes toxic fumes and toxic solution.
Can baking soda be used instead of washing soda?
Great tutorial ! Do you know if you could just use Aircraft stripper to achieve the same result ?
Thats just paint stripper, it wont do anything to rust
possibly
You could try just using the vinegar, leave the part to soak for a week.
How long do you let it do its thing
What happens if you sandblast after electrosys
Oh you bets believe I was movin my body while watching this 🕺🏽
Can the Anode + be a Carbon electrode?
I just call it the “collector” or “rust magnet” or “accumulator” and a circular bent hangar anode set around the “victim” or “subject” or “target” will be more efficient. I can see “disposable” but I just cant do “sacrificial” because it collects debris and is like a dirty dish but hey what do words matter anymore either…
Thanks.
Thanks for the safety tips at the start!
How much amper the charger should have? Mine is 2am 12v , nothing is happening 😢
Table salt is much better than washing soda faster and stronger, but its problem is that it makes the wires heat up quickly
can i use baking soda or anything else?
When I used electrolysis for the first time it worked really well. When I tried it for the second time with another object. I changed the water, added new soda and brushed the anode clean. I turned it on and works good at the beginning. but as time goes on it stops working good and there isn't any foam stuff forming on top. The water only turns slightly brown and there are almost no bubbles after a few hours. The item still has a lot of rust on it after it has been in the electrolysis bath for almost 2 days. What am I doing wrong?
I had a similar issue during an experiment. My electrical source would read “short” and the electrolysis would stop. I changed out my solution and used less soda and it seems to have fixed it. I think there is a such thing as having too much soda.
@@brandonrusso4377 If your electrical source read "short" that normally indicates there is a "short" between the positive and negative. In other words, the part to be de-rusted (negative) is making contact with the other metal (positive) piece. When you changed out the solution and tried it again the parts were probably not touching and therefore there was no "short" that time so it worked.
@@klink370 i had the same problem, with too much soda it short circuit, added water and everything worked
I would secure that a little better. Just one little bump and the anode and cathode will contact each other and POW!
A bath with oxalic acid will give high iron parts a really nice surface finish but it may need to sit for a few days.
love your welded together "scarp" metal :)))
*scrap
@@mrthunt5770 mr correction are you aware that this comment is 3 months old and the person who commented this doesnt give a shit?
@@NBA2K_1 *Mr. *doesn’t
@@chriswebster24 your a littel bit late
What type of metal did you use for the positive connection? Was it steel, iron or does it not matter what type of metal you use?
Don't use stainless steel.
Wondering how long it took. Would have been quicker if you turned the wrench so the wider area was facing the cathode.
So could you just use a 12 V battery?
O problema da Lava Jato não a perseguicão de alguns, foi a protecão de outros.
I set an old rusted adjustable wrench in vinegar for five days and it came out clean. No need for any tools and at $.92.
Would this procedure work on chrome plated metal?
Hi, for chrome plated metal I would advise just to use vinegar would do great job, or even just WD40 if it's just some rust spots. Electrolysis de-rusting would be more for mild steel that is exposed to rust. I did test it on chrome plated in the past and it worked as well.
After all that you should nickel plate it with almost the same process :)
How nice to see that you do not secure anyhthing the table/container could bump and cross current everything.....great demo.
If you put vinegar and brush it you can skip the electrolosys ..
Use salt and up the voltage
Vinegar not needed & eats at the iron making iron acetate. The electrolysis will remove all the iron oxide eventually.
Can i use baking soda?
If i want to de-rust a steel motorcycle gas tank (just the inside) can I just use the gas tank as the soaking tank and just hook the negative lead to the tank itself? (And insert the steel sacrificial anode into the tank without it touching the walls)?
Did you try that?
No. I figured it might ruin the paint. I wound up getting a 5 gallon bucket of Evaporust which worked like a charm
Can I use a 12V power adapter instead? I do not have a battery charger.
What kind of metal can i use for the sacrificial one? :) Galvanized, etc ? Which ones are allowed? Thanks
Any power source you can adjust the current on will do. Galvanised steel definitely won't work , any bit of rusty iron will do the trick though.
Cool 😎
The electrons in the iron is re electrifying
Electron flow is from negative to positive, BTW, thus the +- leads.
Now you have to nickel plating ;)
Hi bro!! Can i use 12v 2amp mobile charge to this process? What is more important in this process? Voltage or amp?
Hi, I believe 12v mobile charger will work fine for the electrolysis proccess.
No simple answer but I'll try. Your mobile charger is 12v and is capable or producing 2 amps of current (maximum). The amount of current it will produce in the electrolysis method will vary, depending on how well the electrical connections to the part to be de-rusted and the other part is, as well as how conductive your liquid solution is. I use a 12v charger, capable of producing 8 amps. I have never seen it go above even 1/2 amp so I don't see why your 2 amp charger won't work.
It looks like you're pouring a couple of soft drinks over the wrench after the process yet you never list them at the beginning as part of the materials needed. The video mentions vinegar but the vinegar at the beginning is white, clear.
This is great video, and after watching this... I decide to just buy new Spencer....
What is the ratio?
before I throw this amount of money and work at it, it would need to be more than a $2 tool to make it worth derusting. But for an example, you did a great job.
Can also use only 5vlt
does it also work with sodium bicarbonate (baking soda)? Can I use copper wire (mains wire basically) to connect the tool to be cleaned to the charger?
no copper in water