These Make The BEST WORKSHOP TABLES / WORKBENCH!! (Tips, Tricks, Secrets--Workshop Table Full Build)

Vložit
- čas přidán 16. 06. 2024
- Check Out Our FREE GUIDE: 25 Must-Have Carpentry Tools...Under $25 Each!
www.thehonestcarpenter.com/
AFFILIATE TOOL LINKS:
Porter Cable 20V Max Cordless Brad Nailer:
amzn.to/3hovMVl
Bosch 12" 15-Amp Miter Saw:
amzn.to/3qqOU9f
Dewalt 10" Table Saw + Stand:
amzn.to/3wYdIrx
Occidental Tool Belt:
amzn.to/35WZBXs
Occidental Stronghold Suspension Harness:
amzn.to/35RJOt9
Kreg R3 Jr. Pocket Hole Jig:
amzn.to/3qzyV8L
Kreg Premium Face Clamp:
amzn.to/3jgG9gr
Estwing 16 oz. Straight Rip Hammer:
amzn.to/3jdQ1Y3
Swanson Speed Square/Combo Square:
amzn.to/3A1LQof
(These are affiliate links. When you shop through these links, we receive a small commission at NO EXTRA CHARGE TO YOU. We greatly appreciate the support!)
FOLLOW US ON INSTAGRAM:
/ thehonestcarpenter
FOLLOW US ON LINKEDIN:
/ thehonestcarpenter
CHECK OUT OUR OTHER BUILD VIDEOS!:
3 Tips--Best Nail/Screw Storage:
• 3 TIPS--BEST NAIL/SCRE...
Truck Cab Shelves:
• TRUCK CAB SHELVES + ST...
Table Saw Station:
• Table Saw Station On W...
These Make The BEST WORKSHOP TABLES / WORKBENCH!! (Tips, Tricks, Secrets--Workshop Table Full Build)
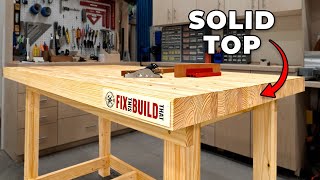
Every good worshop needs a great workshop table or workbench! These stations give you a great surface to cut on, assemble parts on, and get projects up off the floor. This short video from The Honest Carpenter will show you some of the BEST workshop table/workbench tips, tricks and secrets out there...plus, it includes a full build!
The best trick I learned a long time ago for building workshop tables and workbenches is to make the table top out of a FLAT SOLID CORE DOOR!
These doors are heavy and dense, and completely flat. They made of layered up material. The edges are often solid wood. The surfaces are plywood veneers. And the cores are either MDF or masonite, or possible glued-up solid pieces of wood.
The one in this video runs about $80 at local big box stores.
It's best to purchase these doors without mortises or lockset holes already cut into them. This makes them better suited for flat, solid workshop tables and workbenches.
Really, it's like you get two table tops out of a flat solid core door, because when one side gets badly damaged, you can just flip it over and start fresh with the other side!
They're also the perfect size for a workshop table or workbench--32" or 36" wide, and 80" tall (height).
The other tip or trick that I like to employ when make a workshop table or workbench is a TOOL SHELF.
This is a narrow shelf just beneath the table top. Mine has several 5-1/2" windows spread around the various sides of the table that allow you to pull tools off the table top, and keep them just below on the flush-top shelf where you can easily reach them.
The walls of the shelf are similar to a normal table skirt. I leave 3" of material at the top to support the work table surface, and 2" of material at the bottom to support the tool shelf.
The legs of the table are made of 2x4s with the coped edges ripped off. This makes them look more finished, and gives them more flat surface for a better glue connection when I make long L's out of the 2x4's
I set the legs and the tool shelf skirt in 1-2" from the edge of the table. This gives me a CLAMPABLE EDGE around the full perimeter of the table.
The total overall height of my workshop table or workbench is just shy of 36". For someone like me, who is 5'7", this is a good workshop table height.
I also put my workshop table/workbench on rolling, lockable 5" casters that are heavy duty. This makes it mobile around the shop--though I could create custom chock blocks later to make it stationary.
For the full workshop table / workbench build, plus all the other tips, tricks and secrets I used, check out the full video!
Thanks for watching! Be sure to visit us at The Honest Carpenter Website:
www.thehonestcarpenter.com - Jak na to + styl


I'm not exaggerating when I say that I've watched more than 50 of these workbench builds. THIS is the one that I have settled on building for my own workshop. Most practical table I've seen yet. Simple, yes... But there are plenty of upgrades that can easily be added to this design. PERFECT!!! Kudos to you my friend!
yea that under tool shelf thing is genius
Its crazy how many videos there are on workbenches. I like a lot of them, but some are just way too expensive or complicated. This one makes the most sense and since I work at Lowes, i can get a bit of a discount on all the wood and the door.
As an amateur with woodworker, i typically feel overpowered with the entire arrangement czcams.com/users/postUgkxrYREG3-7f1Aqk9ams3ZESRNzGnfdUtyQ . Be that as it may, this arrangements drove me through with much clarity and effortlessness woodplans. Works i now work like a genius. That is great!
Those sweet moments in life when one of your favorite channels uploads EXACTLY what you needed and were looking for. Thank you!
Have the same thought and just got back rom depot after getting a door
Same for me. Now I have to change what I was building. Great ideas in this video.
Exactly as you say. I built a workbench 20 years ago using a solid core door from Habitat for Humanity. Mine is stationery. The superstructure was built from a second solid core door. They will last longer than I do.
This is exactly what I was looking for🙂
same
I have made the same work tables in the past. The one added difference is I edge-band the door top with 1/4” oak that stands proud of the top by 1/8”. I then drop in a piece of 1/8” double tempered Masonite which becomes a sacrificial top that protects the solid core door top, and when the top-side of the Masonite gets damaged I simply flip it over and I have a new top.
Once that sheet of Masonite is completely worn out I can easily replace it with a new piece. That way the bench top (door) last indefinitely and makes for a bench that will last for generations.
FYI: depending on how you care for the work surface, a sheet of Masonite can last for years. My second work table is for assembling wood projects only and the original Masonite that I installed on it 22 years ago is still in near mint condition, so I have yet to flip it over to the second side.
My first work table is on the second side of the original sheet of Masonite. I flipped it about 4 years ago. It was originally installed in 1993.
Good idea, Woodsmoke! Somebody mentioned something similar down below. Gives me something to think about. Great way to extend the table life!
I would prefer the masonite flip, keeping the one side for messy jobs, the other for complete flat and untouched...great add on to the Honestly Awesome Carpenter's vid!
Postscipt, can always pop off the masonite for the new surface for "finesse" jobs...
@@TheHonestCarpenter hello I watch a lot of your videos and they have been invaluable. One of the major things I seem to be having trouble with is developing a client base. I'm a one man crew, and I do work as a general handyman. I know how to do most things, but I keep losing work to my area's competition. What tips do you have for building a business to where I can actually start bringing in more money? If possible could you make a video on this if you haven't already?
Smart tip. Having a wipeable surface on a assembly table is a great idea. With drops of glue and stain everywhere a wood top gets messed up pretty quick
Good idea. Do you secure the Masonite down or just let it rest on the top?
Solid core door for tabletop....that's all you needed to say...pure genius
Suggestion for the window corners, as you used a hole saw for the radius, use the hole saw to cut the corners
My thoughts EXACTLY!
Came here to make the same suggestion but thought I had better check if someone beat me to it 👍
Haha, yup, that was my post as well… I guess we benefit from seeing the build and jigsaw struggles first though.
Great idea
Mmm Hmm
So good I watched it twice. Very basic, solid & fast - just like you said. It’s a nice mod on the design Ron Paulk uses - but way simpler, and a more efficient use of materials. I build custom workbenches, and offer a similar design as a starting point for clients on a lower budget. My only concern is racking (front to back & side to side)., especially if skipping the casters, or using retractable casters w/ leveling feet. An easy fix would be to add stretchers ~12” from the bottom of the legs. The stretchers provide support for another shelf if desired. This shelf provides semi-permanent storage for tools, so i bump mine up to 3/4” ply. Thanks for sharing your design. Your videos are always worth watching for practical advice.
Here's my tip/trick: screw a sheet of pressboard on top. Just replace it when it gets torn up. Easy, relatively inexpensive, and it saves the (more) expensive door.
Yeah but is it square AND flat ?
@@boke75 It can be as square and flat as it's substrate. I've done it for years. But, that's certainly no reason for you to do the same.
I'm going to assume you meant tempered Masonite? Been using that for years. It's smooth on one side.
@@davidguenther8170 Yes Sir. One in the same.
@@solosaga5091 Is that the stuff that they also call Brazilian hardboard - smooth on one side, kinda like burlap on the other side?
Great design, I’m all for functionality and simplicity in the workroom and you hit both! Love watching your videos.
Ethan…I really like your simple approach to solving some everyday issues. I think we like to over complicate things and you are very wise to show the simple yet effective solutions. Keep them coming..greatly appreciated.
Great worktable design! Thanks for sharing!
Brilliantly simple! Bravo
Just as I was about to start my work table project. Thanks
My father used solid core doors as well for work surfaces back in the 60's 70's and 80's. I've done my part to carry the tradition forward as well. Wasn't aware that it was perhaps a common practice.
I’ve seen it in a few other shops over the years, Dan. Next step is to coat the top with minwax to prevent glue adhesion on the surface 🙂
I did the same about 12 years ago. Though I mounted it on a double-wide drawer base cabinet that I harvested from a kitchen remodel 3 houses ago. The cabinet was made with hardwood plywood so it's quite stiff and the addition of a 3/4" back made it much stiffer. The cabinet was ~48" so I trimmed the door length down to 6 feet.
@@cidercreekranch Any issues with trimming the door? Thinking I have to do that because of space constraints.
@@jfchapman42 I have this question too. Thanks.
@John Chapman, etal:
If you don't mind the particle board core showing on the end, it should be okay. Personally, I'd rout out enough particle board to install a solid piece of wood between the top and bottom veneers.
I love your design! Thanks for your time and effort!!!!
Great design and build, thanks for posting! I'll be implementing the open shelf design on my own workbench when I get around to building it finally.
Love the solid door idea. I worked in cabinetmaking in the 80's and we always used 1/4 masonite (hardboard) with one smooth side on top with solid wood edge. Contact cement it on so it's easy to remove with lacquer thinner. Very durable and cheap. Easy to wipe glue off and clean.
Being a metal fabricator, I made kind of the same table using 3/16" metal plate for welding projects, although as a first time home owner I am learning quick the joys of carpentry. I have viewed several of your videos and I appreciate the tips and tricks. I am now on my voyage in purchasing all those fun (tools) toys to get the job done. Thank you
Love the design and build, cheap, quick, and very functional! 👍
Nothing short of genius! Great build.
I love it. Simple, easy, functional, and extremely practical.
Edit: I recently threw one of these together. I have a DeWalt 7491RS jobsite table saw, and I built this about 1/4" shy of that height. So I'm using your design as an outfeed table slash assembly table slash mobile workbench. It's extremely convenient. Thanks for sharing this!
Excellent video. I’ll be building one of these very soon and will use your plans. Thanks for sharing.
Thank you, JSM! Good luck with the build, and work safe! 😄
Love this table, thanks for sharing.
Excellent! And the shelf dropping into place, genius.
Would you please consider doing a really slowed down version of this for us beginners? Love your videos!
Thank you, Dena! I’ll try to do some longer tutorials in the near future! 🙂
Hit the settings and watch it at .25 playback speed. I watch ALL videos (especially movies) at 1.25 speed. Saves time!
Now THIS channel is what CZcams should be about: a sharing of skills that are essential, especially in these times where everything's disposable and not enough people make things. The past few years has seen me become a real 'wood' guy. I buy, or get for free, offcuts, pallets old furniture and actually get creative and USE these things. I'm not as skilled as I like to think I am, but I'm getting there😂, thanks to real craftsmen sharing what they know. Thanks man, keep it up. Oh aye: Subscribed👍🏴
Great tips!!!
Love the table.
Looks great!
Love the door idea, one little thing, when you used the hole saw for your radius, why didn’t you use the saw to cut the corners instead of fighting with your jig-saw? Still a brilliant video, keep them coming 👍
5:54 this is my favorite bit. So many how-to's and guides insist on using boat-loads of fasteners and/or complex joinery, when in reality, glue is easier to use and often stronger.
Thank you for all the help!
You did a great job James. I enjoyed watching it.👍
This is Genius!! I haven’t seen this tip recommended anywhere else; you’re the first! Thanks so much for sharing & good luck on finishing up your new workshop. 👍🏼👍🏼👍🏼
Thank you, Mira! I did a quick search about halfway through video production and realized that it didn’t seem to be very prevalent on the web. I figured it was definitely a good idea to focus on 🙂
I’ve used them for a desk with a file cabinet on each end.
Yep!
Such great information. Thank you!
Really useful! Thank you for sharing!
I'm an old codger in his late 80's, so the most important thing in a work bench for me is its HEIGHT. I've built a couple in recent years one using 3/4 plywood, the last one using 3/4 soft pine " laminate " material. That is material which is not laminated at all but multiple blocks glued together, and a lot cheaper than plywood. The best height is elbow height, so there is no bending over. Deep edges allow easy clamping to the point where no vice { cf vise in US speech ] is necessary. Not much good for planing, but I have not used a plane in years in fact.
If 3/4 tops are too bendy for you add a longitudinal stiffener along the long centre line of the top, say about 2 inches deep by 3/4.
elbow height? Thats seems a bit to high... 90cm max gives you the full control what's on the table..
@@5084204 I take it from your comment that you are not in your late 80's. When you are, you may care to re-evaluate. Meanwhile, best of luck with your 90 cm height. Each to his own.
@@crustyoldfart I have nothing but the respect to your solution and age: I wish you many more great projects in your workshop.
Thank you so much for this suggestion! I'm a 59 year old 5'4" female who would like a custom work table for crafting & woodworking. I too have a bad back - in my case from a severe injury just at the base of my spine. That first tiny bit of bending forward is The most painful thing for me, so to have a work surface height which completely avoids bending over is such a Wonderful Idea. But I would not have ever thought to measure from my elbow - I guess it's common sense, now that you mention it - so Thank You for these great ideas!
My respect to you for continuing to do what you love, and finding ways to work around the issues of aging. Wouldn't it be lovely if our aging bodies could be as easily repaired as our old homes? But the best we can do is work around our physical "glitches" to find ways to keep doing what we enjoy!
@@alycejohnson8115 I'm so glad that my suggestion found someone who realizes that it may be useful. I arrived at the idea by evolution - gradually discovering the easiest way to work.
Another thing I learned [ the hard way ] is the importance of avoiding breathing very fine wood dust. Extremely fine dust [ in the micron sizes ] is notoriously difficult to contain even using good quality dust collection equipment. It is suspected that these fine particles can not only enter your lungs, but subsequently penetrate lung tissue and enter the bloodstream.
Whatever the cause, I personally underwent triple by-pass heart surgery in my early 80's. So now, rather too late possibly, I am careful to wear a mask when sawing wood.
As to the problems caused by ageing - I remind myself that liking what you get is much more important than getting what you like.
My very best wishes to you and success in working around your own physical glitches.
I love this whole series on your new shop. And great idea for use of the door. I also recommend hollow-core doors for planks on saw horses. Lightweight and very strong.
Thanks, David! Definitely save about 100 lbs. with the hollow core 😅 Thanks for watching!
Wonderful idea!
Absolutely brilliant!!!
Used many solid core doors with the door knob holes to feed power cords through.
Or to mount a rotating lamp.
We finally reclaimed the carport now that we have an empty nest and I was talking to the wife yesterday that we would need to start with a work shop table. BOOM you dropped this video in the Nick of time. As always - a carpenter that’s trustworthy. Oh...... and honest😀
Awesome Video! Thank you sir!
Very clean and functional design-Nice work! Thank you.
I've used a hollow core door and folding horses for field work the last 20 yrs... the hollow core door is just lighter to move around, and doesnt add extra weigh on the work truck. For stability, I fasten it to the horses with 2 1/2" screws and fender washers.
If I ever get a shop back, I'll definitely build the work tables in this matter.
nice build. I like the table top idea and will check out my local re-store store. One question on flipping the top. Since glued the shelf in, won't it be in your way when you try to unscrew the top and then rescrew it? I'd think the bottom shelf would not need to be glued to make the flipping easier. you could use wedges in the corners if you wanted a sturdier feel to the shelf. Or is it glued to add support to the legs?
Always love your site: tips and ideas
simple and practical ... awesome
Great build! I once used an old hollow core door for temporary workspace in a garage, hinging it to a wall cleat (using its old hinges) and hinging legs to it so they fell open when you pulled it away from its stored position against the wall. Not a primary work table but very versatile.
That's great! I was thinking of a similar idea for occasional work surfaces in our garage, which is not the primary workshop.
@@wendykrause6791 it was so easy that I couldn’t believe I didn’t do it sooner. I expect you’ll find it the same. 👍
Nice work bench mate! I would put another board on the bottom for more storage space. Still a Great build though! 👍🏻
Very impressed!
Thank you!
What a great idea! Thanks for sharing this neat build.
Dude, you're a genius. Just one more shelf near the bottom and with those casters she's good to go.
When my dad owned his cabinet business he had a table almost like yours😃. Though for the top he used 3/4 plywood . Great minds think a like.👍👍
Great Build !!!
Great idea thanks for sharing
I've heard that solid core doors make great work surfaces before. It makes a lot of sense. I like your work bench build. I wish I had the room for something like that. I use 2 sawhorses and a piece of 1/2" plywood. Not ideal.
Perfect timing brother. I have been looking at different workbench table designs all over the last couple weeks. I need my table to hold wood while I hand plane. My only question is, can I drill dog holes in the top to use holdfasts or what can of system can I use to clamp piece to the top so I can plane the edges of boards?
You could drill dog holes but the holdfasts will likely wallow out the holes over time since the door is MDF core - a hollow door would be even worse. Maybe a strip of wood in the door top for your dog holes line but then you loose the advantage of an easy top.
I regret putting my small bench on casters and then trying to hand plane on it. I wish the feet made direct contact to the floor when working. Check out flip down casters you step on and lock to move it around. This doesn't apply to an assembly table but one you plan on putting a lot of lateral forces against. Even the best casters have slop in the bearings and swivels.
This table is optimized to clamp to the table top around the perimeter. Legs flush with the worktop are common for hand tool woodworking to allow clamping to the top and *side* of the table to work on edges with a vice or bench hook.
The good news is I don't know a single woodworker who has only built 1 workbench. There is always the next one.
Love everything you do!
Excellent video - thank you for all your tips!
Did you mean you ripped the skirts to 10 1/2 instead of 11 1/2 like you stated? If you have a 5 1/2 inch window with 3 inches of wood above it and 2 inches below, that would be a total skirt width of 10 1/2. Forgive my OCD lol. I'm trying to make it look exactly like yours.
Awesome video! The only thing I'd have done differently is using only 2 casters instead of 4. As a safety. Great build and looking forward to the coming videos! Awesome work!
Wouldn't quality locking mechanisms keep it rigid enough?
Great content, outstanding presentation, many thanks!
great table, very instructional, thanx 4 sharing God Bless
Haha…my father worked for a door manufacturer…..he would bring home reject doors all the time….we built a garage out of them
☺️
The moral of the story: reuse
I like this build. When the top gets beat up, he could lay a sheet of luan over it, router around the edge, and he would have a clean new table.
I keep an old flat door in my shed. It's nice to lay over a couple of sawhorses to use as a project table under the shade tree.
Thanks, mark! In my early years working solo, I carried a flat door and horses in my van. Quick job site table 😁
I’ve been using tempered Masonite as a sacrificial surface for decades. And one sheet cut and doubled up makes a great roll around surface for your office chair. Haven’t bought any lately, but it was cheaper than a decent quality plastic carpet protector - you know, the kind with a zillion little spikes that kill your hands when you go to move one.
BTW: I’ve also used hollow core doors (used to be CHEAP!) to make a double desk surface and a laundry room folding table. Ford the wife. Some sanding and a couple coats of urethane give you an attractive durable surface.
Great build!
Great video! Lots of good suggestions.
I love these builds, but find implementing them challenging - I could really use a workbench in the garage, but between a car and miscellaneous storage, we definitely don't have the room for me to dedicated "unitasker" tools like a table saw or miter saw. I'd love to see build videos where you incorporate some of your other content, like your "Just Two Tools" video for those of us that don't have dedicated space as the default - in the sense of "Mark up your project and I'll show you how to cut one out parts for one side with a circular saw and jigsaw, and the other side I'll do using the table saw for the big cuts and a router for the corners."
Thank you for the suggestion, Jonathon! You’re right, not everybody has as much space. I’ll definitely think about it for future videos 🤔👍
I have seen videos on a work bench that the legs fold into the top and the whole thing clips to a wall. Might be solution to your issue.
Fold out trestles and a door - instant work bench that stores easily. You can make it more solid just by clamping top to trestles with any clamp that fits.
I also only have a single garage and need to build a work bench. This is a great idea for the top. You could add a secondary shelf lower down as a storage shelf for you other tools, table saw, router etc if you don’t have shelving space. Built in drawers could hold all the smaller tools. The sly is the limit but will make this build more complicated .
Wait, What? You put your car in the garage? Clearly you don't understand it's purpose :)
Back in the '70s, I needed a desk to get through college on a budget. A friend turned me on to a remodeling business that liquidated their Formica kitchen countertop mistakes (and old ones from demo) for $1 per linear foot. I got a 10' desk top for $10. Later in life it moved to the shop as a work table. Not quite as good as a solid core door for rigidness or stability, but it opened my eyes to the Formica work surface. It repels everything and even glues can be easily scraped/popped off instantly without leaving a mark. I highly suggest getting some contact cement and adding a matte Formica veneer to your door for the best of both.
Great Build
Super cool design! Thanks for the video.
Well that’s very disappointing!
Why didn’t you do this ten years ago when I was building my shop? 😂👍
Love the tool shelf idea. Very cool, and something I want.
Simplicity is best in life! Thanks for the great video!
Very clever. Good job.
Wow. Excellent build!
Thanks for another great video!
Great worktable build and approach!
Great video. Thanks!
Thanks for the idea. This looks simple enough, yet functional. Can’t wait to build it:)
Thank you Ethan! For this and all your other videos. I like this simple design.
For my small garage workshop I bought myself a couple of Worx Pegasus. Works like a dream.
But I’m definitely hoping to one day have a proper work table.
Thanks. Well thought out design.
Looks Amazing!!
Nice job. Thank you.
Excellent job
Excellent idea! Very practical and uncomplicated. Love it.
Thanks so very much for sharing that with us! I have been watching several videos on workshop tables and yours is awesome! I’m going to build one of those because I believe it will be the one that stands the test of time. Keep your videos coming!
What a nice build. Thank you.
Elegant and simple.
Excellent ideas… Thanks!
GREAT design and video. Love the tool shelf. Will be building this, though it is a bit more complex than what I earlier envisioned. The tool shelf makes it so useful.
Great tips, great build - thanks 👍
Genius. I’m getting ready to build a workbench and this will be perfect! Thanks!
Very helpful and informative. Thanks.
This is a GREAT Idea. Thanks for the upload.
Most excellent design and build simple and rugged
Thanks for all of the great content you produce.
Excellent idea/video. I’d been thinking about building a table using a solid core door for some time now but wasn’t sure it would work. You answered all my questions.
Super! I will do one for myself! Thank you!