One Of These Things Is Not Like The Other / Shou Sugi Ban Face Off

Vložit
- čas přidán 17. 01. 2019
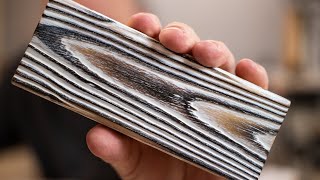
- In this video I go over the two more popular ways to get a shou sugi ban or charred wood finish. One requires a little more steps, but they both have very different looks. Links to everything I used today are just below!
BRUSHES TO REMOVE CHAR -amzn.to/2MjDMqv
GENERAL FINISHES BLUE DYE STAIN -amzn.to/2MiO4HA
VARATHANE VINTAGE AQUA -amzn.to/2T21Gcy
VARATHANE EBONY -amzn.to/2MjY8Qg
“PROBABLY WHISKEY” MUG - amzn.to/2M3wIhP
Looking for BLEMISHED PEC COMBINATION SQUARES, DOUBLE SIDED TAPE and overall great savings ALL THE TIME? Shop where I shop! lddy.no/go67
YOU CAN SAVE 10% ON STARBOND CA GLUES AND ACCELERATOR!
Use the code “INSPIRE10” at checkout! www.starbond.com
SAVE 10% ON OLIGHT FLASHLIGHTS, TACTICAL LIGHTS AND HEADLAMPS!
Use the code "INSPIRE10" at checkout! olight.idevaffiliate.com/idev...
BANGGOOD WOODWORKING TOOLS: www.banggood.com/marketing-Wo...
MY HAND TOOLS, POWER TOOLS, CAMERA GEAR AND MORE:
www.amazon.com/shop/inspirewo...
VISIT THE INSPIRE WOODCRAFT SHOP: inspirewoodcraft.com/product-...
Adjustable Box Joint Jig Plan: inspirewoodcraft.com/product/...
Multipurpose Shooting Board Plan: inspirewoodcraft.com/product/...
All Purpose Tapering Jig Plan: inspirewoodcraft.com/product/...
EMAIL: inspirewoodcraft@gmail.com
WEBSITE: www.inspirewoodcraft.com
PATREON: / inspirewoodcraft
INSTAGRAM: / inspirewoodcraft
If you appreciate this content and would like to help give back FREE OF CHARGE, simply give this video a “thumbs up”, leave a positive comment, subscribe to Inspire Woodcraft’s CZcams channel and SHARE THIS VIDEO with someone who you think would enjoy it. Some of the links that we’ve provided above are affiliate links. That means that when you make purchases through those links, we earn a small commission of the sale at no additional cost to you. While we do use affiliate links where we can, we only endorse products or services that we believe in. That commission is a big part of our income, which also goes back into making more videos, so by using the links you help support what we do and for that we are very grateful. - Jak na to + styl


What are your thoughts? Hard way or easy way? Maybe a time and place for both?
A lot of times I do short pieces because I use them for collage type art pieces. Sometimes I make long runs and then cut them up into the pieces I need too. Just for production's sake. I've never done a jewelry box though.
Great job showing the contrast between the two techniques.
For me the long way produces a "proper" finish while the short method produces a faux-finish. It looks good from a distance or at a glance, but not close up. Not that a faux-finish is necessarily bad, sometimes it's what's called for.
You covered that issue really well. Either way is fine, that's the nature of all art 🎨 in general. Personally I think I'd take the extra time and brush technique. Again, nice video
Like you said, it's all about what someone is looking for. I prefer the hard burn and brush style over the simple one, but I like to see that deeper texture..
I prefer the textured look. If I’m making a shadow box or a frame for something I used the textured look on then I usually just do the none texture on the frame so it doesn’t take away from what I’m displaying. Did I say that right?
I only did any of my work using “ surface burn”, until I watched how you did it big guy. I’ll go ahead and say it for you. Your way produces works of art, and is far superior to anyone, who has actually seen a true, textured piece. You do beautiful work my friend. Keep it up!
The "char and brush" process definitely leaves you with richer looking result. More texture and contrast.
I think it would be a cool effect to exterior furniture
Agree, but I like the low contrast look better. There is no right or wrong, just preference.
Full burn is way more beautiful, however, sometimes you may be seeking a smoother surface, and the tradeoff is less color variation. This is a very helpful video. Thanks for the very clear explanation!
Great explanation, just started doing this procedure, and have always done the surface burn, but you get so much more texture and character with the char/brush technique. The extra work is worth the time and your eye is on point.
Great vid
It’s well worth the extra time and effort to create that amazing texture and contrast. The difference, one looks good, the other (charred and brushed) looks amazing. Loved your shou sugi ban tutorial series! Thank you for the knowledge!
I did my first stab at “your” way this week and the texture and depth I got by brushing off after the char process is exactly what I was looking for. Thank you SO much for your videos and look forward to more ways a noob like me can fake it till I make it 🤘🏼
Hey how do you think I've been getting by all this time? Ha! Thanks so much for watching. I'm really glad you got great results!
I love how you handled that. You’re a genius!
Totally agree, the hard way is definitely the most beautiful... the texture, the contrast, so phenominal!
Your method is so much better than the other. You get what you put in... time, care and attention pays off and creates a true piece of art. Skipping steps or cutting corners gives you a product that will never stand up against a job well done.
I started the Shou Sugi Ban method last year and I just love it. Nothing beats the texture that you can get with it. Thank you so much for your very informative videos. They help me a lot in creating a whole bunch of wall art.
I just discovered this method a week ago and your videos are insanely helpful... I agree time and place. I did a pine outdoor table and did a light burn and just used poly and it came out amazing... but for a smaller piece I charred to get the raise grain for staining also looked amazing...
I like your videos, you don’t ramble, you get to the point and aren’t wasting my time. I like your work too.
Well thank you very much for the kind words!
Love it! Your video is super well explained, really good quality, good angles and is not the "ugh... go to the point!" Type of video♡
Finally someone who shows and tells the steps AND the how's and why's of most of it. Love ur teaching style
I totally think it's worth doing the extra steps. I love the look it achieves.well done!!!👍
Nailed it!!! Thank you for your explanation. I realize now that I was mixing the two techniques without realizing. At times, I am a little heavy handed on my burning. This helped me to understand what might be happening. Great tip
I really like using water based dyes mixed from dry powder. Lots of control of dye density and intensity. Stains are great too. It all depends on the look you desire. In this series I love the dimensionality of the charred wood. Thanks for your tutorials.
I have a spool that I'm turning into a table and have been waiting for the weather to clear to start. I started today and burnt the wood to the char then followed what you did and am loving how it's looking! Thank you for your video!!!
I wanted to say thank you for your Shou Sugi Ban series. Mostly, thanks for the info on which brushes you use. That was what really sets it apart from just a steel brush. I made a really cool looking bench with your method. I haven't figured out how you get that subtle coloring you do. Maybe using the wrong product. Anyway, thanks man, my bench is bad ass because of you.
The texture of yours is so much better. It has so much more character and depth.
Thank you so very much for taking the time to explain the difference, and to show how to achieve both looks. you have saved me a lot of time, and have educated me on both processes. Very much appreciated, cheers
Your videos are quickly becoming some of my favorites! Thanks brother!
Yours looks so gorgeous, there's so much dimension to all the colors in there.
Very glad I stumbled upon this video.
Each method absolutely produces a different result.
I'm making a reclaimed-wood looking table, and I want the wood to look as if it came from different places, so I'll definitely alternate between both techniques.
I definitely like your char and brush method the best - the contrast and the "colour-fastness" of the dyes made the piece vibrant and "alive". I can appreciate, though, how some people would prefer the other way if they want a softer, more misty, look for their task at hand.
Very well explained! I'm with you on taking the extra steps to create that textured look. Good job on the video.
I agree with you. The way you did it with the char and brush off looks much nicer than the other way.
I have used both ways and I have way more compliments on your way that I use on the flags I make but it looks sick with the more steps so worth the little more work! You get out of your peace what you put in to it in my book thanks man keep up the good work
I have what I needed for my old electric guitar!!! your way is so much beautiful in my opinion, thank you for this video, well explained, not too saturated with too much information, just right.
The way you do it looks so much better. Way more interesting in finish and colour.
Love the vid! The extra work you're putting into the film making aspect of your videos really shows! Keep it up!
Wow that really means a lot! Thank you for saying that. We've been working our butts off over here!!
Just wanted to say thank you for this amazing info. I am loving the samples I just made, and this technique is going to make a few of my DIY projects really stand out!
I just started doing this technique and your way is night & day different ( Better ) so anyone who says your way takes too long, or there is too many steps,,,,,,Well they just don't care about quality.
Your videos are great, very informative. I have learned a hell of a lot by watching you. Thank You for your time.!
Wow! This video is so informative. It really shows the effects of burning deep and barely burning. I now get the concept of burning.Thank you! And their is a huge difference! Awesome!!
One IS better. Too many steps?! Unbelievable! There is a CLEAR DIFFERENCE! Your technique was really awesome. In fact I’m gonna use it on a project I’m currently working on.
Thanx! Don’t let arm chair woodworkers get you down!
Awesome comparison, thanks for doing this.
Customers love the texture and feel of the brushed wood. Definitely adds character and beauty to the piece, especially smaller pieces like picture frames or plaques. I use Minwax water based stains for their variety of colors. Great video. Your first how-to vid inspired me and my customers are very happy, so thank you!
That's so awesome to hear! Seriously that's what our very namesake is all about so thanks so much for sharing that!
Spot on informed explanation...I'm just about to do 2 different pieces of work one an old cable drum and an old table, this video has made me understand how I can at least try to get the same finish if I dig into the grain or not to gauge my finish.
Spot on dude...🖒
I really enjoy your view point and how you stand them up and do it fairly in front of us , well as best as the medium allows.
Your way is baby far much better for my taste. Your videos are quite informative and inspiring. Thanks for the time you take to put them together. Very much appreciated.
Amazing, worked with wood most of my life and never knew of this technique until now, thanks for showing the differences between both
The charred wood is GORGEOUS!
The full burn is so much brighter and offers more color and design outcome. Thank you for the side by side.
I am SOOO in love with the burned and brushed piece of wood with the Varathane Vintage Aqua stain! I went out and purchased a torch and the stain 💙
What you put in is what you get out. Yes, I like how your way of doing it, it is a world difference to me. Thank you so much for demonstrating it, that I know what steps should not skip :D
I very much appreciated this tutorial and the explanations of both techniques. I am terrified to burn anything but this has inspired me. Great video!
This is super well explained. Im so grateful you shared this! Because I've been wondering how to get this particular look. Very professional video. 👏🏽👏🏽 Thank you for making this!
I think the right way is a richer look. You get people in a big hurry and don't want to commit time in to a project. We live in a "I want it now" world. I like your way and I am going to try and use that technique on a pull out trash bin for the kitchen. My first project ever. Thanks for the tips.
No, you're right! Your way is better. Very helpful, thank you.
Wonderful wood painting. congratulations....
Your technique looks sharp! Has a noticeably higher quality appearance. It really brings out the contrast. And I LOVE the texture created by it! Thanks so much for showing the step by step! 👊
Glad I watched your video and saved myself the time so I get the results I wanted!
Super informative and unbiased. Love the content.
Hoping to make a beautiful dining table for my friend's wedding present and this really helped.
Great video!! I also prefer the scorched and brushed look, it's beautiful and the difference between the two methods, when side by side, is quite dramatic.
WELL!!! Thanks a lot. You just made a lot of work for me. LOL. I have looked at so many ideas and experimented with paints for a bookshelf husband made me. Thought I had settled on one till I watched this video. This is so gorgeous.....have to do it.
Your way shows up way better for me. The contrast is so much better and i love the 3d look
Great video. To the point and well explained. Keep up the good work.
I've never seen this before...so cool and your way is much better looking. It's always what you put into it!
Excellent demo
Great explanation! It didn't seem like a “rant” to me! I can see valid applications for both and appreciate the time you took to show us.
I look up a lot of stuff on CZcams. This is a damn fine video. Great knowledge. Straight forward and well spoken. Every person on CZcams should take this guys lead.
The Shou Sugi Ban method has a richer look and feel. It will come down to preference though. Thank-you for the videos! They are very helpful.
I've never seen Shou Sugi Ban before, very cool. I did see something similar with wire wheels on unburned wood, it removed the softer parts and left ridges as well, but I like the burn effect.
Awesome explanation, I didn't know about this technique until now. Thank you!
Excellent tutorial, thanks for sharing
I like the charred method. Looks great.
Great Video!!! Explains the difference very well. 👍
Thanks! Very inspirational and clear videos!
Great way to explain both methods!
Hard way.you are so talented,generous and humble.thank you.from Portugal
hard way I prefer.. charred wood finish gives much more of a rich look. Thanks again master of awesomeness. Ramble all you want.. great wisdom comes with rambling when it comes to woodworking
I agree that the one on right was best and if you put in the extra effort it shows in your work.
Cheers
Tim from wood4nothing
Huge difference. I like the texture.
This was the best video explaining the difference 😍
Great video Jodie!
Beatiful projects.Thanks
Very cool. I like yours a lot better! Thanks for the fresh new idea, I'm always open to leaning new things. 👍
Well done comparison.
Thank you!
Excellent comparison
Great video. I learned alot. I love your way looks awesome. Thank you
Quality takes time! Keep up the great work.
I will say this bro ! I like your choice just because it has more “ texture” and I see 3 tunes...
1. the burn wood
2. The grain on the wood
3. The actual original wood when you sanded...
But like you said ... and your right ... everyone has there preference... but I’ll definitely go with yours... just saying my opinion !
That's amazing technic! Thank you for your video!
Another great educational video. Thank you.
I see your old green DeWalt radial arm saw and it brings back memories of my Dad's shop. He had two of those permanently mounted in a high bench along the wall. Bearings were so smooth the blade would spin forever. Until one day he had someone _repair_ one and monkeyed it up.
Cool, bangin vid, first exciting vid in this whole category! Informative, and at my timing. great.
I’ve just binged on all your videos. I like your presentation style. You’re a natural teacher. I’ll definitely try your techniques. I agree with you about your preferred look for final product. I don’t understand people who complain about “too many steps”. It takes what it takes to get what you want. I think the quicker way looks. . . quicker. My own interest will be to apply these techniques to wood sculpture. Can’t wait to see what I get. Nice knowing you.
I really appreciate the kind words and feedback, Larry. Good luck on the sculpture!
I much prefer the barnboard'ish look and feel of 'the hard way'. Beautiful tutorial, I'll be dusting off the old torch for my dresser project ~ thanks to your fine tutelage! 👍👍
That blue and burnt look is gorgeous
great and informative video, thanks for sharing. I love your mug in the video!
Thanks for the video ... I'm building a wood wall in my home, and I really like the way the deeper charred wood looks. Unfortunately that means more work for me, but it'll definitely be worth it.
Keep doing what you're doing!
Your way is the only way inmho, you only get out of a job what you put into it.
Thanks for taking the time to film and post this video. 👍
Thank you Inspire Woodcraft, for the video. As I understood, doing the complete burning and sanding technique will leave areas which will not strain sand remain brown.
I planning to a dining table with almost a midnight blue and thing the black grain will give it a good texture but brown grain will not pair too well with the colour. I guess I'll go for the light blowtorch and not sand it down. 👍.
Thanks for the video.
I agree with you! One of those is not like the other. They're two separate techniques that will give you totally different results.
Ooooo I love the one that was charred n brushed better. Colours are omg 😍
I love rants, so I subscribed, yay new subscriber!!!
Love the coffee cup.
I didn't even know of this technique! Thank God for CZcams's related video suggestions :D
Beautiful work. Thanks!
thanks for the video, it's perfect very clear and to the point!