Just a handy add on, (2013 Ranger XLT btw) once you have replaced actuators, sometimes you have to reset A/C unit if hot and cold air flows not working as they should, this is done simplely by removing A/C fuse from drivers side box, start car and run for 2 minutes, turn off car and replace fuse, start car and wait for A/C to reset (about 10 secs.) This may not need doing, but I had to last time I replaced the actuators, but didn't have to the first time, (150000 ago)😂
@TheBrowneTown super helpful, narrowed down which is the fault and unfortunately it will require a drilling first to get to the screw, but have worked out how to get the noise to stop, back demister is the culprit, hopefully limited in further faults so you dont have to make further videos 😅
Yes I can always make them when my car stuffs up, but I won't be looking for things to fix that's for sure. Done enough work on my car to last a long time.
Mate, as everyone else has said, you’re a legend! $42.50 for the part, my hands on $priceless! Just saved me an arm, a leg and a kidney! Took me 5 mins too for anyone asking. Passenger side AC.
Bloody legend! My partners BT50 was making that exact noise on the drivers. Was afraid it was going to cost hundreds to fix, so she will be so happy once I fix it for her for less than a hundy using your guide. Cheers.
I tried cleaning one that was making the grinding noise and it didn't seem to change anything. Have seen people clean out the actuator making the knocking noise with good results (for the air recirculation). Did you clean one which was making the grinding sound and it fixed it?
Very good useful and time-saving information. It will save me discovering for myself the challenges in changing the actuators. I have repaired (cleaned) the easy one behind the glove box but the noise persists. So now I know what different part to buy (UC9P61A60) and how to test for which remaining one (or more is faulty. I very much appreciate your posting this information. 😀😀😀
No dramas. They're a pain to access that's for sure. Such a cheap part, Ford should have done better as this is a clear problem this stupid grinding noise.
Legend, great video helped me diagnose, order and fixed my issue. During my fix, also confirmed the Mazda service centers lie about having no issues with the actuator, as some of the bolts are loosened on the side of the actuator… naughty Mazda in Leichhardt.
Great video! best one I have seen yet, I have this issue, I had the clunking issue and its sorted. Then a few a days ago I started having hot air only coming from passenger side, changed the bottom actuator and now it just puts out cold? Any idea, should I just change the top actuator as well? Thanks in advance!
My only two thoughts would be that the guide pin of the motor isn't moving the white plastic mould to open or close the vent. Or Somebody else commented about needing to do factory resets on the system at times, I can't remember the details of the comment but you should see it down below somewhere.
Beauty mate , I’ve had that weird noise coming from behind the dash for a little bit now . Definitely will be buying one off those tomorrow arvo from ford dealer , have a good spare parts in regency park . Awsome video mate & very well put together, you’re a legend . Mine is a 2012 bt50 , these parts work for that model ? Thanks heaps mate
Cheers mate, not too sure about the year models that the part numbers work for to be honest. Might need to ask the Ford spare parts place to confirm. Good luck
Fantastic. My 2015 BT has been through a few of these actuators and it's now grinding again! I'll do it myself this time and your video will be the perfect guide. Only thing is that I now live in a country where the vehicles are LHD - do you have any idea if the setup is identical or a mirror image (I assume the latter) of the RHD BT50?
I actually don't know to what extent the design changes affect the air system. I would also assume mirror image, maybe if you can see any Americans working on their Rangers it might be clear but unfortunately I am not sure 🤷♂️
Mine is actually the bottom one passenger side had a check this morning , the one you replaced, was that hard too replace I notice there’s a grey moving part on top side , I’ve drilled the hole ready
I think the one that controls the airflow direction you just need to make sure all the little pins go in the guide tracks on the white plastic moulds. It's an annoying job but quicker than removing the dash. I did it a while ago now so don't remember the specifics too much.
Hi my evaporator is leaking and i really liked the manual , the screen shot with dash board removed. Any idea i can get a manual like that so it can assist me on removing the dash and getting the evaporator. Thank you! 🙏🏼
Hey mate, the one I have is called "Haynes". They have an online version you can buy if you don't want the paper version. It makes it easier because you can search for terms and zoom in on images.
Hi. Loving the content. Can I ask you a question about your overhead shelf and fridge surround please? I'm looking at putting something like these into my canopy and instead of spending $$$ on them I thought I'd save a bit by making them myself. But not having done this before, I'm not sure whether I should use 2, 2.5 or 3mm aluminium. Do you know how thick the aluminium is on your shelf and fridge surround? (I presume is Ali and not Stainless steel?) I'd like to keep mine to 2mm or 2.5mm max as bending 3mm would be a bastard. Thanks!
Hey mate, the fridge cage is 2.5mm Ali, I'm not too sure about the overhead shelf though at a guess I'd say 3mm but that's just me guessing. It feels strong.
I also think the fridge cage would be fine with 2mm as well, doesn't really need to do much besides stop things rolling into the fridge. I'd actually like to mount the fridge without the cage now and save the 13.5kg, the compressor is up high and not much chance of getting damaged with things tied down. Cage is helpful as extra shelf or to tie things off though.
@@TheBrowneTown Thanks for the reply! I wasn't aware that you could mount the fridge without a box. I haven't got one yet so don't know what's involved. I've just seen that everyone on CZcams seems to have one. But for 600 bucks if I can live without one I will. I've almost finished making a bending brake (whew- what a job) and hoping it's strong enough for 3mm. Thanks for posting all the content online. You really seem to know what you're doing. I'm just an amateur. I know YouTubing is a time consuming task so it's appreciated. It's great content and I don't know why your channel doesn't have more subscribers. It's much better than others out there that are racking up the hits. Oh well, one of CZcams's algorithmic mysteries i suppose. Hopefully these comments and likes will bump it up. Keep up the good work. The only way I can see to improve it is to ditch the BT50 and get a Triton! That way I can do a direct copy instead of having to "translate" LOL. Cheers, Gary
You can mount the fridge if you design custom brackets. But as it comes it is only made to be recessed into cabinet slots such as in a caravan. I can't be bothered going through and removing it all and making up mounting brackets for it but it would save some weight. The fridge compressor is up high though so shouldn't get damaged. Haha, the algorithm. I have a few videos that aren't 4wd related with more views, so the algorithm would score me down for stuff like that. But it's all good, I can't guarantee that the next videos will be 4wd related once the build is over but I am not going to focus on a niche and create different channels for each one. The channel will be flexible, just what I feel like at the time, even though it would be better served by "playing the game".
Only different one is the actuator on the recirculation/fresh box above the lint filter compartment. Other 3 on the A/C unit are the same as each other. Ranger PX 1 2013 XLT btw


Just a handy add on, (2013 Ranger XLT btw) once you have replaced actuators, sometimes you have to reset A/C unit if hot and cold air flows not working as they should, this is done simplely by removing A/C fuse from drivers side box, start car and run for 2 minutes, turn off car and replace fuse, start car and wait for A/C to reset (about 10 secs.) This may not need doing, but I had to last time I replaced the actuators, but didn't have to the first time, (150000 ago)😂
Cheers, all info helps
This is probably one of the best, straight to the point informative videos on CZcams. Thank you so much. Have definitely help me sort my problem 👍🏽👍🏽
No dramas, glad to help
From now on, this is how I want to find diy car videos on YT. You've set the bar mate 💯🕺
No worries, can't promise there will be too many more but hopefully the ones that are up get you by 👍
@TheBrowneTown super helpful, narrowed down which is the fault and unfortunately it will require a drilling first to get to the screw, but have worked out how to get the noise to stop, back demister is the culprit, hopefully limited in further faults so you dont have to make further videos 😅
Yes I can always make them when my car stuffs up, but I won't be looking for things to fix that's for sure. Done enough work on my car to last a long time.
Mate, as everyone else has said, you’re a legend! $42.50 for the part, my hands on $priceless! Just saved me an arm, a leg and a kidney! Took me 5 mins too for anyone asking. Passenger side AC.
Good to hear!
Did you have a quote to fix it from anyone before seeing the video?
Bloody legend! My partners BT50 was making that exact noise on the drivers. Was afraid it was going to cost hundreds to fix, so she will be so happy once I fix it for her for less than a hundy using your guide. Cheers.
No dramas, good luck 👍
You are a legend, thank you for this video mate! My biggest gripe with my BT50 is now solved.
Glad it helped. Agreed it's an annoying issue.
Good not having to remove the whole dash though to change them out.
Best and most complete explanation of the many videos on this issue. Supporting information is great. Thanks.
No dramas
My car makes that sound for almost 3 years and im driving with shitty ac. Thank you so much for taking time to record the sound
No dramas haha. It's crazy how bad the fail rate is of this. Typical Ford trying to save money whenever they can with cheap parts.
Great video done mate 👌
Cheers, hope it helped 👍
You’re a bloody Champion mate.
Cheers 🍻
Muchas gracias por el video. Excelente trabajo!!
Gracias 🙏
Nice this will help me fix my bt50. Thanks heaps. Also like the stereo videos as im in the same position. Great videos.
Thanks 👍
Same as Everest. Just pulled two out and open them up and clean the contacts. Working again.
I tried cleaning one that was making the grinding noise and it didn't seem to change anything.
Have seen people clean out the actuator making the knocking noise with good results (for the air recirculation).
Did you clean one which was making the grinding sound and it fixed it?
Very good useful and time-saving information. It will save me discovering for myself the challenges in changing the actuators. I have repaired (cleaned) the easy one behind the glove box but the noise persists. So now I know what different part to buy (UC9P61A60) and how to test for which remaining one (or more is faulty. I very much appreciate your posting this information.
😀😀😀
No worries mate, it was a bit of a mess around for myself figuring out the locations.
Brilliant video thanks for getting me up to speed on this issue, getting no where with dealership. Going on far too long. 👍🤙
No dramas. They're a pain to access that's for sure. Such a cheap part, Ford should have done better as this is a clear problem this stupid grinding noise.
Thank you...good information.solved my t7 problem
Glad it helped
Legend, great video helped me diagnose, order and fixed my issue. During my fix, also confirmed the Mazda service centers lie about having no issues with the actuator, as some of the bolts are loosened on the side of the actuator… naughty Mazda in Leichhardt.
Good to hear you got it fixed at least.
Brilliant. Thanks very much.
No problems
information worked a treat
Sweet 👍
Excelente, de los mas completos sobre el tema.
Cheers 👍
Great work! Thanks for your efforts. I messed up my air circulation actuator, doesn’t fit back in. Them screws are difficult to get to
Yeah it's a pain, but taking off the dash to get better access is not a quick fix, although it does help a huge amount if you can be bothered.
Legend
Cheers!
Great video! best one I have seen yet, I have this issue, I had the clunking issue and its sorted. Then a few a days ago I started having hot air only coming from passenger side, changed the bottom actuator and now it just puts out cold? Any idea, should I just change the top actuator as well?
Thanks in advance!
My only two thoughts would be that the guide pin of the motor isn't moving the white plastic mould to open or close the vent.
Or
Somebody else commented about needing to do factory resets on the system at times, I can't remember the details of the comment but you should see it down below somewhere.
Beauty mate , I’ve had that weird noise coming from behind the dash for a little bit now . Definitely will be buying one off those tomorrow arvo from ford dealer , have a good spare parts in regency park . Awsome video mate & very well put together, you’re a legend . Mine is a 2012 bt50 , these parts work for that model ?
Thanks heaps mate
Cheers mate, not too sure about the year models that the part numbers work for to be honest. Might need to ask the Ford spare parts place to confirm.
Good luck
Fantastic. My 2015 BT has been through a few of these actuators and it's now grinding again! I'll do it myself this time and your video will be the perfect guide. Only thing is that I now live in a country where the vehicles are LHD - do you have any idea if the setup is identical or a mirror image (I assume the latter) of the RHD BT50?
I actually don't know to what extent the design changes affect the air system.
I would also assume mirror image, maybe if you can see any Americans working on their Rangers it might be clear but unfortunately I am not sure 🤷♂️
¡Gracias!
Thank you.
Mine is actually the bottom one passenger side had a check this morning , the one you replaced, was that hard too replace I notice there’s a grey moving part on top side , I’ve drilled the hole ready
I think the one that controls the airflow direction you just need to make sure all the little pins go in the guide tracks on the white plastic moulds.
It's an annoying job but quicker than removing the dash.
I did it a while ago now so don't remember the specifics too much.
hi, is it need to do aircond diagnos after replaced the actuator?
Nothing will change. If your air con needs re-gassing that's a seperate issue.
What is the blue clip behind the glove box @3:55 ? next to the air circulation actuator.
Not too sure mate, I'd need to look at the car and trace the wires out but I'm not near the car ATM.
Hi my evaporator is leaking and i really liked the manual , the screen shot with dash board removed. Any idea i can get a manual like that so it can assist me on removing the dash and getting the evaporator. Thank you! 🙏🏼
Hey mate, the one I have is called "Haynes".
They have an online version you can buy if you don't want the paper version. It makes it easier because you can search for terms and zoom in on images.
Thank you very much mate!
Hi. Loving the content.
Can I ask you a question about your overhead shelf and fridge surround please?
I'm looking at putting something like these into my canopy and instead of spending $$$ on them I thought I'd save a bit by making them myself.
But not having done this before, I'm not sure whether I should use 2, 2.5 or 3mm aluminium.
Do you know how thick the aluminium is on your shelf and fridge surround? (I presume is Ali and not Stainless steel?)
I'd like to keep mine to 2mm or 2.5mm max as bending 3mm would be a bastard.
Thanks!
Hey mate, the fridge cage is 2.5mm Ali, I'm not too sure about the overhead shelf though at a guess I'd say 3mm but that's just me guessing. It feels strong.
I also think the fridge cage would be fine with 2mm as well, doesn't really need to do much besides stop things rolling into the fridge.
I'd actually like to mount the fridge without the cage now and save the 13.5kg, the compressor is up high and not much chance of getting damaged with things tied down.
Cage is helpful as extra shelf or to tie things off though.
@@TheBrowneTown Thanks for the reply!
I wasn't aware that you could mount the fridge without a box.
I haven't got one yet so don't know what's involved.
I've just seen that everyone on CZcams seems to have one.
But for 600 bucks if I can live without one I will.
I've almost finished making a bending brake (whew- what a job) and hoping it's strong enough for 3mm.
Thanks for posting all the content online. You really seem to know what you're doing. I'm just an amateur.
I know YouTubing is a time consuming task so it's appreciated.
It's great content and I don't know why your channel doesn't have more subscribers.
It's much better than others out there that are racking up the hits.
Oh well, one of CZcams's algorithmic mysteries i suppose.
Hopefully these comments and likes will bump it up.
Keep up the good work.
The only way I can see to improve it is to ditch the BT50 and get a Triton!
That way I can do a direct copy instead of having to "translate" LOL.
Cheers, Gary
You can mount the fridge if you design custom brackets. But as it comes it is only made to be recessed into cabinet slots such as in a caravan.
I can't be bothered going through and removing it all and making up mounting brackets for it but it would save some weight.
The fridge compressor is up high though so shouldn't get damaged.
Haha, the algorithm. I have a few videos that aren't 4wd related with more views, so the algorithm would score me down for stuff like that. But it's all good, I can't guarantee that the next videos will be 4wd related once the build is over but I am not going to focus on a niche and create different channels for each one.
The channel will be flexible, just what I feel like at the time, even though it would be better served by "playing the game".
Does this fix the AC not working on ranger driver side?
Possibly, but it's not the only problem an air con system can have so I can't say for sure.
How many a/c actuators bt50 2016 have?
It depends if they're dual climate zone or 1 climate zone.
The one in the video is for dual climate zone.
Hmm got mine fixed my Mazda today and now doesnt blow cold air on the passenger side.
I'd be getting them to sort that for free if they've stuffed around with it.
the airflow direction actuator and climate control actuator are the same part no.?
Yes. I don't remember the part numbers but whatever I said in the video.
The recirculation / fresh cabin air is different though.
Only different one is the actuator on the recirculation/fresh box above the lint filter compartment. Other 3 on the A/C unit are the same as each other. Ranger PX 1 2013 XLT btw
Damn the links to parts are broken. Anyone have new links?
I can update them later when I have time. Unable to do it right now.
Hey mate, the links should be working now.
was there not 3 of these in a BT
3 of one kind and 1 different style for the recirculation.
Models without dual zone climate control will have less.
Massive pain in the arse changing the 2nd actuator
Yes, just do it for the money savings 😀
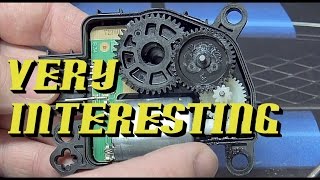
I always thought that knocking was coming from gear shifter ffs
Haha nah, it's these cheap actuator motors. At least the recirculation one is easy.
The climate control ones are a little tricky.