Restoring old German bench grinder - Tool Restoration (+customization)

Vložit
- čas přidán 15. 11. 2019
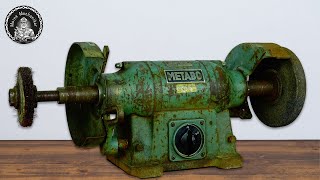
- I needed a bench grinder for the shop and restorations so I decided to buy old quality tool and restore it rather than buy a new Chinese grinder. I found this old Metabo that I liked. It works but there is still some restoring to do as there is some rust and cord is bad etc. It also has a badge the Finnish importer has added on it. Since that is not an original badge I decided to replace it with custom badge of my own since the grinder will be used in future videos. If someone steals my videos I will at least get some promotion. links to my tools and other stuff in the end. Check out Odd Experiments here: / @odd_experiments
There was no major issues with the disassembly. After the disassembly I sandblasted the parts to get rid of all the rust and paint. It is often nice to do sandblasting whenever I have to remove both rust and paint because that takes one step less than removing both separately. there is not really other good way to remove both, although electrolysis works on both to some extent.
After sandblasting I masked the parts and painted them with sprayable hammer paint that didn't need basecoat. It doesn't have much of the hammer pattern but I really like how it turned out.
At first, being very cheap, I tired to just cut the bad part of the cord but it looked bad on the inside as well so I decided it will be safer to replace the whole cord and leave add the vintage plug back to it.
The bottom of the grinder had a picture of the schematics which I took a picture of. Then I took that picture to Photoshop and traced everything to make new picture. I also managed to find a font that matched very close to the original hand written text. This was printed on sticker paper and added back where the old picture was.
I cleaned the old badges of the front of the grinder but I replaced the bottom badge with a custom one. I will probably make a video on making these type of badges to the Odd Experiments channel. But basically I masked bras plate with paint and used electrolysis to etch the unmasked area very deep. Then the masking was reversed and I painted the bottom of this etched area. To attach the bade I had to drill larger holes because I wanted to use same rivets on all badges. the bottom plate was added afterwards so it had slightly smaller holes.
Thanks for watching once again. In case you are a new viewer, please consider subscribing for more weekly-ish content.
---------------------------------------------------------------------
Patreon: / oddtinkering
T-Shirts: teespring.com/stores/odd-tink...
Instagram: / odd.tinkering
SOME OF MY TOOLS:
ROTARY TOOL: amzn.to/2WF75I6
RUST REMOVER: www.mc-51thebestrustremover.c...
PRESS FOR ROTARY TOOL: amzn.to/2Uiv1Eu
2-AXIS TABLE FOR THE PRESS amzn.to/2WPkttl
CHUCK NORRIS’ TOOTHBRUSH: amzn.to/2YfXUj2
POLISHING KIT: amzn.to/31w983l
POWER FILE: amzn.to/2URHvPq
CORDLESS DRILL: amzn.to/2Wois77
SCORLL SAW: amzn.to/31Eblej
SCREW DRIVER SET: amzn.to/2F3n6kO
MY FILMING GEAR:
MAIN CAMERA: amzn.to/2JvtKox
MAIN TRIPOD: amzn.to/2OlpYgn
MICROPHONE: amzn.to/2I80iDz
VIDEO LIGHTS: amzn.to/2FpJDaB
MAIN LENS: amzn.to/2Fm8yMk
CINEMATIC LENS: amzn.to/2TmNdHH
WIDE ANGLE LENS: amzn.to/2U7iJha
GOPRO: amzn.to/2U3eqU3
---------------------------------------------------------------------
SUBSCRIBE ▶▶▶ czcams.com/channels/f_s.html...
---------------------------------------------------------------------
Restoration playlist▶ czcams.com/users/playlist?list...
---------------------------------------------------------------------


I'm not a mechanic, i don't know anything about mechanic. But whenever i watch this kind of videos, i feel satisfying (idk why?)
First one showed missing parts. Second one was complete. It's a working bench grinder
6:33
That was an excellent job. I wouldn’t remember where all those parts would go back together.
Dir dabei zuzusehen ist sehr beruhigend. Tolle Arbeit die du da machst. Ich überlege es dir gleich zu tun und auch Mal etwas gebrauchtes zu restaurieren statt immer nur im Baumarkt etwas neues zu kaufen
If your power switch seems to be tight and harder to turn than before the restoration, it may be due to the rubber washer under the black knob being installed upside down. There’s a nub that should be inserted facing into the hole where the switch shaft extends through the housing, you have it facing outwards. This makes the washer taller and may require extra effort to turn the switch on and off. Refer to the before image at
06:33
Beautiful restoration! I was glad you restored an old one instead of buying new. The older German power tools are usually so much better quality than you can get now. The color you repainted it in looked like a metallic modernized version of that green Russian equipment paint. Looks great! Fantastic job. It is always a pleasure to watch you work.
When he dropped the screw in the hole... I felt that 😔
Technically, all houses are spider houses.
Nice restoration. Much better then the boring restorations that use a rust effect to make the idea look worse then it does
There is nothing more satisfying than buying an old bit of kit and fully refurbished it. Something that is broken or in a nasty condition and bringing it back to its glorious self. Great job
Very nice grinder. It could use one more item, an eye shield. Got to save them eyes so you can make more video’s.
When I take something apart I always have at least 3 spare screws. Great job Brother!
I'm so glad you went for a classic tool color / finish. Love this so much, can't wait to see more!
Every week I cannot wait to see what you’re going to do next. Massive fan here from the UK, keep doing what you’re doing.
Great restoration and old tool will last much longer then new one made in China 👍
Great to see a beautiful and quality piece given new life, very nice work.
16:49
This is going to touch people who know what it is to be loved and appreciate it on a whole other level.