Realistic Sky Swaps With Photoshop AI | Master Your Craft

Vložit
- čas přidán 27. 07. 2024
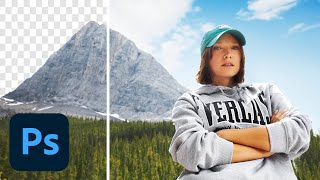
- Sky wasn't quite right on location? In this video, Pye shows how you can automatically select out and convincingly replace the sky in your photo for a better one using Photoshop's AI.
Realistic Sky Swaps With Photoshop AI
Intro: 0:00 - 0:46
Apply Look/Preset: 0:47 - 1:34
Replace Sky: 1:35 - 2:27
Match Scene: 2:28 - 4:13
Opacity: 4:14 - 4:53
Refining Mask: 4:54 - 5:24
Outro: 5:25 - 6:08
Welcome to “Master Your Craft,” a photography educational series by SLR Lounge, exclusively on Adorama TV. From gear advice to in-depth instruction, our goal is to give you practical, real-world advice to help you master the craft of photography. Whether you’re a beginner just learning your camera, an amateur looking to become pro, or a professional seeking inspiration, this is the series you’ve been looking for to help you become a better photographer.
SUBSCRIBE AND BE PART OF THE ADORAMA FAMILY:
➥ / adoramatv
__________________________________
Be the first to shop our great deals and sales by signing up for emails from Adorama!
www.adorama.com/MyAccount/Login
__________________________________
✘ PRODUCTION EQUIPMENT USED:
Canon EOS C200 8.85MP PL Mount 4K UHD Digital Cinema Camera Body: www.adorama.com/caec200pl.html
Canon EF 24-70mm f/2.8L II USM Zoom Lens:
www.adorama.com/ca2470.html
Benro S8 Tripod:
www.adorama.com/bea673tmbs8.html
Blue Yeti USB Microphone:
www.adorama.com/micbyetibo.html
SanDisk 128GB Extreme PRO UHS-II Memory Card:
www.adorama.com/idsdxdk128ga....
Adobe Premiere Pro:
www.adorama.com/ab65299421.html
#photographytutorial #photoshop #adorama
__________________________________
❐ LET'S GET SOCIAL ❏
➥ Facebook / adorama
➥ Instagram / adorama
➥ Twitter / adorama
➥ Twitch / adoramaxp
➥ Adorama Music / adoramamusic
❐ MORE ADORAMA ❏
➥ Shop www.adorama.com/
➥ Blog www.adorama.com/alc/
➥ Live Events www.adorama.com/g/42-live
➥ Create No Matter What www.adorama.com/g/create-no-m...
➥ Podcast www.adorama.com/g/adorama-pod...
__________________________________
CZcams: / slrlounge
Newsletter: www.slrlounge.com/newsletter/
TikTok: / bornuncreative
Instagram: / slrlounge
Facebook: / slrlounge
Twitter: / slrlounge
__________________________________
THANKS SO MUCH FOR WATCHING! - Jak na to + styl


Great video, Pye.
have always enjoyed Pye's tutorials! more power to y'all.
Awesome!
I just have to remember that in 2022 photography (and beyond) mastering a "craft" is more closely related to using Excel or an accounting software than it is to wood working or building something.
Your videos are quickly becoming my go-to. I wasn't even aware of this feature! I have used a trial of Luminar and found it very impressive and flexible, but this is right in PS, so it might be easier to work with. Thanks so much!
Well done Sir
Fantastic, I never new we could do sky replacement in photoshop
Thnx just what I needed
The one thing i do extra to your process is to use the sky mask to apply a gaussian blur on to the sky to match the depth of field. It can look bad if the sky is sharper than tree's or whatever is in the image.
Yes, important step when you don’t have infinite or near infinite depth in the shot! Great added point. This shot didn’t need the blur since it’s mostly all in focus via the wide angle lens
Good stuff Adorama!!!
Wow!
Wou you delivered very sensitive matter invery simple way. Imressed Dr Anand Baranwal VNS. INDIA🇮🇳
I'm in slr group for subscription. Do you have more of these type of examples step by step?
I personally love the sky replacement especially for scenes where there simply wasn’t any meaningful contrast. I would like to ask where to get additional skies from? The current choice is very limited. Any feedback would be appreciated
Wow, this new feature is a game changer. I will try a sky replacement for the first time after this great tutorial. Thanks, Pye!
I'm quite surprised that photoshop doesn't add a defocus slider, similar to luminar. Do you think they'll ever add that?
Thank you. The last two steps are the easiest to ignore, especially reducing the opacity to zero, then dialing it up to find the most appropriate level.
You asked for more questions, so here’s one I struggle with. Once I’ve got an image to where I want it, my print preview often tells me I’ve got one or more colors out of gamut for my printer and paper. I’ve found that ignoring this warning usually leads to wasted paper and ink. What is the best strategy for dealing with this? I suspect that waiting until the last step isn’t the way to go.
I don't know why people doing this :|
Nope. Just nope. I’m struggling to see how software features like this don’t hurt our craft. What’s real and what’s not anymore. What happened to the days of patience, persistence, and photo craft. For me this takes a photo and turns it into graphic art, not photography. Sorry, but that’s my perspective.