How to Make June Tailor Quilt As You Go Project Bags | a Shabby Fabrics Tutorial

Vložit
- čas přidán 17. 05. 2023
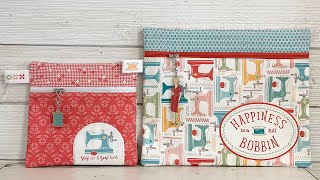
- Tammy brings us a fun and functional project that will change the way you stay organized! June Tailor’s Quilt As You Go Project Bags are the new essential to keeping your sewing space tidy while securing all of your project pieces in one place. We used the Wander Lane II fabric collection by Nancy Halvorsen to create these darling bags, which coordinate beautifully with your supplies if you joined the On Wander Lane BOM!
With Zippidy-Do-Done-Zippers, vinyl, and easy piecing, follow along with Tammy as she shares how to create these bags using all of her favorite tools and tips along the way.
Watch the Full Quilt As You Go Tutorials Series: • Tips for Making June T...
#shabbyfabrics #quilting #sewing
_____________________________________________________________
WHAT YOU NEED FOR THIS PROJECT
- Quilt As You Go Project Bag Kit - Wander Lane - Makes 2 Bags!: www.shabbyfabrics.com/p151522...
- Quilt As You Go Set of 2 Project Bags - White: www.shabbyfabrics.com/p151553...
- Quilt As You Go Set of 2 Project Bags - all colors: www.shabbyfabrics.com/search?...
- On Wander Lane Collection: www.shabbyfabrics.com/c6270/f...
- On Wander Lane Collection II: www.shabbyfabrics.com/c6442/f...
_____________________________________________________________
NOTIONS USED IN THIS VIDEO
- Clover Press Perfect Roll & Press: www.shabbyfabrics.com/p57789/...
- Wash-Away Wonder Tape: www.shabbyfabrics.com/p85169/...
- Creative Grids 2-1/2" x 24-1/2"" Ruler - CGR224: www.shabbyfabrics.com/p72962/...
- Creative Grids 4 1/2" x 8 1/2" Ruler - CGR48: www.shabbyfabrics.com/p51214/...
- Clover Wonder Clips - Assorted Colors - 50ct: www.shabbyfabrics.com/p47405/...
- Clover Water Soluble Pencil - 3pk: www.shabbyfabrics.com/p130011...
- June Tailor Eze-View Pressing Cloth - 14"x24": www.shabbyfabrics.com/p151849...
- Heat-Resistant Cool Pins - Bohemian Blue - 1-7/8" - 50ct by The Gypsy Quilter: www.shabbyfabrics.com/p133497...
- Clover Magnetic Pin Caddy: www.shabbyfabrics.com/p51323/...
- Clover Seam Ripper: www.shabbyfabrics.com/p35041/...
- Schmetz Topstitch Needles - Size 80/12 5ct: www.shabbyfabrics.com/p65074/...
- Olfa Rotary Cutters & Blades: www.shabbyfabrics.com/c4180/c...
- Sulky 50 wt Cotton Thread 1177 Avocado - 160 yds: www.shabbyfabrics.com/p73323/...
- We're sewing on a BERNINA 770 QE and we love it!
_____________________________________________________________
SUBSCRIBE so you don't miss our newest videos: bit.ly/ShabbyFabricsCZcams
We love hearing from you! Leave a comment below if you have any questions or suggestions for videos! We'll get back to you as quickly as possible.
JOIN our community of quilters on your favorite social media:
FACEBOOK: / shabbyfabrics
INSTAGRAM: / shabbyfabrics
PINTEREST: / shabbyfabrics - Jak na to + styl


I've viewed several project bag tutorials in the past, so when I noticed your video pop up, I knew this would be the best tutorial....and it was! Thank you for putting in the time to show and explain every detail for assembling bag, your tips and tricks and your dos and don'ts.....this was perfect!! Thank you so much.
Thank you for watching! We are so glad you enjoyed this tutorial. -Kristen
Tammy, this is the first time I have made a perfect binding. Thank you for your easy to follow instructions!!
We appreciate your support and happy that you enjoyed this tutorial! Thank you for your comment! - Abby
So glad to see Tammy back
We love Tammy. Thanks for watching! -Kristen
So glad you are back, have missed you for quite a while.
We are so happy to have Tammy back in house! -Kristen
So glad to see you back. Great tutorial Tammy.
We just love Tammy. Thanks for watching! -Kristen
Great project. Thank you 😊
It is a great bag to make and have for some of your sewing supplies! Happy that you love it and we appreciate your support! 😊 - Abby
If you put tape on the underside of your sewing foot, it would prevent the vinyl from sticking. A teflon foot as well? This worked for me sewing face shields for kids during the Covid outbreak.
Instead of doing the first 1/8th" seam line connecting the back to the front, just wonder clip the layers with the binding, just to start, and make sure nothing slips as you sew. You can still do your mitered corners when you get there.Then sew the binding down through to the back using a longer stitch length through the edge of the front binding. Still 2 rows of stitching through the vinyl without having to hand stitch. Going through the front binding edge, 1/16" or so, secures the vinyl even better.
Would make sewing a minute or two longer but saves time not having to hand stitch, yuk, lol.
I'll have to try this myself on this project bag. Worked for my face shields when making my own gkids sun visor type face shield using vinyl as the shield. Not all kids wanted to wear a face mask. I used binding for an eye opening so it wouldn't alter their vision any.
It's a blessing to have you back Tammy. You and Jen truly are shabby fabrics team anchors!!!
Thank you for those helpful suggestions !We are happy you enjoyed this project! Thanks for watching.
-Kristen
That is a very helpful tip in using the tissue paper.
We are so glad you found this video helpful! -Kristen
If you are afraid of using the iron to get the crease out of the vinyl, use your hair dryer instead
What a great suggestion! Thanks for watching! -Kristen
Great idea. Thank you. 😍🧵🪡
The hair dryer w😊orks great too!
I just love listening to Tammy’s videos. I can’t wait to make these project bags they are so cute and useful.💕
We are happy you enjoyed this project! Thank you for watching. -Kristen
Love seeing Tammy back. ❤️
We are so happy to have her back in house full time! -Kristen
Love this project bag! Suggestion: instead of using your iron and press cloth to get the wrinkles out of the vinyl, use a hair dryer set at medium and a few inches away from the vinyl and the wrinkles will come out (I wouldn't chance ironing vinyl). Also, if you find that the vinyl is a little stiff when sewing, just go back to the hair dryer and warm the vinyl up a bit and it will be very easy to sew. Thank you for sharing this project.
We’re so glad you enjoy this fun project! Thanks so much for sharing those great tips!! -Michelle
Welcome back Tammy!
We will pass the warm welcome along to Tammy! Thank you for watching. -Kristen
These bags are also great for school age children. Especially those that have homework or a picture group.
Absolutely! They are so functional! -Kristen
@Julie, what a great idea. Then I thought what a great teachers gift!! To make project bags to hold dry erase markers and erases!! Scissors and other supplies!!
I have struggled for years in getting my magic binding to work. It’s always been hit or miss on getting it right on the first try. You have made it easy to understand, to do and it comes at correct first time. LOVE the tutorials of Shabby Fabrics! I learn how to do the project and there’s always new tips and tricks!! Thanks
We're so glad you've found our tutorials helpful! Thanks so much for your kind comment. -Michelle
I love how you join your binding without any fuss..
We’re so glad you enjoyed this tutorial! Thank you very much for watching. -Michelle
Thank you for such wonderful directions! I received this set in the mail today, so now I have a head start! I have never seen your technique for connecting binding! I can’t wait to try it! I am glad you explained why you did not stitch the binding on by machine. I wouldn’t have thought about making weak lines in the vinyl! It makes sense!
Hi Sherry - We're so glad this project inspires you! Thank you very much for your comment. -Michelle
These are so much fun to make and hold a ton of projects along with your tools, etc.
I taught a class for this recently.
That is awesome. Thank you for watching! -Kristen
Thank you so very much. Excellent presentation! Very informative and helpful.
We’re very glad you enjoyed this tutorial! Thank you very much for watching! -Michelle
Thank You Tammy, I have a set of these, been putting off making! Think it’s time now!
They are just so cute and functional! -Kristen
The bags are so fun to make and the zippers being already sewed in is a huge plus!
Enjoy!
Great tutorial Tammy! Thank you. Love the bag!
Thank you for watching! -Kristen
So wonderful to have Tammy back doing tutorials. Thank you.
We are definitely blessed to have her back in the house :) So glad you’re enjoying these videos!! -Michelle
You are a marvelous teacher thank you so much😊
We appreciate your support and happy that you enjoy our tutorials! Thanks for your comment! 😊 - Abby
Nice to see you back Tammy!!!!! I love these bags.
We are so glad you enjoy this cute project! -Kristen
How inspiring! You make it look it so simple. Thank you for sharing all your knowledge!
Thank you for watching! We are happy we could inspire you! -Kristen
Great teaching tips. Thanks ‼️
Thank you for watching! -Kristen
Great tutorial, clear and helpful instructions. Really pleased with the one I made. Thank you.
We’re so glad you enjoyed this project! Thank you very much for watching. -Michelle
Oh hi Tammy. It's so good to have you back. Bought the kit. Love the BOM.
Thank you fro watching! We are so happy you enjoyed these projects! -Kristen
Thank you so much for this tutorial. Looking forward to making mine now!
Happy that you love this project! Great bags for your crafting or quilt supplies! Thanks for your comment! - Abby
Love this tutorial
We are so happy you enjoyed it. Thanks for watching! -Kristen
This was a very helpful and informative video!!
Love my new project bags!
So glad you enjoyed it! Thanks for watching. -Michelle
Heating up your ironing surface with the iron helps too!
That's a great tip! -Michelle
thanks for tutorial
Glad you enjoyed it! Thank you very much for watching. -Michelle
Ok , I finally found this again. Thank you Abby. I do not get paid until the 10th. So I cannot order until the 10th. Can you hold these for me until then ? I have ordered two different sets with 2 each and some of that tape, etc. Thank you again Abby.
Unfortunately we don't offer that as an option but we should still have some in stock for you! Thank you for your support and comment! - Abby
I used a heating pad to get the creases out.
Thats a great suggestion! We appreciate your support and comment! - Abby
Great tutorial Tammy👍. Wondering what the largest size of bag availability 🤔
Thank you for watching! Each kit comes with the materials to make two bags. They finish to approximately 18 inches and 16 inches!
I think it would be great to add a handle.
Great suggestion! We appreciate your support and comment! - Abby
How did Tammy attach the backing fabric on the quilt as you sew pattern? Did she use a spray adhesive?
Hi Delores - Yes, Tammy used a spray adhesive, then stitched all the way around it, to attach the backing fabric to the template. Thanks so much for watching :) -Michelle
Would you be able to use a nonstick foot to sew the around the bag?
We haven't tried using that foot, but it sounds like it may work well :) -Michelle
I need those but am afraid to make them. I will mess them up , I am sure
We believe in you and it's okay to mess up. The more you do it the better you will be! Thank you for your comment! - Abby
Picture book
These certainly would fit books, crafts, and all sorts of other things. They are so functional! -Kristen
In the 12 - 13 minutes of the video it "sounds like" we first SEW on the green line (made from the back side as the line to follow to finish combining the "log cabin style" block - and then CUT ON THE SAME LINES?? Watched several times, and do not find the answer. Is the final outside of the block the cutting OR the sewing line?
Yes you will sew on the green stitching line with your machine, then after that you will cut on that green thread line that you stitched making it easier for you to trim. Hope this helps and thanks for your comment! - Abby
@@ShabbyFabrics Thanks SO much for your quick response. So, this is simply to make sure it gets cut properly. As always, love your site, and your projects!