Project - How to make a rustic cedar ice chest / cooler box!

Vložit
- čas přidán 21. 08. 2013
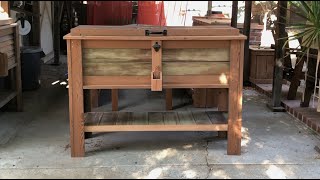
- In this video I show you how to make a wooden ice chest / cooler box out of 10 (not 8) cedar fence pickets.
Full plans available on my website.
www.funwithwoodworking.com/
This plan is based on a 52 QT Igloo cooler.
Purchase full plans with cutlist, material list, and cutting diagram here: www.funwithwoodworking.com
----------------
Please click subscribe and never miss a video!
czcams.com/users/subscription_c...
Website: funwithwoodworking.com
Facebook: / funwithwoodworking
Twitter: / funwithwoodwork
----------------
Music by Dan-O at danosongs.com
Licensed under a Creative Commons license:
danosongs.com/danosongs.com-li... - Jak na to + styl


I'm surprised this man still has any fingers left. He got close, more than once, to the table saw blade while it was running. Love the ice box chest. You did an awesome job.
Haha I came to to comments for this. He used the jig when the wood was far away then his fingers when it got close to the blade!
Building these this Spring!
I'm about a week out from having my shop together I'm a beginners beginner greenhorn... Lol I have been watching all of your videos over and over again big fan and appreciate all of your posts you really make it easy for the greenhorn to understand .. Thank you
This is a really great project and one that I can see building soon.
Loved the cooler box, great idea.
You were a big reason i made one for my daughter's wedding reception, was a big hit! So my thanx for the plan and incentive i gained from it!
I just made two of these boxes. I also made a video that i'm releasing on the 15th. Thanks for the great project. I also gave you credit for the design. Thanks again.
Mike Fulton That's awesome! I can't wait to see it.
Love it. Gonna give this a try, after I finish a few other projects. Thanks!
loved seeing it being built.
I made one this past week. I used a 48 qt Igloo from Walmart at $16 and the cedar fence planks were $24. It came out great for less than $40. I research alot of similar designs on the web. Yours was the best looking. Thanks for the post.
Donald Shade That's great to hear! I would love to see a picture of your completed project.
Great video, this is exactly what I've been looking for! Thanks for the Sketchup plans.
Amazing piece and great tutorial, thank you very much !!
What a excellent project. It certainly is better than having the cooler sitting on the floor at parties.
That is so cool. Thank you so much for sharing! I love all of your great tools too.
bransonhauntedhills Thank you!
Cool thanks for replying. I'm definitely going to make one of these. Thanks for the video and easy instructions!
The router sure does make it look neatly finished
nice project
Thanks for sharing your skills
Video came out great. I really like this project. I need to build one soon. Thanks.
Loved it. You're very efficient, no lost time, thanks.
Great idea and design! Even better job on the execution.
thanks for the video, excellent work,
Greetings from Mexico
Dude! Yee Haaaa starting mine today! Thank you for all your efforts to record and teach.
I just started this project tonight, and all the cuts have been made (with the exception of the miter cuts). I'm going rouge and not using a cooler, but instead building my own out of construction foam, which will be impregnated with epoxy and fiberglass cloth. I'm making it so the water will collect in a 3/4" diameter PVC pipe at the bottom, which runs on a slight angle down towards the spigot. It would have been cheaper to buy an Igloo cooler based on initial purchase cost, but this will be my own homemade project from start to finish. Thanks for posting this and the PDF file!
I had excess pallet wood, pickets, styrofoam coolers that came with Christmas gifts and a 35 year old bottle opener. Thanks to your video. My excess is almost gone. I posted a pic on your Pinterest page.
Awesome, thanks!
Awesome!! thanks for sharing. just picked up a bunch of fencing panels this morning. this gives me a AWESOME idea for a last minute girt. Keep up the great work. love the videos.
Al Smith Very cool man! Please send me pictures or post them on my Facebook page once you get it done! I also sell a full set of plans with cut list, material list, and cutting diagram on my website if you get stuck. www.funwithwoodworking.com/p/store.html
im gonna have to try this build thanks for the pdf file.. one would look great on the front deck!!
Great job !!! I will try to do it
greatings from Mexico
Amazing work!
'Cool' project. Thanks for sharing...
Beautifully done. I'm envious of your shop and your skills.
Thanks!
I think it's a cool project. I think I'm going to make one but with wheels on one side so I can move it around easier. Thanks for the great idea.
Good project. Well presented.
You've got a good channel starting here. You've got some nice projects and do a great job with the videos. Thanks!
awesome man. That came out great! Yes -you scared me with the table saw too. Great job though. Thanks for the video.
Hell ya basic bird house builder here I was all puckered up during the table saw run
Nice video! Well made, great job!
Man, you work fast! LOL! Great job!
I made 2 of those before I see the video, I just saw your video to see the technic and I want to say, good job ,my have wheels that's the only difference!!
Great video man! Really enjoyed it! Keep up the good work!
I love the New Yankee workbench...I built 2 for my wood shop.
Those push stick skills are what’s up bro!
Great video. Id love to see a video highlighting your work bench... it looks really well thought out.
Nick Pernia Thank you. It is the New Yankee Workshop workbench that Norm built in the second episode. I purchased the 1st NYW book used on Amazon for less than $10 and it has the plans inside. I shot video when I built it but it was the 1st project that I ever shot and it is very bad. I may still post it.
I never comment on videos but this one was just absolutely great. Video was shot amazingly just as well.
Thank you!
Thanks for the video, just purchased and downloaded the plans and materials list, I'm building this today. Out the door, on my way to Lowes.
Nolan Barges That's awesome! Please send pics when you're done.
Very nice love your work
Great job!
Very cool video! Thanks!
Great work! You do the kind of wood working I like. I plan on doing allot of your projects for our home! Thanks for the insite and keep up the good work.
Davy Crockett Thank you!
Love the tutorial. I went the other day to buy my supplies to do this with a mid size broken fridge, bout 26" tall, not the mini. Almost had a heart attack! 189.00 for everything, of course, I over figured. Wasn't using fencing, which is a great and much cheaper idea. 'Will be making a return trip to the local hardware store. I am using cypress left from a remodel at our house. I have watched this video numerous times and will tweak my cooler. Thanks for the tips, I may keep it here and not take it to the beach (Dauphin Island, Alabama) for my kid and friends to use. :) Wish me luck! I am a budding builder, I LOVE power tools!!!
If you're interested these are some great woodworking plans you could use: HootWood. com
Nice project.
Nice work! Thnks 4 sharing!
Excellent video. Well explained for a DIYer. Thanks
Really well done. This might be a good spring project.
I like the way he used a scrap piece of wood to keep the hinges and handles in the same location on both sides. I never thought of doing that, I always measure. I need more tools. Clamps and the air brad nailer would be really cool. This is a pretty cool little project.
Yeah, the scrap wood he's using would be a type of 'story stick'.
Thank you very much!
brilliant!
Only thing i would add is a cup under the bottle opener for the bottle caps to drop into !! nice vid
very well done my friend
Nice work
Thank you!
Thank was looking for aution donates for DBA runs. This is perfect
great video and awesome idea. ty
Great video !!
Nice job, cool vid!
Amei este vídeo, muito ótimo. Farei com certeza. Obrigada!
Jaciara Silveira Muito obrigado
thanks for sharing very niocely done
thanks for doing what you , its great for me.
Very cool I like it
nice work
Just finished the ice box using an old 54 quart Coleman cooler. I found some cast iron handles at Hobby Lobby shaped like black pipe that when well with the theme. Also shortened the legs opposite the downspout by 1/2" and ran a 4" wide cedar board to the underside of the tray between the legs to which I mounted 2" caster wheels. Finally, I added a trim piece under the top plate mainly to add support the the hinges and balanced it with a trim piece around the bottom of the box which hid the bottom boards from view. Great project with many complements on the finished product.
Ray and Vincetta Nicosia That sounds awesome. Please post some pics on my facebook page!
that was a great job now I am going to make one thx to you and your easy steps on you youtub
thx for that man
Love it.
Great job with very easy materials!! My only concern is maybe should have guards on that table saw. I know they can be a pain in the arse but......
nice job!
Love watch'n your channel man. Keep up the good work. Can't wait to get mine made up as well. Starting on it this weekend!
Thank you! Please post some pictures on my Facebook page when you finish it!
FunWithWoodworking
So I botched the first one...So It's going to be turning into an outside plant station for my girlfriend. I'll post pics of them both soon to your FB page when I finish. Legs are drying currently. I cut all the other stuff. Just have to assemble. Thanks again man. Love the project. One of my favorites on the web! Keep up the good videos man. You have my support.
Hey nice video! Thank's for taking the time to make this. You just got a new subscriber!
Love it, now I just need to get my husband to make it.
Very cool project. Walking around the saw to grab the piece of stock at 2:50 made me cringe a bit. I generally let it drop or use a table as an extension. You have a great shop with all of the essentials. Nice.
Thank you for your concern. I have learned quite a bit about using the tablesaw since I made that video.
Nice job.
Thank you.
Well done
ok, that sounds good! Thank you...
This is awesome. Thanks for the plans off your site. I'm gona make one of these before the 4th.
Thanks! Please post a picture on my facebook page when it's done. I would love to see it.
Will do
Well done :)
I made one change to your version, what I did was I left the ice chest plug alone and drilled a hole on the bottom of the ice chest with a drain valve from a boat, so the water drains completely out without having to soak up the water that's left in the chest bottom.
That sounds like a good idea. I will have to check it out.
good job bro!!!
Bom trabalho.
Love it
Absolutely gorgeous job. I see here that you say 10 pickets, on the video you say 8. Also, it looks like you use 6' pickets, is that correct. Without a doubt, nicest cooler box on here, can't wait to build a couple of my own. Great gifts for outdoor enthusiasts.
Thank you very much. The box is made out of 10 pickets. I accidentally said 8 in the video. The pickets are 72" x 5 1/2" x 3/8".
Thank you. I'm really looking forward to making this.
i was wondering the same thing. thanks for clarifying.
It is a Skil 3410 Contractor saw. I bought it at Lowes.
Hey great video, I just finished building one using your design, some reclaimed siding and an old cooler I had laying around. What do you think about using pressure treated pickets? Thanks
What a great video. I admire your cooler especially the craftsmanship, the designed and cannot compare to the rest of those other builders. Thanks again.. I have a suggestion if you agree to build a lifetime calendar (made of wood). A good size wooden frame and inside the frame you attach the month (slide it in) and below the days in order also slide it in and below the numbers in order also( just like jumble). Remember now all numbers are single piece and also holidays are different piece.. thanks again and good luck...Months, days are written(paint) not curving.
William Dizon I like that idea. Let me see what I can come up with.
Watch the video again and pause it at 3:25. The 3" face is flat on the table and the 2 1/2" board is sitting upright. Look where the shorter boards are. 2 on the left and 2 on the right. with the cut angle pointing in towards the middle. When you build it you want to make the 3" part with no glue seam point towards the front. That way you don't see the glue joints when you look at it.
Now that I made mine, everyone in the family wants one!
Hola me gustaria saber como hiciste tu mesa de trabajo ya que me gusto mucho hacer unapara mi. Gracias muy buen video
Great job with the video editing. I could use this as an example of excellent instructional design (except for that part with the unprotected work on the table saw). Still, this really is an excellent video.
i,m in houston tx ur in cal, i see. use to live in la many moons ago.
Bravo!!!!!
I made this cooler with your plans. As usual I had to screw one thing up, like I do on everything I do.
I assembled the legs wrong so I had to make a fifth leg. I guess I have a start on my next one.
I won't say that it has never happened to me.
bad ass bro good job
I don't have one right now but I will see what I can come up with.
Awesome project and great idea, those coolers come in very handy down here in Texas. I laugh at the people commenting about your "table manners." I've yet to see anyone that is 100% safe 100% of the time with power tools (I remodel houses for a living). Great video, will be watching more of yours!
Thank you very much!
FunWithWoodworking Do you happen to have a written cut list of the pieces needed to make this cooler box out of 8 pickets? Would be handy versus having to go through the download and write each one out. If not, no worries.
Brent Russell I actually sell the full plan with cutlist on my website. www.funwithwoodworking.com/p/store.html
Nice.
12:43 Those miter joints are killin me right now! Yes, it is an outdoor piece but still...
Thank you!