Strong 3D Printed Connections on BIG parts

Vložit
- čas přidán 19. 01. 2024
- If we print big, we need strong connections, what's the biggest connection you can think of?
Help support this channel! / needitmakeit
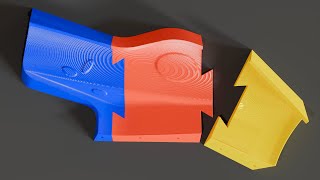
I've seen some attempts at creating enclosure or frames, and they are lacking in a few ways. One is that they don't pull the joint together, they're simply bolted. The end result is something that will shake and wobble, not good enough. There are other designs which require lots of hardware. There are also lots of designs which require supports. I'd like to try to do away with all or at least most of that to try to find the best and strongest connection for joining two large 3d prints together.
It's great to have the big printers, that helps a lot to minimize the joints, unfortunately they're not big enough and we need to join pieces together.
Gluing a connection is a good option, but how do you pull the joint together tight while the glue sets? do you really want to rely only on the glue, or would you rather have both a mechanical connection and a bonded connection as well?
I hope to answer those questions and more as I show off one of the oldest types of connections I can think of and we find out just how strong it is compared to other connections.
Another way to support this channel indirectly is through my affiliate links (where I receive a small commission). It helps me to continue to provide high-quality content videos. Thank you for your support!
NEW MIC (I bought this)
amzn.to/3vcMKAr - Rode Wireless ME mic (Saved me about 4+ hours/vid)
amzn.to/3NBFvZe - Mag clip (Super handy, but a little pricy)
BAMBU PRINTERS
shrsl.com/4aghz
CREALITY PRINTERS
shrsl.com/4aghy
CREALITY HYPER PLA
shrsl.com/4aghn
#bambu
#crealityk1
#3dprinting - Jak na to + styl


My high school physics teacher didn't use weights. He took a 5 gallon bucket and slowly poured in sand, then when it failed he would weigh the bucket of sand.
That's a good idea, I have a bucket, I could do the sand trick for sure. I was thinking about getting a fish scale, but I'm not making too much yet on YT videos and I've been making sure not to spend until I can have a more steady income. All in good time. Maybe in the meantime I will have to use the bucket and sand trick. Just need to make sure it doesn't tip over, but that's easy enough if it can be close to the floor.
one option for the bucket is to suspend the bucket past the point of fail. that way the suspection can prevent the impact on the bucket.@@NeedItMakeIt
@@NeedItMakeIt Use a secondary catch line to keep it from tipping after failure.
Take the source bucket, fill with sand, weigh the sand, then calculate the sand remaining in the source bucket when things fail.
Yes the gradually increasing of the load is important, this load on off stuff is really bad for comparison. You can also use a car jack and a scale and all sorts of stuff.
If you're planning on continuing the series, I'd be curious to see how these joints compare to a part printed without a joint. Looking at the failure modes, I would not be surprised at all if the extra perimeters in the jointed construction are stronger than an un-jointed piece. (Great job on the video!)
Agreed came to comments to mention a control sample
A joint is never as strong as a full part without joints. It's physics. You have a lot of samples in the woodworking area.
@@christianmontagx8461 but this isn't wood, nor 100% solid material, there is empty space on the inside and the infill is nowhere as strong as the perimeters. That's what was being mentioned here as far as I understood, that the joint having more perimeters involved in the demanded sections could be stronger than a full part that would be mostly infill on the same cross section
@@christianmontagx8461 even if thats true, you still want a control so you can see what percentage of strength you lose by using a joint instead of a large piece.
The failure was in the material not the joint coming apart. I have found using a hollow extended into each part allows for using small dowels of wood or metal to greatly strengthen the material itself. I've used wood, nails, straightened paper clips, and all manner of materials. 👍✌🖖🥃
Oh, I'd like to see more about your connection idea is there any way for you to send me a link to a picture?
Just putting hollows in the parts will cause additional inner perimeters. There are vids out there on how prusa uses this to strengthen parts.
Prusa Slicer has this ability, I think it has been carried into Bambu Studio as well. A word of warning , if you use the default suggested pins and their orientation you are almost nullifying the purpose (other than alignment) as the pin layer lines are matched to the joint. Print your pins on their side for improved strength. Until Prusa lets you use polygonal pins you may need to 'cut' the pins down on the long edge to get a good print. If you are using dowels, ignore this step and just make sure your holes are sized correctly.
@@grepmonkey I just finished testing it out, there are quite a few options, some are weak, however the option for alignment using cone shapes seems useful. Having that in combination with a machine screw would be a nice solid option. Question for you, do you think that layer direction plays a large role in part strength? It seems there is still some debate. Personally I think that parts, some more than others are quite a bit weaker along their layer lines, but I'd have to do more testing to be certain, I'm curious about your thoughts on this.
I don't understand this comment. If the failure is in the material and not the joint, how do you explain the wildly different results for the same material? The only thing that changed is the shape and amount of material.
That scarf dove tail was insane. Joinery is very interesting for printing large models. I think you could keep continuing to explore this. It's very interesting.
That’s impressive! I have started looking at Japanese joinery as layer lines are similar to wood grain. I have expected keyed scarf joint to be good, but that blew my expectations 😮
Me too, I was adding weight and kept saying, it's going to break, going to break, and it didn't. The wedge and constant pressure to keep the joint tight helped quite a bit compared to the other connections I think. The great thing is that I think there are a lot of improvements that can be made, and imagine if the connection was glued as well. I guess it doesn't matter much if the joint doesn't break at the connection. I think there is some potential here to apply other framing techniques to 3D printing as well. I'd be happy to make more videos if there is interest.
Interesting, cool bit of information. Thanks!
I suspect here with the material the main difference between them is that the more complex a joint has, the more wall material is being used. I would try a bit denser infill with the cubic pattern. So that you decrease the difference between the joints having more wall surface area between the parts.
Would love to also see your design process for creating these joints.
Oh, sure that can be arranged. I can whip up a video; I figured that most design videos are pretty boring so I tend not to show too much of it, I think I can get it down to about 5-7 minutes total. Maybe what I can do is setup the camera to show me speaking while designing and that might be a little more entertaining. I tend to look angry when designing and working for some reason...
@@NeedItMakeIt
As a newbie to 3D printing that immediately realizes the need for a larger enclosure would absolutely love to learn more about the adventure involving designing these.
Would you happen to have shared the files or would you consider it?
Either way, first time viewer but not last. Sub a dub dub
@@Mazda.Fit.Hey! I have another couple of videos coming up testing the structural properties of 3d prints, and after that, we can design a simple and fairly inexpensive enclosure. If you'd like the files right now, you can send me an email, they're not really in a finished state to post for everyone, but if you'd like to work with them, that's fine with me. Needitmakeit@gmail.com. I'm curious about what it is that people are looking for in an enclosure.
Thanks for the Sub! New videos 1-2 times per week and I hope to make it 2 each week.
It would be good to see a control piece that doesn’t have a joint in it, so we can compare best case scenario.
For sure, that's a great idea, I will make sure to do something like that for future videos.
It would be good to break the base version a few times just to a vague estimate on the inherent variability of the test proceedure and print quality.
@@MilesMcCusker I have 4 printers now, I just need to place an order for enough filament and I'll be getting back to some testing videos! I think I'll continue to use PETG, the smell of ABS and ASA in my shop is not something I want to have to deal with.
Really love you're exploring the structural and joinery domains. Good stuff!
Awesome, I'm gad you liked it!
I've seen quite a few big models coming out, I figured it was time to pay some attention to how we're going to join them together. The idea stemmed at least a bit from a frame I saw on Printables with what looked like a floating tenon, it was an okay idea, but it left the frame very wobbly because there was not enough tension and the joints were left flopping around. I just used some of my experience from when I used to Timber Frame and applied it here... I guess in some way I kinda miss that level of hand-crafting that we used to do.
Anyway, it's pretty neat and I think performed well, I think that the community can improve the design and simplify it a bit more.
The design at 7:23 is the solution I've always wanted for 3D printed parts, but couldn't think of, was how to put them together with only using printed components.
You're channel is amazing. Thank you so much for thinking of these cool ideas. It has opened up a world of possibilities for me for printed designs. I'm happily subscribed!
So cool. This is more informative than the usual videos of many other creators on 3D printing. This gives me ideas of how to approach some 3D printing problems.
I have a hard time putting in inserts with an iron. I do it from the other side, and make the hole smaller on the fastener side to keep the insert from being pulled through.
Excellent video all-around. This was my first viewing of this channel and I am quite impressed with the quality of the content, the dialog/explanation, and the video.
Thanks! I'm working to do better with each new video. I have lots more to come, I'm still working towards 2 videos/week depending on the video length. I also have lots more structural related 3D printing videos coming up, I just received a new batch of filament to make it happen!
A fair comparison would be to angle all of them equally. Versions 1 and 2 broke because of their relative orientation to the weight and stresses applied to a thinner cross section of the material/side of the material. Very nice joint, but I would have loved to know how these 3 compare on a somewhat more similar style and same relative stresses.
I would have liked to have seen a control test as well. Very cool. Love to see more.
Excellent video. Geat production quality and a very interesting subject. Keep it up!
impressive stability! well done!
Nice, I'm glad you liked it. I was kind of blown away with the performance. I think it needs to be simplified a bit for more people to want to use it, but there is some potential there at least. Thanks for taking the time!
It’s pretty interesting how the failures were all along the print material, not the joint itself. This tells me that they’re all very strong joining methods.. it would be interesting to try this test with 100% infill, or different infill weights or latice structures around the joint. It also seems that to optimize a joint with a normal infill, the key is keeping the cross- sectional area large- and possibly playing with that geometry to have an I beam section throught that acts as the joining dovetail or something. Very interesting! Thanks for making the video!
Thank you for the video, this is really good quality.
I want to test out some joints for a large frame, something along the lines of a monitor.
Awesome channel 🙌
thank you very much for public test. Very useful!
Nice video 👍🏻 Yes please do more like this. Would also be nice to see which angle the joint is strong vs weak. 3D Kitchen has a nice testing rig…
Thanks for sharing 👍🏼
This is fascinating, thank for showing it!
It's my pleasure, and I'll have many more to come!
This is very interesting, please stay on it.
I'm working on it right now!
Impressive project, would Love to see other joints.
Thanks for sharing your experience with All of us 👍😃
I have plans to show some other options! I'm also working on a project that will require some kind of joint, hopefully I can find one that's simple, strong and effective that works well in the situation I'm running into.
Very cool idea! Thanks for the awesome video!
Interesting video. I really like the "put a pin on it" approach to connecting pieces. Thanks for sharing!
Breathing some life into a very old technique. I was once a Timber Framer back right out of College and this was a connection we used on occasion for long spans, truck bed length and material was a problem as well. It seemed like it could work well here also, but I didn't think it was going to work this well, there is certainly some potential here. If nothing else, it's a cool idea and someone will probably be able to improve on it. The wedges were great, having that constant pressure rather than a loose joint probably helped it quite a bit. I think I may need to design a full enclosure with this method, it looks pretty cool as well as a little bonus!
@@NeedItMakeIt Yes, I wonder if there is away to make the insertion/removal of the pins tooless, or are least a bit more ergonomic than the current "let us jam the pens in".
I have seen the viral japanese woodwork videos that shows these kinds of joinery. It is pleaseant to see how much overlap there is in the people who like wood work and 3d printing. Let the river of ideas flow!
@@rodrigob I think so, I had been thinking about a single wedge concept, also there is the ability to use a wedge/screw combo to pull the parts together to tighten the joint, but I figured it wasn't good for this test.
So we shall explore more of these ideas! I think there is some potential here. I think we're all still in the search for the ultimate 3D printing material as well which is stiff, doesn't break, can take the heat, and isn't prone to warpage.
Wow! So the joint does not break! This was indeed very informational.
Joint does not brake. Joint fails. Which does not happened here. Material broke. The joint outperformed the material,
I thought they all did a great job. The table and clamp moved before the parts broke. Thank you for the video.
They did, I'll have to do a re-test of a tighter dovetail and also a sliding tapered dovetail as well. Maybe a follow up with improvements? I need a better test setup for next time though. Maybe I will order a fish-scale.
This is exactly what I need for my project!!
Go for it! I'm sure you can improve it as well. I was only taking what I already knew from Timer Framing, I'm sure that it can be made even stronger and sleeker than my version.
Awesome video Mike. I can see a 3d printed box frame using scarfs being very strong and very possible. Would be interesting to see a tensile strength test with the same joints, just for fun!
Fascinating results! I've been slowly experimenting with the dovetail joint in Prusaslicer. I like having the joinery built into the slicer but I agree, if you had to redo it, it may not be accurate. Still, the simplicity of having it in the slicer makes me choose that option. I recently did a large model that required joining the two. Granted, it didn't need strength perse, but did allow me to test the dovetail joint. I found that I really needed a good bit of tolerance set, to accomodate the print lines sliding against each other. Very cool test!
Thank! I agree, it sounds like we've had very similar experiences with the dovetail. I think it's a great option especially if someone doesn't have the design capability. I think they could make some minor adjustments to the dovetail option and get far better results. The separate dovetail I showed briefly works great to pull the parts together and we wouldn't need to worry about the fit as much. Reprint the small dovetail again if you need to, or make it tapered and it should be able to be pressed/hammered a little further to bring it tighter. I think there will be more development in this area as people want to print bigger and bigger. If there is enough demand, we should see some solutions to help.
Interesting video and well presented. Thank you!
Thank you very much I really appreciate it!
Skills!
Good presentation
Thank you so much! It was a pretty cool idea I thought, and seems to work really well. I'm getting a little better in front of the camera, it takes a bit of time but I should be able to get some something that looks at least semi-professional.
@@NeedItMakeIt your doing a great job👍
Great test. Thanks
Of course, it's my pleasure. I'm glad people seem to enjoy it and maybe found something inspiring here, or at least interesting.
That was an awesome video man!
Awesome, I'm glad you enjoyed it... Lots more to come!
Nice work. I like to learn things like this
I love wood joinery, and using them in 3d printing is underutilized!!
Well, then let's see if we can't do something about that!
On the first joint, I would have printed the fixed part of the half lap on top, that way the weighted end would be under compression, instead of pulling away. I would also put the heated inserts on the outer face, so the bolt squeezes it all together…or maybe bolts with inset nuts
Shoot, that's a great point, as the pressure is applied, it tightens up. Great feedback on that one! I was thinking that I could do the half-lap as well with the screws on an angle maybe set 45 deg to the connection in order to pull the joint tight. I can also do a similar undercut and that may also help. What do you think?
@@NeedItMakeItI was actually rather curious as to how the other two joints would behave if they were printed on the 45 as well and the scarf joint at the 90. Since the bolted joint and sliding dovetail were both along the flat plane perpendicular to the force applied. The scarf joint was at the near ideal angle for strength
@@NeedItMakeIt If you redid it as we're describing, the pivot point would move out to where the two parts mate. To counteract this, I'd put more emphasis on putting the bolts towards the clamp-end.. I'm not sure if the bolts being inserted at an angle would make any difference...but it's YOUR time and filament 😜
Wood joints reused for 3D Printing. Cool 👍
Great testing, each can now be designed better by reviewing the video. Thanks
Thank you! There have been quite a few great points, the half-lap has some potential still. I was thinking that I should do a re-test with the improvements, but maybe I should buy a fish scale to make testing easier and print as many good connections to do a more complete test video to find any clear winners.
I print a lot of tools and structural prints, almost exclusively with PETG. My tip to you would be to throw out the infill. You get almost nothing from it strength-wise, and it adds to your primt time. If you need to add just enough to support your top layers. Beef up your walls and top/bottom thickness and i think you'll end up with parts stromg enough you'll be testing joint strength more than just material strength.
Great tip, how do you handle tops, do you just bridge and rely on more tops?
@@NeedItMakeIt a combination of super light infill purely to support the top layers, and designing the part in a way that doesn't require infill at all - on thinner sections, using chamfers to bring the top edges in so there isn't a flat top layer at all. I've also recently started using lightning infill on prints where it can't be avoided, again just to support that top layer, and letting my walls and top/bottoms provide the strength
@@austincase914 Yes, I can see that working well, I shall setup a test and see how it preforms on these particular parts. Normally my parts are under compression, I need the infill to assist there, I'll put this on the list and see if we can get some results that we can use, it would certainly speed up the print time and save material, I like it! I've never tried Lightning, but I will give it a go if needed. Great tips my friend!
Super cool! The first connection reminded me of the ones on The100 3D printer, so it would be interesting to see how the last, strongest connection would perform on a printer with 100k acceleration, that happens to have a printed frame (The100).
Thanks! I hope that people take it and run with it a bit, maybe they can improve it even more. The wedge for example can be a single piece if the extrusion between is also tapered, it makes the design harder, but maybe there is an advantage to that concept. Yeah, I saw that 100 printer going, Whoa that's fast, and it does not look like much either.
So much effort, also one thing missing -> Printed threads instead of brass inserts. Just have a minimum of 3x width of thread, so for M3 minimum of 9mm. Not sure if that still gives full strength, but that's the rule of thumb i've used.
17:35 another improvement that can be done to this type is giving it a "tail" too that slots into the other part.
Then it wouldn't open as much from bending because it would have to pull that additional part out of the other first.
That is a cool test. I would like to have seen all those same joint styles oriented in at least 2 different ways. What I mean is with the joint facing up and the joint facing to one side or the other. It also seemed more like a failure in the print material rather that the joints themselves. It looked as if the joints remained intact.
I can always make a follow up video, I wanted to see if there was enough interest in these ideas before I went too far with it. The original concept was that I was going to just show my idea for a new type of 3D printed connection, but I thought I had better compare it with something else at least, I should have also printed a part with no connections as well and I should have done exactly what you suggested and at least flip the connections around. I will purchase some more filament and start thinking about the next one!
The half lap shlould have been turned 90 deg to engage the full cross section....this isn't an apples-to apples comparicon. Plus the choice of material has bad creep characteristics. I would suggest an ABS that can be easily solvent bonded and that would create a really good joint.
Good point, I was a bit conflicted with that one, so I will see about printing another test and report back, I think there is some more potential in that connection as well. I've also updated the model to have a larger rad in the corner, it wasn't really ideal for this test. I haven't been doing too much with ABS lately, but I do have some that I can experiment with a bit, great tips, thanks for your thoughts!
@@NeedItMakeIt The beauty of ABS is that it fails more predictably, slowly, not brittle fractures and catastophically like PETG and PLA.
I'd say a lot of these can be reinforced with using a 3d printing pen to further glue things in and get the bonds to be permanent and more evenly distributed. Also, consider doing the hanging off the corners of the table so the table doesn't bend. With the current bend the force is not evenly distributed perpendicularly but more like tugging on the joint, still, pretty solid joints.
I see that you're teaching us to fish...but For the people who are bad at cad(not everyone is an artist, or like me who is 1/4 blind). Can you make a printables or makerworld with a universal kit print files? For example parts would be: 1.) corner piece 2.) Long beam(for printing diagonal on a Bambu printer 3.) Short beam (for side to side printing or smaller print beds) 4.) Pegs. I think with that setup you could build just about most things.
You could make multiple types and go wild with up to 6 way corners; or even with 1" 2" or even stuff that people can make go-karts out of(ala popular science pvc gokarts). But even a universal beam in 1" or so would be extremely useful.
Absolutely, I was wondering if anyone would be interested in this concept and I'd be happy to provide some models to use. What I should do first is make up a full test frame and... test it out to see that everything works properly before I go ahead and release anything. The 1" (25mm) rails seems to be quite strong, maybe a 1 and 1 1/2" would be good to try out. I also wanted to see about the recess for acrylic panels. I believe 3mm acrylic is good for this job as long as the span isn't too great. 6 way corners, I'm going to have to think about that for a few minutes. Up, Down, Front, Back, Right Left?
I like to keep things as simple as possible when I post, is there a way to use the slicer to combine parts to make a beam at a length of your choosing? If I supplied the ends and a central piece, could that work?
@@NeedItMakeItI think Bambu/Orca slicer only allows for full object resize, since the bars are "cut" in the x,y and z direction, if you resize the connectors will also be skewed. I think in the beginning;
1.) you could do without the acrylic recess
2.) make a 1" setup to start with
3.) Make the straight pieces like Legos so you can attach 2 300mm pieces together to make a 600mm.
Etc...
4.) A 3 post corner is nice for a box, but you can make a desk or multishelf furniture if you make 4/5/6 posts.
5.) You could have 1 printables page for 1", another for 2" etc....
6.) Later on you could do other straight pieces in 100mm/200mm/300mm etc.. also add the recessed angles for acrylic.
7.) Open source it and work with people like Zack Freeman to spread the word to encourage others to make other compatible or similar systems.
I think there is a need for Lego like "1 by" wood replacement. That someone could just build something with without doing the cadwork.. similar to Gridfinity.
Future would be cool for 2x4 replacements etc..
I think a parametric design for beams.. would be real neet. I have a project where I want to build something long.. maybe 5 pieces.. plan to lock together like this@@NeedItMakeIt
@@docdailey Well it so happens that I have some testing videos coming up that are looking at that very subject, I think I should have something within the next 1-2 weeks and I think we're going to try to test all of the ideas out there to hopefully get to a point where we have something that's rigid, not too much weight/filament which should mean that it prints fast as well. Beams and posts are a good place to start, we can also look at ways to integrate cheaper materials within our prints, for example thin wood dowels strategically placed along the inside of the parts.
Good thing I stuck to the end of the video as I wanted to comment on the first part disadvantaged test. I think another point that need to be controlled is the connection length.
What do you think of a sliding dovetail with a bolt in the middle to fix it in place. You will have a large contact area and a bolt to keep them intact.
Awesome video! Are you planning on sharing those test files? I really liked the idea and would like to try using it to design a frame or enclosure for my printer
Yeah, if you want to email me I can provide you with them. I wanted to make a follow up video first to refine them a bit more, but if you want to play with them now, just email me at needitmakeit@gmail.com. I might be a day or two getting back, I have a bit of backlog in emails to get through.
This is an extremely interesting and useful topic. An other Topic would be toleracne compensation, because having those joints you will introduce more tolerances than before which might be a problem to fit properly. You should analyse tolerance compensation features such as crush ribs in holes for instance. The wedges are also extremely nice you can really increase the pre tension and lock the parts
Helpful video. Liked and subscribed. What software do you use for the 3D animations please?
That scarf joint has been a favourite of mine since I saw how effectively it joined two lengths of structural beam in a timber-framed house. One thing we can do with 3d printing that would be very hard in timber is to use a generous fillet on all of the angles to prevent stress risers. You might want to dish the faces of the wedges to make it easier to drive them in and out.
It's an impressive joint for sure, it looks great, keeps the joint tight, and provides the clearance so that the parts don't need to fix exactly, the wedges do the rest! Ah, that's an interesting idea, give the ends a concave shape to be able to easily position the driver? I was also thinking about creating a version with a single wedge, though the modeling would become a bit tougher.
For the bolt ones I would've had the brass inserts on the outside so that tightening compresses the parts together instead of rips the inserts out. All that's holding the inserts in is the material around them.
Nice designs, if I would have to make something I would probably go for the screw design but instead of screws I will hammer in printed pins.
The Japanese woodworking connections look nice but they might need more post processing.
I've watched other joint comparisons, with different media and processes. I'm left wondering how layer orientation and in-fill may have had an effect. Very interesting results none the less.
It's certainly something worth more exploration. From my previous testing with PETG, the material as long as it is printed with the right settings and preferably in an enclosure will have similar properties regardless, but a test is required to be definitive. I will be doing more videos on these subjects coming up. I just purchased a good hanging scale with a hold feature, that should help to speed up the testing and give a bit better precision to them as well. I have a few Printer testing videos to finish up and then I'll be back onto more structural 3d print related videos again!
Even if the half lap wasn’t at a disadvantage I prefer the simplicity of it. This might speak more to abilities in CAD or just general intelligence in understanding the geometry required for the scarf joint but I would design and redesign a threaded insert connection to be as strong as required before attempting the scarf joint. 😂
Hey, to each their own, I think there may be a way to combine the two ideas together, if we can take a simple scarf and use the machine screws set at an angle, it can pull the joint tight and provide a similarly tight connection. Thoughts on that? I'm with you, I like the simple, but the tight joint has some advantages as well. Maybe if we have "All of their powers combined" we can form... Captain P... I mean the best and simplest method. I'd like your feedback on this.
For the supports, I would try using PLA as support interface without any gap to the part. Regarding the tests, I think it wasn't quite fair. The last junction was spread over a much bigger area, giving it an advantage over the first two. I think the test would be more representative, when the junction area would be kept the same. Also the first two parts weren't oriented the best way possible (as you did mention in the end). Especially the first one would have held much more load when put on it's side. Still an interesting junction design.
Love ya work!
I think the scarf joint would have done better up-side down, putting the more of the orange part into tension.
But who knows, the grey part was on the brink too :)
Not too bad for a first go at it eh? Yeah, I think you're right with the orientation, they probably each could have done better that way. I wasn't thinking that far ahead on it sadly, I was paying too much attention to the scarf. I'll have a few more videos coming out soon on the subject of structural prints in the hopes that we can come up with the ideal conditions for a strong part without wasting too much time printing and wasting too much filament either.
@@NeedItMakeIt that said, the scarf joint was pretty formidable!
One limitation of the final two joints is the direction of assembly. They require lateral space to fit together whereas the first joint type allows lateral and transverse assembly. They will still work to create a frame but will require subassemblies rather than direct ad hoc assembly. Put another way, imagine making a cube with butt joints verses dowel joints. Butt joints can slot in wherever there is an opening whereas dowels need to be installed from on direction. Small detail but when I saw you put risers in the middle of the scarf joints I could see it limited assembly options.
One possible way around this, or adding more support to the wedge design, could be to angle the outside edge of the wedges thereby creating an additional direction of pressure. Tricky to do if you’re cutting the joints but when you can print it then a non issue after design.
On the bolted part: I'd be curious to see how it performed if you flipped the location of the arms. The way you are testing applies a rotational force so having the blue arm on top means it adds no strength to the joint. All the force is applied to the lower orange arm. Having the blue arm on the bottom would essentially result in it being pushed back towards the orange base. It could make the whole joint stronger or result in the failure occurring in the heatsets rather than at the base of the orange arm. Actually, the same idea would apply to all three models.
Absolutely, I think for the dovetail and the half-lap connections, it would probably improve the performance quite a bit, for the Scarf, because it it wedged tight, it likely wouldn't make as much of a difference, but that's a great idea for a follow up testing video. I have one in the works right now, it isn't so much about the connections as it is about the parts themselves based on feedback from the community. Some people claim for example that a hollow part will be nearly as strong as one with infill. I'm not a believer myself, but I'd like to test it, I have a few more examples of different ideas that we need to test along with that.
@@NeedItMakeIt You could also try with varying levels of infill (25, 50, 75, 100)
@@jasonjohnson785 The next video I'm working on is going to be exactly that, I wasn't going to focus on infill exactly, but the comparison will be there for sure, and hopefully the results show how big of a difference it makes. Great suggestion!
brutal, love it, feels like japanese joinery
the last part failed because of the clamp fixture acts as stress raiser, that why it failed in the shoulder. because plastic has such low elastic modulus, the things tend to bend a lot, changing the direction of max tension vs grain orientation. allowing it to bend to conform to the stress and squish a bit of more "performance"
steel suffers from the opposite problem, as its high elastic modulus means that any and all stress will be directed, almost ideally (in contrast to plastic, at least) to the weakest point.
since most of the time, the bending allowance is a problem in joints, you could also add a maximal tip deformation (at a given load) to see the effective rigidity of the solution, as a thin plastic (like a 2x12 mm, I estimate) hook with a controlled round flexion at the fixture could eventually surpass everything tested here, but it would suck as a frame element.
It would be interesting to see some of the Japanese joinery would work in this setup.
For sure, oh I watch some of their work because I used to be a Timber framer and WOW they are so precise. We were pretty good, but their level is far better that ours. Incredible craftsmanship. I'd love to try some other connections, if there is interest, I'm happy to do several of the best connections and have then face-off. What do you think?
how would you connect panels together? or right angles?
I think it would be interesting to see the same tests on a more rigid table. I feel like the table you are using is handicapping your results…. Great videos by the way! 👍🏽 👍🏽
Oh, yeah I definitely need a proper solid wood or possible a metal framed workbench. That's on the list of things to build this year, maybe it'll end up as a YT video as well, I'm not sure if the 3D printing people would be interested though. Thanks for your thoughts and for your feedback on that, I agree that the floppy table needs to go back to being a desk!
to bad you did not print a sample with out a joint to compare. I understand that this was a test for part to long for print bed, I was wondering if the scarf joint made it stronger than a single bar.
It would depend on the infill in the solid part more than anything. The joint adds additional perimeters so with identical infill, is expect it to be somewhat stronger.
That's a great point, I didn't think of that. I was thinking more connection to connection, but adding a solid part, yeah that's something super easy to whip up. It'd be hard to believe that it could be better than a 'solid' or at least infilled piece, but I can't be certain until I test it.
Ah, yes that's possible. I'll also see if I can get the walls and top/bottoms to around the same thickness, at the moment I have 1.2 Top/Btm and 2.4 for the walls, it'd be better for me to set the tops to 12 layers and then we have a test which is more uniform regardless of orientation.
I did NOT expect PETG to hold up as well as it did.
The table is taking a lot of the force applied by the weights exponencially. I assume in a solid base the higher results would drop down a lot.
The last one is very similar to Japanese Kanawa-tsugi joinery, isn't it?
Technically, material failure is the cause of breaks on all 3 joints, but your video does illustrate the importance of knowing the direction of forces and orienting the strength of your joint to accomodate.
Joint 1 had 1/2 the material thickness to work with and the joint wasn't really part of the equation. Rotate the part 90 degrees and it would do another 10 lbs (my guess).
Joint 2 also had 1/2 the material thickness because the orientation of stress caused an upward bow splaying the joint. Again, 90 rotation would test the joint itself, probably would hold another 5-10lbs.
Joint 3 had full material thickness to hold against the stress because the (correct) orientation forced the joint to compress together.
Nice analysis!
I'm seeing a lot more of these large format prints being made, but when I look at the way the parts come together, the joints are loose and the entire frame then relies on the acrylic panels to stiffen them up. It's ideal if it can be strong as a stand-alone, and the panels only add to the integrity of the structure.
Each will have advantages over the others and can be used in different areas. The scarf is a little complex to setup, but it's pretty slick, maybe someone can improve on the idea as well. The half-lap is really quick and easy to create and it's pretty strong, and I think it can be even better with a few tweaks like you mention and some slight design changes as well.
More testing to come, I need to finish up a few projects first, but I have the material on order and I'll get back to it soon!
As you can see your connections are strong enough therefore failures occur at one of the 2 parts. if it was me i would play around with the infill type to try to make the parts even stronger and see if the connections still take the loading. Or even better, you should design the infill as well and remove any automatic infill thats done by the software
Something i have always wanted to do is make a really solid 2.5 D 90 degree or perpendicular joint. This would mean you can machine just the top surface of two pieces but be able to join them perpendicular to each other. The best I got is dove tails but those are 2.5 Dimension not 2 dimensions.
Is there any way you can send an image of it? I am going to be doing some follow up videos, and I can add some of your ideas in if you like. I will give credit to you of course if that's something that interest you.
@@NeedItMakeIt Thanks Mike, but i never got around to designing something. I was using a CNC router not a 3d printer. There was no clear solution that did not require an undercut. Some undercut geometries were achievable with special router bits like a dove tail. That was how I was going to get the extra .5 dimension. I was inspired a lot by japanese wood joinery and wood joinery in general. The key thing is that the member holding the pieces together is not the thing that is experiencing the force in the direction you care about.
I recently started to play around with "tsugite" and you might be able to find a geometry that is optimal for 3d printers. I would consider looking at what some of the stronger wood joinery methods are and take inspiration from that. Take into consideration if joining method is in tension or compression to better plan the part orientation.
It looks to me that it could be stronger reversing the load. what I mean is the weak part is in extension. They all broke at the stress riser from the edge of the table.
Thank you for sharing. Do you share f3d files? I learn so much looking at timelines of others builds.
If you want to shoot me an email, I can give you the files. needitmakeit@gmail.com
I'd like to see it used in a large practical print like a frame for a printer enclosure.
Sounds good, I'd like to do an enclosure which is cost effective any easy for anyone.
@@NeedItMakeItI feel like bracing wires or cords running through channels inside the printed components and tensioned from the outside upon assembly could play a role in making stiff frames.
designing for strength is way more than just specific joints. layer lines, infill, plastic choice. engineering has a whole area of knowledge on designing for load bearing.
Sure is, the plan is to continue to test realistic parts so that we can gain a better overall understanding. I'll have more videos coming soon on that subject where we test a few different options to see if any of them make sense, or if purchasing an alum. extrusion is a better option in the end. Curious, do you know of an application we'd see plastics used for load bearing, I'm thinking of something on a larger scale. We see resins used a lot, but they're reinforced.
you're not just measuring the weight these rods can take in the demos, you're also measuring torque. If the rods were longer then they would take much less weight.
Yes absolutely, the tests aren't perfection by any means, it's really just a starting point. I think a better way to test would be to have two bearing points, both which can pivot and provide support at the ends, we can load the center and test deflection and breaking while not having the 'table-edge' effect on the parts as well. Let me know what kind of setup you think would be best for this and I can see about working it into following videos. I have a new scale on its way, that should make the videos a little shorter and the testing a bit more accurate as well.
Interesting test my take away from all the brakes was more infill would have them stronger. I have a habit of putting shake pieces into joints to make them stronger in bamboo slicer. I would’ve made 26 mm wide 3 mm high and probably 10 to 12 mm long and put them inside the joint and then did 100% infill making the two pieces for a little t at the joint, Then, when I slice it, I look at the positioning to make sure it’s strengthening the joint from the intersection. It may be useless, but it appears to give more strength and I will look at different ways to do the one that appears the strongest in the slicer so I may slice it 10 or 20 times till I get the effect I want at the joint. I like doing half height joints that are 10 cm longer and half the thickness of the material and I also put in dowel hole I’m super glued dowels and joint in place. Anything that structural I’ll do anywhere from 60 to 100% infill to get the strength I want. I grew up making things out of wood, so I still use the things that work with wood and they seem to work well with 3D Printing also. I think of the fill amount as different types of wood and the strength they supply from my test so I can take my knowledge with wood and use it in 3-D printing. Press board being 10 to 30% infill Softwoods I would consider like 50% infill or harder hardwoods I would consider 75% or higher infill and African hardwoods being 100% infill.
What temps are you using for the hotend and bed when you print in PETG?
255C for the nozzle and 70C, I'm set to 13mm³/s for this material to be safe, not nearly at top speed. I have run it faster and I set it to 275C for the nozzle to help keep up and that seems to work well also.
@@NeedItMakeIt When I print PETG on my CR-M4 @240c/70c, it is extremely difficult to remove from the supplied buildplate. I have begun experimenting with reducing bed temp. 50c seems slightly better. I was hoping you’d say you used something even lower. 😂
Makes me wonder if you can cold fit the dove tail. Like with a cold press bushing
Oh, that's interesting. I think you might be onto something there, heat up one part and cool the other and that may just work. Tight tolerances, but you may just be onto something there. Awesome thinking!
With such low wall and infill settings, pretty much each of these joints will be stronger than the rest of the part anyway.
It seems like more walls and a heavier infill could help for sure. Printing them 100% solid would be idea, but it's not realistic, it's far too costly unless the parts are small.
What orientation did you print those joints
where did you found “mouse ears” in the bambu studio?
If I don't have to worry about taking things apart again, I'll opt to just weld the parts together via a dremel mounted welding tip
A what a what? Please explain what you mean.
@@NeedItMakeIt A cone of plastic printed from the same material. Lut it on a dremel to spin it fast, push it against a part to melt the plastic together
@@jackgamer6307Thanks, I've never heard of this method used on plastics, this is a very interesting approach, just like what you'd see with metal friction welding.
curious why dowel style joints with glue or epoxy are not used a lot in 3d printing?
There are some options for this coming into the slicers. I think for the most part because printing was so slow, big parts were pretty much not an option, that's starting to change, but you'd need a background in furniture making to want to apply those techniques. I worked for a company called Durham furniture and we had a department of 'Dowel-adders' and I ended up doing that job for a bit, it's amazing how fast you can get at adding dowels in. It's great for wood for sure.
As far as for plastics, with PLA, the part longevity is a concern, they become brittle with exposure to moisture since they're designed to breakdown, for PETG, it's hard to glue, I think PU glue might be the best option for that material, and for ABS, acetone to connect the parts might be the best option, it would solvent melt the surfaces together nicely.
I think dowels can work fine as long as you find the right adhesive for the material you're using.
@NeedItMakeIt: I was wondering what I could derive from this interesting approach: None of the joints were the cause of terminal failure, and the test rods broke as an effect of the design being so stressed that the deflection of the entire structure rendered it useless for most applications. In that context, any joint is a good joint?
I don't know what you can derive, it depends on your ideas for application. In my case I wanted to show some alternate options for connecting parts which did not require fasteners. In the case of the lap connection with the screws, it failed due to the smaller cross-section, correct not due to the screws themselves, however it is failure due to the design of the connection which is a limitation of this kind of design. The dovetail connection had failure on the dovetail, however it was just at the lowest point (from memory). The modernized version of the Under Squinted Stop Splayed Scarf failed due to what looks to be the connection being stronger that the rest of the part.
It is always better to have parts coming together with as much surface area in contact with the other, the lap joint only does this on one plane, the USSPSJ does this on many and so it will be a more rigid way of bringing parts together and keeping them together, no fasteners of course, but there are wedges.
In the end, these are just ideas in my head that I'm trying to bring into reality, you can take what you want or don't take anything at all, I'm not promoting one or the other, it's just me sharing ideas and trying to find a way to make it as informative as I can and interesting. Maybe you'll get your own ideas from this, I don't know.
Could be interesting to add a dial indicator to the end of the arm to see how much it deflects
Or at least connect the tests to something other than a desk that deflects so much...
For sure, I will have to order a new arm, mine has gone bad. I could also add a ruler. I was thinking that I should move to an entire frame and compare the flexibility of it in its entirety. In that case, if it were me I'd be looking for something that acts like a solid structure, no wobbling around, it should be fairly stiff ext. Thoughts on that?
What was the infil type and percent of?
The fulcrum point on the first one with the screws did not test the joint strength whatsoever. It was purely on the part.
Should have positioned it half way across the joint overlap on all of them.
Very nice, but it looks like the last one tested, was placed a wee bit longer into the table. If so, this would have made it stronger because of the reduced weight at the end.
For a minute it was looking like your table was going to break before the 3D print broke.
Yeah, I need a proper testing setup. My shop isn't really big enough so everything is portable. I will need to make a proper solid wood workbench and then we'll be cookin'. I think I'm going to need to buy a decent fish scale for these tests, it'd make the videos quite a bit shorter and not so hill-billy using my weights. All in good time I suppose.
I was going suggest a fish scale or luggage scale to speed things up, but if you do that, make sure to use some sort of pully system. If you just directly pull down on it yourself, when it breaks, the chances of injury are huge. I've seen people get knocked out doing that because when it snapped, all that force hit them in the head.@@NeedItMakeIt
Everyone does inserts wrong. If you have the option to do a through hole and put the insert on the backside, do that instead. It's a lot harder to pull through the entire part than it is to pull out of the hole it melted itself into. If you're trying to make something look nice, sure, hide them. If you want strength use them just like you would use a countersunk nut. You wouldn't super glue it in a pocket and hope it holds. You'd put it on the backside and squeeze the two parts together.
Point taken, I agree with you. Do you have any techniques to make sure that you don't have plastic coming into the hole from inserting from the other side? Using a tap?
@@NeedItMakeIt I guess it would depend on the design. But in general I'd probably do through holes slightly oversize for the screw/bolt on the mounting surface and then have a pocket specifically for the insert on the opposite side. If needed I guess you could clean out any excess with a drill bit or tap.
Obviously for this project it wouldn't matter. The fasteners aren't the weak spot. But a lot of times the point of failure is going to be the inserts just pulling out. In those cases I would try to design for through holes and inserts.
Hi there! Would you be able to provide some stl files for these prints in the video? I've been pondering some ideas for framework, but I'm a complete newb with Fusion, so it would probably take an eternity to make something useful on my own 😊.
what the recommended 3d modeling software to learn and start with. Lowest curve?
Hmmmm.. good question. Personally I think Fusion is the best right now, but it's a bit too pricey for most people. I don't like Tinkercad personally, it'd really hard to use to get good results. Fusion may still have the free version for new subscribers for a year, after that I'd buy the full year plan and it's much cheaper. There are some other options coming to the market now, I'd need to test them out first though.
Are there 3d files for the scarf joint?
Are you printing in standard speed or did you slower the printspeed?
This is set to standard speed for PETG, 13mm³/s, a little slower than I'd like, but it's fine for these small parts. When I upgrade the nozzle, I'll be able to play around with it a bit more.
Also infill type could really change that
I have a few more videos coming up to see how Infill, walls, hollows, nozzle size, and I'll likely also do material at some point affect the final result. If we're making a frame, we'd want something stiff, but also doesn't use too much material. Having the material exactly where we need it would be ideal.. I've also been thinking about a structure like a bone for the inside.
hmmmz nice! where can i find the stl file
I would go solid infil if I need that strength
Keep in mind that solid infill does not necessarily add as much strength as you might think it does compared to a good infill pattern like gyroid. The perimeters are more important as far as load capacity in most cases
I can't see my self spending that much money and making the parts solid, it would be more cost and time effective to buy alum rails. Another idea that just popped in my head is to use fairy thin wood as the reinforcement and have the plastic and the profile we need wrapped around the wood. Wood isn't that cheap but it would allow long spans and we could have a piece set to 90 degrees for stiffness in both directions. Thoughts?
Did you post these anywhere for the hobbyists interested in playing with those joints? Clearly I’m interested in playing with it. You were very thorough with your Fusion design process, but downloading could save me 3 hours.
Sure, if you want, just shoot me an email at needitmakeit@gmail.com and I'll send them over.