@@miniindycarprojectza7793 amazing project love evry bit of it But please tell me how did you combine both halves? Did you have an overlap area or what exactly?
Hey Man, really awesome and inspiring video. A lot of hard work was put into that chassis, one of the best I’ve ever seen and all done by yourself and your family. Incredible. Keep up the good work and stay safe, mate.
back again to watch the video on your hardware mounts. Glad I subscribed for sure. Dude, my garage is in a constant state of 'disaster' from each project. I clean it up and then 'go to work whatever's next' rinse, repeat. The tub looks awesome!
Just found this and its incredible. see that you haven't posted in a couple years and I hope that you were able to complete it! A mountains worth of work, but the thrill will be worth it
The year was 1977. I had discovered go karts and my cousin had a paper set of plans to build a wooden derby cart like the one you are building. The plans were lost to time and the kart was never built I was thinking of that the other day and here in my feed is build in carbon !
This is epic! This is the first of the videos I have seen. I tried counting your shirt changes half way through but I got at least 4 or 5 days of work I think. Keep up the good work and the videos coming!
Very very nice project my friend! And great that you involved the kids for sure! I'm considering making a CF mono for my Motion Sim build to switch from steel to all carbon. Been considering it for about a year now. Maybe I'll go ahead after watching this as I don't need to make it quite a nice as yours. DMAX motion Sim Channel
Fantastic craftsmanship. I would love to know how to do this myself. I’m still making frames and cars the old fashion way. I’ve done cosmetic carbon panels but nothing structural
Amazing, doing your own CF is super hard to do. So many steps and specialized equipment put CF out of reach for most backyard car makers. If you have the time, money, equipment, and knowledge, CF is usually superior to other types of composite manufacturing. I am most familiar with FG composite.
Very cool stuff! I echo some of the other comments regarding the bonding of the upper and lower halves. To me, this is a major part of the process (one that I'm trying to learn more about :-)). Other monocoque build videos do the same thing - show both pieces and then in the next scene they are somehow 'glued' together miraculously with not much detail. Can you please provide some videos and details of this process? That's my only comment, otherwise, excellent work!!!
The flow medium we used is similar to infu-flow mesh but cheaper. Its extremely drapable and so much easier to work with. The orange clamps are made in SA by AMT. Really fantastic and affordable. I think they were R65 or like $4.
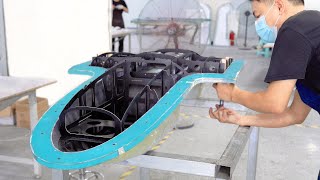
Thank you! We made two half carbon rings around the plug that were 12 layers thick or 8,2mm thick. We then routered out the core between the layers of Carbon Fibre on the upper and lower sections. Leaving us with a 22mm deep section. The CF flange was 38mm high. We then used SR7001 adhesive and joined the two havles.
@@miniindycarprojectza7793 sounds a bit complicated. Would love to see how you did it. How did you determine that your technique for joining them provided enough strength?
Question: Where did you source the carbon fiber titanium weave fabric? I have been looking for this specifically for quite sometime for a project I am working on. Great videos and explanations, thank you so much for your time and effort.
Hi Jason, our local supplier had a batch custom made up for a client and were kind enough to sponsor us a few metres for the project. I know that they only do it on special order and the order took 4 months to arrive. Unfortunately don't have more info than that! Thank you for the support.
Stiffness of composite surface is related to its thickness^3. The foam core is a cheaper and more light-weight way of achieving thickness without adding layer after layer after layer of CF.
Hey, great video showing the process! I'm curious why you didn't bulk down and cure the outer skin first, then remove the peel ply and do a second infusion with the core and inner skin? Like that I can imagine the core would be a much better fit with no chance of it moving when you pull the vacuum. Also supprised to see the aluminium inserts left between the inner and outer skins relying on the glue bond only, in the aerospace stuff I've seen they would normally be encapsulated completely within the outer layer with 45deg beveled edges to give a glue bond plus a mechanical lock. This gives a solid connection between inner and outer skins at these points instead of relying on foam to transmit the load.
Thanks for the comment. We did bulk down for the first three layers and then again for the last three layers. If we did it again I'd probably bulk down every two layers, then core under heat. We wanted to have one infusion process and there was alot of debate back and forth as to which would be best. An ex Williams F1 engineer made the final call and I just went with his opinion. So the inserts have resin channels, they've been roughed and we did edge all the corners. We also applied S grade fibre glass to prevent galvanic corrosion. The reason we didn't film everything is mainly because it's me and my 11 year. It's very tough doing all the work and keeping up with all the filming.
Thank you. We used three different types, a Local brand which is AMT, very low viscosity and helps with the resin transfer. We used Tensorgrip TC42 and TC71 mainly for around the inserts and core.
05:59 thankyou sir..i specialized looking for this techniq... I trying to make a 1:1 scale replica of F22 Raptor fighter jet replica project but I'm still confused about the strength of the connection joint between the body frame and the wing frame, whether the connection is strong enough if it's just bolted directly between carbon fiber and carbon fiber without any solid mounting bar installed. in a carbon body such as titanium or forged steel.
Really cool project mate, how are you stopping the aluminium inserts from reacting with the carbon causing long term corrosion? I use a layer of s glass fiberglass just wondering if you have a better way.
you need bigger flow lines scratched to the core and some resin break before the vacuum line so you can slow down your infusion in the end and fill all those voids!
Agreed on the hose. I thought it would slow down the resin around the tight and much thicker areas. Worked well but wasn't needed. I'll look into the resin break idea. Thank you.
@@miniindycarprojectza7793 thanks for answer and good luck on your project! to do a resin brake barrier is very easy, because your flanges are big enougth. just extend the peelply with nothing underneat, cut the flow mesh shorter than the cloth and put the vacuum line over the peelply. if possible wrap some peelply at it and you will be good!
16:58 Difference between being a kid and an adult. A kid would multitask having fun(standing on a tube while helping dad) An adult would know better, due to experience falling, indicating it's a hazard. :D
Nice! What I don't get: you apply Carbon as a first layer, add foam and another Carbon layers. How do you secure that all Carbon is getting soaked with resin through the foam?
We did a few digital simulations but due to a restriction on experienced resources locally I decided to do an entire batch of actual layups. We then did a few months of testing and finally came up with the ideal strength to weight ratio. Once that was decided we added additional layers/plys to safety critical areas.
a doubt, were those small aluminum plates placed to serve to anchor the body screws on the chassis? congratulations on the project, new subscribed here ;)
Thank you for your support! We placed inserts for mounting various items from the floor tray, seat belts, rollover hoops and so forth. I'm safety critical areas we used them as compression areas and have the fasteners go straight through.
@@miniindycarprojectza7793 Thanks for responding. Congrats on the build. Maybe please make a video about different kinds of carbon fabric used in the project and why etc if you have the time to do so. Great work and good luck.
@@miniindycarprojectza7793 Can you mention what kind of aerosol adhesive spray? any brand name or chemical composition? I would like to use it for a smaller project. thanks.
I may have missed it in the video and comments but did you somehow insulate the aluminum plates? Carbon fiber and aluminum contact can have issues with corrosion. Sometimes with pretty quick deterioration of the aluminum.
Hi Tim, the most common form of reaction is Galvanic corrosion. To avoid this we used 410Grm SD Glass fibre between the layers of CF and the Aluminium inserts. This should avoid any corrosion issues.
I once again watched your video: Don’t you see a problem that the edges of your aluminium parts are not chamfered/rounded? They are a bit but I would be worried that those edges can create a cracking point in your finished carbon layup.
Agreed. unfortunately I'm not able to film everything but we did round off all of the edges throughout the tub. We also machined small groves for the flow of resin, corner drilled resin flow ports and to add to adhesion we roughed both sides of the inserts.
@@miniindycarprojectza7793 interesting the way you bonded the two half. staggered lap!? I thought you would go for a half-lap or tongue and groove type. The finish looks amazing, was it difficult to bond the two half together!? I still trying to figure out how you manage to place the inserts! Awesome job! Keep it up! B.S: that oven looks super cool!
We use a out of autoclave process. The process is after infusion/resin transfer we allow to cure at AT and then in the oven for 18hrs at 60 degrees Celsius.
Hi, I am student working in Formula Student team in India, We currently make Spaceframe chassis due to knowledge limitation and budget issues, But i want to change this trend and make a monocoque draft ready for future teams, Is it possible for you to connect and then we can discuss about it. Best Regards.
@@miniindycarprojectza7793 interesting. I've been trying to understand the monocoque methods used of OC1 canoes and amas and my understanding is they are literally monocoque and layed up as one piece.
This thread might help explain a bit better. We're unable to do complex layups in one piece without compromising structural quality. www.fsae.com/forums/showthread.php?10036-Carbon-fibre-monocoque-joints/page3
The result looks nice, but the layup is a total nightmare. Especially the corner overlaps. Half of the layers have too little, the rest have too much - which doesn't compensate for the bad ones. And square sharp edged slabs of aluminium as inserts ... that's not exactly ideal and not how it's done in actual race cars. The amount of spray tack used is also problematic. Bolt it to the garage ceiling, it'll make for good decoration, but do not bolt an engine to it and let a living being drive that contraption. Seriously. Not trying to be a jerk, but you obviously haven't done enough research ... Or use it as a mockup to test fit other components. There are several commercial and affordable resin systems you can use to make your own pre-preg that cure at low temps and pressures, so even a relatively simple diy curing oven would suffice. And with the ton of time and money this project is gonna consume ... buy/build a 5x10' cnc plotter/routing table to prepare the pre-preg on (making the cutouts for the inserts is not something you can eyeball and get away with it). It's not gonna cost much more than the money wasted on this tub. The simplest way to make patterns would be to treat the tub as a sheet metal part in Fusion 360 and unfold it with a minimal amount of cuts, then add 2-3" uniform overlaps in those cut areas. If the thinnest spot of the tub has 6 lays of cf, then you want at least those 6 layers as single pieces of cloth in the mold with the additional layers added locally. Aside from outer and inner most layers use as much unidirectional fiber as possible, it'll help keep the resin content down. Double wedge shaped sheet metal inserts for every layer, perpendicular to the fibre orientation and simple round spacers for the core section. Etc, etc. I hope you'll succeed eventually, but this part is only a monocoque in form, not in function.
I've been through your comment in some detail and think a few things need to be clarified. I believe you're trying to make a technical assessment on months of work based off of 30 minutes’ worth of highlights. Never going to have the full picture. Secondly I think you're under the impression that I'm a lone ranger on this project. In reality we have several advisors and engineers involved, one of which worked for Williams F1 team as an engineer. Regards the technical points raised in your comment- The ply schedule allowed for gradual overlays ranging between 60-120mm. These allowed for 0 or 90 degree orientation which, when using the Bi-Ax gave us a medium/high bending strength and torsional strength ratio. We also had the Bi-Ax at a 45 degree which was more flexible but has a higher torsional strength. This is far more complex but an answer in a nutshell. We chose the layup pattern for convenience and ease of manufacturing and using Bi-Ax the strength wasn't compromised. We have more than the required overlap between the various cut-outs and joining sections. Those were raw pieces had hadn't been given a radius yet. All the inserts were machined edged and given resin channels and 3 mm holes in each corner to allow for no dry spots. This was tested a few times before manufacturing for load and deflection under load. I can tell you that for safety critical elements such as harness mounts it was decided to rather machine solid mounting plates to allow for the full area of the inner and outer skins to absorb load. The Spray tack used was a very weak and low viscosity. We also bleed the infusion by around 15% allowing some flow through. Oven Pre-preg was the only alternative solution but not feasible for us for two reasons- firstly the expense and secondly access to an autoclave in SA isn’t a reality. The issue with room temp or even low temp isn’t feasible, the layup took over 60 hours and we wanted the inner, core and outer skins all infused as one not individually. This wouldn’t have been possible any other way outside of a autoclave Pre-preg. The Tubs thinnest area is 6 layers of CF on each side of the core, along with this we have 170gsm Kevlar layers, 410 Bi-Ax S-Glass sandwiched between then Aluminium inserts to prevent galvanic corrosion. The core is 10mm PVC closed cell. The thickest area is 26 layers thick with 20mm Core. Respectfully we have done our homework and before manufacturing we did a number of composition testing, Mechanical, Metallographic and failure analysis.


Great father son project! Your teaching him that he can do anything if you put your heart into it... good Job dad!!
Thank you very much!
@@miniindycarprojectza7793 amazing project love evry bit of it
But please tell me how did you combine both halves?
Did you have an overlap area or what exactly?
Hey Man, really awesome and inspiring video. A lot of hard work was put into that chassis, one of the best I’ve ever seen and all done by yourself and your family. Incredible. Keep up the good work and stay safe, mate.
Such a beautiful job you have done! Amazing
What an outstanding job! And what a ton of work man! I'd love to see the peeling of all the disponible materials and fabrics 👍🏼
back again to watch the video on your hardware mounts. Glad I subscribed for sure. Dude, my garage is in a constant state of 'disaster' from each project. I clean it up and then 'go to work whatever's next' rinse, repeat. The tub looks awesome!
I'm liking the double tacking. I hate tracing down some of these leaks.
Thanks for the video
Just found this and its incredible. see that you haven't posted in a couple years and I hope that you were able to complete it! A mountains worth of work, but the thrill will be worth it
Absolutely Beautiful ! Well done! And a joy to see you guys are from ZA. Im very much Looking forward to the next upload.
Thank you very much!
Super nice work!!!
just found your work mate brilliant stuff! keep up the good work from the uk
Thank you very much. I'm quite behind on the videos but will keep them coming!
Nice work!! Unfortunatly I found your video only now!! Well done
Thank you very much!
You are a freaking legend.
The year was 1977. I had discovered go karts and my cousin had a paper set of plans to build a wooden derby cart like the one you are building. The plans were lost to time and the kart was never built I was thinking of that the other day and here in my feed is build in carbon !
This is epic! This is the first of the videos I have seen. I tried counting your shirt changes half way through but I got at least 4 or 5 days of work I think. Keep up the good work and the videos coming!
Thank you!! Hundreds of hours! 🤣
@@miniindycarprojectza7793 An easy hundreds of hours :-)
Very very nice project my friend! And great that you involved the kids for sure! I'm considering making a CF mono for my Motion Sim build to switch from steel to all carbon. Been considering it for about a year now. Maybe I'll go ahead after watching this as I don't need to make it quite a nice as yours. DMAX motion Sim Channel
Thank you! Good luck with your project!
@@miniindycarprojectza7793 Thanks my friend! Thanks for posting your project! DMAX
Fantastic craftsmanship. I would love to know how to do this myself. I’m still making frames and cars the old fashion way. I’ve done cosmetic carbon panels but nothing structural
Thank you. Really appreciate it!
Sooo cool man, so cool
Thank you!!
hi broo, this video is very inspiring
Amazing, doing your own CF is super hard to do. So many steps and specialized equipment put CF out of reach for most backyard car makers. If you have the time, money, equipment, and knowledge, CF is usually superior to other types of composite manufacturing. I am most familiar with FG composite.
Very cool stuff! I echo some of the other comments regarding the bonding of the upper and lower halves. To me, this is a major part of the process (one that I'm trying to learn more about :-)). Other monocoque build videos do the same thing - show both pieces and then in the next scene they are somehow 'glued' together miraculously with not much detail. Can you please provide some videos and details of this process? That's my only comment, otherwise, excellent work!!!
Thank you. It's a question that's asked frequently and I'm planning on doing a full video on how the halves were joined.
That’s an awesome project! Two quick product questions: what is the blue flow media and did you buy or make those orange hose clamps? Thank you!
The flow medium we used is similar to infu-flow mesh but cheaper. Its extremely drapable and so much easier to work with. The orange clamps are made in SA by AMT. Really fantastic and affordable. I think they were R65 or like $4.
Awesome project. Thank you for sharing. Not much info on this process.
Thank you. We're trying to share as much as possible.
This is what I'm talking bout, real build shxt..+!
Where did you find an oven that big? DIY? Thank you for the awesome video, btw. It's inspiring.
Thank you!! We built one. I'll post a video soon showing all the equipment we've had to build as part of the project.
Hey, nice project how did you bond the upper and lower part? Greetings David
Leka man my fellow south african!
Wow this is awesome! Really inspiring. Im wondering how you joined the 2 halves together?
Thank you! We made two half carbon rings around the plug that were 12 layers thick or 8,2mm thick. We then routered out the core between the layers of Carbon Fibre on the upper and lower sections. Leaving us with a 22mm deep section. The CF flange was 38mm high. We then used SR7001 adhesive and joined the two havles.
@@miniindycarprojectza7793 sounds a bit complicated. Would love to see how you did it. How did you determine that your technique for joining them provided enough strength?
Great build I want to make something similar with similar dimensions. How much did you spend on the carbon fiber material for this project?
Question: Where did you source the carbon fiber titanium weave fabric? I have been looking for this specifically for quite sometime for a project I am working on.
Great videos and explanations, thank you so much for your time and effort.
Hi Jason, our local supplier had a batch custom made up for a client and were kind enough to sponsor us a few metres for the project. I know that they only do it on special order and the order took 4 months to arrive. Unfortunately don't have more info than that!
Thank you for the support.
Incredibly work, nicely done. But I´m a bit curious about the pvc foam core, what was its purpose in first place?
Stiffness of composite surface is related to its thickness^3. The foam core is a cheaper and more light-weight way of achieving thickness without adding layer after layer after layer of CF.
Hey, great video showing the process! I'm curious why you didn't bulk down and cure the outer skin first, then remove the peel ply and do a second infusion with the core and inner skin? Like that I can imagine the core would be a much better fit with no chance of it moving when you pull the vacuum.
Also supprised to see the aluminium inserts left between the inner and outer skins relying on the glue bond only, in the aerospace stuff I've seen they would normally be encapsulated completely within the outer layer with 45deg beveled edges to give a glue bond plus a mechanical lock. This gives a solid connection between inner and outer skins at these points instead of relying on foam to transmit the load.
Thanks for the comment.
We did bulk down for the first three layers and then again for the last three layers. If we did it again I'd probably bulk down every two layers, then core under heat. We wanted to have one infusion process and there was alot of debate back and forth as to which would be best. An ex Williams F1 engineer made the final call and I just went with his opinion.
So the inserts have resin channels, they've been roughed and we did edge all the corners. We also applied S grade fibre glass to prevent galvanic corrosion. The reason we didn't film everything is mainly because it's me and my 11 year. It's very tough doing all the work and keeping up with all the filming.
@@miniindycarprojectza7793 thanks for your reply, yeah I bet it's a crazy amount of work for a father/son but great experience I'm sure.
Muy bueno1!!
Stunning effort! What is the adhesive you use to position the various layers in the vertical?
Thank you. We used three different types, a Local brand which is AMT, very low viscosity and helps with the resin transfer. We used Tensorgrip TC42 and TC71 mainly for around the inserts and core.
05:59 thankyou sir..i specialized looking for this techniq... I trying to make a 1:1 scale replica of F22 Raptor fighter jet replica project but I'm still confused about the strength of the connection joint between the body frame and the wing frame, whether the connection is strong enough if it's just bolted directly between carbon fiber and carbon fiber without any solid mounting bar installed. in a carbon body such as titanium or forged steel.
Really cool project mate, how are you stopping the aluminium inserts from reacting with the carbon causing long term corrosion? I use a layer of s glass fiberglass just wondering if you have a better way.
There's no need to do this.
@@matthewwatt3284 he’s addressed it in another video, you absolutely do especially in a structurally integral life cell.
@@matthewwatt3284 he just does what I do, fibreglass mating surface
♥️
you need bigger flow lines scratched to the core and some resin break before the vacuum line so you can slow down your infusion in the end and fill all those voids!
Agreed on the hose. I thought it would slow down the resin around the tight and much thicker areas. Worked well but wasn't needed. I'll look into the resin break idea. Thank you.
@@miniindycarprojectza7793 thanks for answer and good luck on your project! to do a resin brake barrier is very easy, because your flanges are big enougth. just extend the peelply with nothing underneat, cut the flow mesh shorter than the cloth and put the vacuum line over the peelply. if possible wrap some peelply at it and you will be good!
Thank you for the advice. We'll try that on the next big pieces which are the side cowlings.
16:58 Difference between being a kid and an adult.
A kid would multitask having fun(standing on a tube while helping dad)
An adult would know better, due to experience falling, indicating it's a hazard.
:D
🤣 I've never noticed that!
Nice!
What I don't get: you apply Carbon as a first layer, add foam and another Carbon layers.
How do you secure that all Carbon is getting soaked with resin through the foam?
Thank you.
We use a specifically designed foam core that has small channels which allow the resin to transfer.
How do you decide which sizes and shape all the different pieces of the layup have?
did you do any torsional strength calculations/simulations? if yes, could you tell us how you did it? really interesting project
We did a few digital simulations but due to a restriction on experienced resources locally I decided to do an entire batch of actual layups. We then did a few months of testing and finally came up with the ideal strength to weight ratio. Once that was decided we added additional layers/plys to safety critical areas.
@@miniindycarprojectza7793 thanks a lot
What kind of spray glue is that you are using to hold into place?
Hey. Nice progress. Is PVC foam available locally in SA?
Thank you. Yes it's available from AMT and Aerontech.
a doubt, were those small aluminum plates placed to serve to anchor the body screws on the chassis?
congratulations on the project, new subscribed here ;)
Thank you for your support! We placed inserts for mounting various items from the floor tray, seat belts, rollover hoops and so forth. I'm safety critical areas we used them as compression areas and have the fasteners go straight through.
@@miniindycarprojectza7793 thanks for the answer, this is probably the area about which I have my biggest doubts
It was ours too but we did alot of testing before we started the process. We're pretty confident it will work!
Great stuff, by the way, what is the adhesive you are spraying between layers?
Thank you. We use a product called Sicomin SR 7100 which is a Structural Adhesive. We use the HT which is also thicker and allows for post curing.
@@miniindycarprojectza7793 Thanks for responding. Congrats on the build. Maybe please make a video about different kinds of carbon fabric used in the project and why etc if you have the time to do so. Great work and good luck.
Apologies, I didn't read your comment correctly. We use a aerosol adhesive spray that dissolves when then infusion process takes place.
@@miniindycarprojectza7793 Can you mention what kind of aerosol adhesive spray? any brand name or chemical composition? I would like to use it for a smaller project. thanks.
wow where can i buy the products you use for the Monocoque?
How do you prevent the carbon fiber from reacting with the aluminum plates?
I may have missed it in the video and comments but did you somehow insulate the aluminum plates?
Carbon fiber and aluminum contact can have issues with corrosion. Sometimes with pretty quick deterioration of the aluminum.
Hi Tim, the most common form of reaction is Galvanic corrosion. To avoid this we used 410Grm SD Glass fibre between the layers of CF and the Aluminium inserts. This should avoid any corrosion issues.
@@miniindycarprojectza7793 sounds good :-) , working on aircraft I have seen the results of direct contact.
Hi. I can use eva foam instead of pvc foam?
How is ur edges of carbon fibre is perfect
Can this foam “sandwich” be oven cured or should I use a different kind of foam for oven cure ?
Yes it can be oven cure.
I once again watched your video:
Don’t you see a problem that the edges of your aluminium parts are not chamfered/rounded?
They are a bit but I would be worried that those edges can create a cracking point in your finished carbon layup.
Agreed. unfortunately I'm not able to film everything but we did round off all of the edges throughout the tub. We also machined small groves for the flow of resin, corner drilled resin flow ports and to add to adhesion we roughed both sides of the inserts.
how did you bond carbon fiber ? did u use structural epoxy? or u use other method?
We used a structural epoxy adhesive and then layered three CF joining layers on the inside.
@@miniindycarprojectza7793 thanks i really enjoy the vid. its really fun to watch.
@@miniindycarprojectza7793 could you make a video about that? or if you allready have can you point me to it?
Nvm, just watched your latest video :)
@@miniindycarprojectza7793 interesting the way you bonded the two half. staggered lap!? I thought you would go for a half-lap or tongue and groove type. The finish looks amazing, was it difficult to bond the two half together!?
I still trying to figure out how you manage to place the inserts! Awesome job! Keep it up!
B.S: that oven looks super cool!
Do you guys send it off to an autoclave to cure?
We use a out of autoclave process. The process is after infusion/resin transfer we allow to cure at AT and then in the oven for 18hrs at 60 degrees Celsius.
how to joint upper & lower part?
I was wondering the same thing. And how do you do it without adding a stress concentration?
What top speed do you expect to reach ?
With the current drive train setup probably around 240kms.
Hi,
I am student working in Formula Student team in India,
We currently make Spaceframe chassis due to knowledge limitation and budget issues,
But i want to change this trend and make a monocoque draft ready for future teams,
Is it possible for you to connect and then we can discuss about it.
Best Regards.
Do you produce Carbon Monocoque parts? Do you have website and email address?
Could you please turn the music down.
This looks like a traditional split mold layup not monocoque which is a single complete piece at once like an egg.
It's a two piece part that's bonded together. Most modern day carbon fibre monocoques are made up of sections and joined together.
@@miniindycarprojectza7793 interesting. I've been trying to understand the monocoque methods used of OC1 canoes and amas and my understanding is they are literally monocoque and layed up as one piece.
This thread might help explain a bit better. We're unable to do complex layups in one piece without compromising structural quality. www.fsae.com/forums/showthread.php?10036-Carbon-fibre-monocoque-joints/page3
Aluminum on carbon is not good 😢
The result looks nice, but the layup is a total nightmare. Especially the corner overlaps. Half of the layers have too little, the rest have too much - which doesn't compensate for the bad ones. And square sharp edged slabs of aluminium as inserts ... that's not exactly ideal and not how it's done in actual race cars. The amount of spray tack used is also problematic.
Bolt it to the garage ceiling, it'll make for good decoration, but do not bolt an engine to it and let a living being drive that contraption.
Seriously. Not trying to be a jerk, but you obviously haven't done enough research ...
Or use it as a mockup to test fit other components.
There are several commercial and affordable resin systems you can use to make your own pre-preg that cure at low temps and pressures, so even a relatively simple diy curing oven would suffice. And with the ton of time and money this project is gonna consume ... buy/build a 5x10' cnc plotter/routing table to prepare the pre-preg on (making the cutouts for the inserts is not something you can eyeball and get away with it). It's not gonna cost much more than the money wasted on this tub.
The simplest way to make patterns would be to treat the tub as a sheet metal part in Fusion 360 and unfold it with a minimal amount of cuts, then add 2-3" uniform overlaps in those cut areas.
If the thinnest spot of the tub has 6 lays of cf, then you want at least those 6 layers as single pieces of cloth in the mold with the additional layers added locally.
Aside from outer and inner most layers use as much unidirectional fiber as possible, it'll help keep the resin content down.
Double wedge shaped sheet metal inserts for every layer, perpendicular to the fibre orientation and simple round spacers for the core section.
Etc, etc.
I hope you'll succeed eventually, but this part is only a monocoque in form, not in function.
I've been through your comment in some detail and think a few things need to be clarified. I believe you're trying to make a technical assessment on months of work based off of 30 minutes’ worth of highlights. Never going to have the full picture. Secondly I think you're under the impression that I'm a lone ranger on this project. In reality we have several advisors and engineers involved, one of which worked for Williams F1 team as an engineer.
Regards the technical points raised in your comment- The ply schedule allowed for gradual overlays ranging between 60-120mm. These allowed for 0 or 90 degree orientation which, when using the Bi-Ax gave us a medium/high bending strength and torsional strength ratio. We also had the Bi-Ax at a 45 degree which was more flexible but has a higher torsional strength. This is far more complex but an answer in a nutshell.
We chose the layup pattern for convenience and ease of manufacturing and using Bi-Ax the strength wasn't compromised. We have more than the required overlap between the various cut-outs and joining sections.
Those were raw pieces had hadn't been given a radius yet. All the inserts were machined edged and given resin channels and 3 mm holes in each corner to allow for no dry spots. This was tested a few times before manufacturing for load and deflection under load. I can tell you that for safety critical elements such as harness mounts it was decided to rather machine solid mounting plates to allow for the full area of the inner and outer skins to absorb load.
The Spray tack used was a very weak and low viscosity. We also bleed the infusion by around 15% allowing some flow through. Oven Pre-preg was the only alternative solution but not feasible for us for two reasons- firstly the expense and secondly access to an autoclave in SA isn’t a reality. The issue with room temp or even low temp isn’t feasible, the layup took over 60 hours and we wanted the inner, core and outer skins all infused as one not individually. This wouldn’t have been possible any other way outside of a autoclave Pre-preg.
The Tubs thinnest area is 6 layers of CF on each side of the core, along with this we have 170gsm Kevlar layers, 410 Bi-Ax S-Glass sandwiched between then Aluminium inserts to prevent galvanic corrosion. The core is 10mm PVC closed cell. The thickest area is 26 layers thick with 20mm Core. Respectfully we have done our homework and before manufacturing we did a number of composition testing, Mechanical, Metallographic and failure analysis.