How to Flood Coat a High Gloss Epoxy Coating onto Wood and Other Surfaces

Vložit
- čas přidán 3. 08. 2024
- Check out www.glasscastresin.com/glossy... for project details
Further info and product links ▼
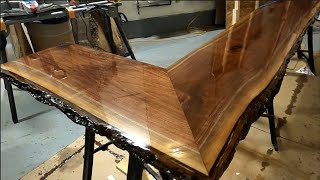
Video tutorial showing how to apply a super glossy, hard-wearing surface coating to any table or surface using GlassCast 3 epoxy coating resin. We demonstrate the process by giving our Forged Carbon Fibre River Table an alternative look!
We've included all the steps along the way including preparation, calculating how much resin you'll need, mixing, pouring and curing the resin and finishing the project.
Links to the GlassCast 3 Resin used in the project:
► GlassCast 3 Epoxy Resin www.glasscastresin.com/glassc...
If you have any questions, please just ask in the comments below!
#epoxyresin #resin #glasscastresin - Jak na to + styl


Excellent resin. I use it A LOT and always recommend it to friends and other DIY makers/artists. 👍
Appreciate the kind feedback, thank you for your continued support and suggesting GlassCast to others!
bonjour, it's done I passed the finishing coat with Glasscast3: it's very pretty, thank you for all your advice and thank you for taking the time to answer my too many questions 😇
Glad it worked well for you.
The density of cured epoxy is 1.2 g/cc. So you need 1.2 kg of resin /square meter/ millimeter of thickness.
Excellent video., I do have a question. I poured resin onto some mosaic surfaces which are small table tops for the outside. I did follow all instructions, and they were fine in summer, but as the weather turned into winter, they have not lasted. A couple of cracks and delamination occurred. I can of course resand and apply more UV resin. However, what might I do to prevent the resin from turning yellowish and delaminating for next go-around>? Thank you. I can't find info on this problem! In Canada, we get temp extremes outside. Should I use a boat resin instead? We need the tables for the nature centre exterior area and can't come inside for winter as people use them.
The GlassCast range of resins are not designed for outdoor use like that so if you can't find a UV stable outdoor resin, then we would recommend bringing the tables inside when not in use or creating a cover. Epoxy chemistry is such that you can gain a good level of UV resistance but the resins are not UV stable so will still yellow outside over time.
Very useful tutorial. How heat resistant is the surface. Could you put a cup of tea on it for example.
The GlassCast range of resins is limited to around 45'C so a red hot mug is likely to leave a mark in the surface. Notwithstanding that, we have numerous customers who make products such as coasters using our GlassCast10 and in common with all epoxy resins that we have tested, following a full 7 day cure, a very subtle ring can be left by leaving an extremely hot cup to stand on the surface of the resin, this mark is slight and can usually only be seen if the surface reflection is inspected closely. Customers who use this resin for drinks coasters report that the marking is almost un-noticeable in practical applications and continue to use GlassCast 3 or 10 commercially for coaster applications.
It may be that we’re more conservative but in reality, having tested dozens of ‘high. temp’ Epoxy Coating Resins side by side, the results always tend to be similar between our resin (limited to 45’C) and those with higher temp. claims. Our testing is quite straight forward; pour two identical samples, one in GlassCast, one with the competitor product, and divide each into four sections so that we can conduct the same test after (end of standard cure for the given resin and then 7, 14 and 21 days thereafter).
Our test involves pre-heating a mug with boiling water, emptying it after 30 seconds and then put newly boiled water back in - the mug is then placed directly on the surface for 5 minutes. In our own testing, all resins performed more or less the same, with a small ring left behind. The ring is generally faint and only visible from certain angles but nonetheless, even supposedly high temp. stable coating resins had the same issue.
I realise there's a lot of information above to a straightforward question but I hope this helps.
Great channel, do you have a suggested sealant coat? I want to flood coat my epoxy charcuterie board. I already have the flood coat epoxy. Having troubles finding a good sealer… thanks 🇨🇦
I'm glad that you enjoy our channel! We use a small amount of the resin and hardener mixed together as the seal coat. Depending on which epoxy you are currently using it could be possible to do it with your current resin.
@@glasscastresin thank you for the quick reply, keep on keeping on 👍
Hi just wondering if i can use varnish on the wood and river pour?
Most varnishes will adhere to the resin once it has had a suitable key. However the resin itself will normally have a tough glossy finish once fully cured so it may not be necessary to use one.
last question please, can we treat the tray with Rubio or Osmo before finishing with GlassCast 3? merci 🙏
Oil based products and stains will likely cause adhesion problems. Other stains and finishes can be used as long as they are fully dry before pouring and the surface can be suitably keyed to help resin adhesion.
@@glasscastresin merci 🙏
Should I apply a seal around the edges and or underneath?
Not needed if done like in the video.
In the minute 1 after sanding it, the middle chopped fiber section looks very grey (even after wiping it). Why does it look so shinny at the end?
Hi David, sanding the surface puts micro-scratches into it, hence it looking grey but when the resin is applied, it infills those scratches and leaves you with a beautifully clear finish. The scratches are needed to give the resin something to mechanical grip to.
Bonjour, is it possible to pour this resin also on the edges (without putting the adhesive tape)? will there be a resin thickness problem?
You can follow our worktop videos and use that method for the edges. That avoids any issues with resin thickness.
@@glasscastresin ok I ordered the resin (it will be available next week) do you have a calculation formula for 2kg per M2, I have 0.450 M2?, thank you
How would you do this if you wanted the resin to flow over the edge where the bark is still attached to a biscuit?
The process would be similar apart from the tape barrier used to keep the resin in place. You would naturally need more resin to account for the additional area that the resin needs to cover on the bark edges and also any run off. You may need multiple layers of resin to fully coat the bark so one option wudl be to brush the resin onto the sides and build up the thickness that way. Then once completed you can do the final floodcoat over the top and allow it to run down and finish off the edges.
can this be poured over an uneven surface like tile? i’d like to pour this over a tile shower floor and im wondering if it would be compatible. also, does it scratch easily?
It could but we'd recommend splitting the pour with the first layer being used to bring the overall level to approximately the same height, and the second pour, applied when the first has reached its B-Stage (firm but tacky to the touch) flood coating and providing the perfect surface finish. Splitting the pour ensures a great finish whereby pouring in one go can result in small dimples in the slightly thicker areas where the surface slightly shrinks back.
@@glasscastresin ok awesome this is super helpful! so just to make sure i am understanding you correctly, you are saying 1. pour a first coat that is thick enough to bring the overall level to the same height. 2. waiting for that coat to dry to a "b-stage" and then 3. pouring a second full coat. i am understanding your directions correctly? thank you so much!
That's correct yes. Doing it in stages like this usually leads to a better, flatter surface. It can become slippery when water is sitting on the surface so might be something to consider.
If you put eg a 3mm rounded edge on the table with a router, and then sand the sides of the table and also the round top edge - lets say to 1,200 or even 2,000 grit - how can you avoid that you scratch your beautiful flood-coated top surface?
You would need to mask the perimeter with a good quality masking tape or similar that extends in at least as far as the base plate of the router - this should be sufficient to protect the surface but I would also suggest leaving it a few days to cure as much and as hard as possible as the longer you leave it, the more resistance it will have to being scratched.
@@glasscastresin But then could you not just repolish the surface if you did scratch it?
Bonjour, do you think it would be interesting or totally useless to polish the tray once the resin hardens? with NW1plus and Topfinish 2 products
Generally the GlassCast 3 has a very high gloss out the bottle but if you needed to sand it or do some repairs, no reason why you could not then use those polishes to get back to a high gloss finish.
@@glasscastresin ok y understand, y test today 🙄
bonjour, can I use another brand of resin to make the first coat of resin with a brush, I haven't received the Glasscast3 yet and I don't think I would have enough to do everything!! merci
For a sealing coat, any good quality epoxy is likely to be suitable, although it may be wise to do a small test incase there is any unforseen incompatibility.
@@glasscastresin ok merci 🙏
@@glasscastresin it's done I passed the finishing coat with Glasscast3: it's very pretty, thank you for all your advice and thank you for taking the time to answer my too many questions 😇
Hey ... how can I get a super thin coat? ... I find it thick, and that would cost a lot when I produce a large batch. Thank you in advance.
Ideally the GlassCast 3 needs to be poured in a layer at least 2mm to allow it to self level and produce a flat glossy surface. Less than this and the resin might not cure as intended.
@@glasscastresin 👌
How fine do i need to sand before flow coat ?
120grit is ideal as a surface prep between layers of resin.
Do yoi dlo both sides
Only if you want the same finish on the underside of the table.
Will it not warp the table
🤔 And the edges? Imo the edges should match the top.
They can be done as a separate process or done similarly to a worktop and let run down the side.
Yes leaving them exposed ruined it for me, like half done.
Why did you not let the epoxy flow over the edges?? Would look much more professional.
It's really down to personal preference and on this table we wanted to create a nice crisp edge without a radius created from the resin running down the edges.
Working in weight instead of volume in this situation is just confusing and incorrect
We sell our resin by weight, so working in weight helps to quantify the amount required. The resin can be measured and mixed both with a volume ratio and weight ratio. As digital scales are more accurate than a visual indicator on the side of a measuring container we tend to favour this method for measuring out the resin and hardener.