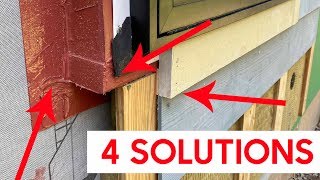
How I Make & Install Trim Around Windows After Exterior Styrofoam Insulation

Vložit
- čas přidán 27. 07. 2018
- If you shop at Amazon.com (for anything) please use this link - amzn.to/2AxZxjZ - that will give us a small commission at no additional cost to you.
If you want to help support Shannon to produce more videos like this, visit www.house-improvements.com/do...
Shannon from www.house-improvements.com shows you how he likes to make and install trim around exterior windows when styrofoam is added on the outside of a home's walls.
If you have questions about your home improvement projects, stop by the forum on our website, where Shannon will answer your questions in detail for free.
Website: www.house-improvements.com
Facebook: / 180657245288627
Twitter: / house_improve
We are a participant in the Amazon Services LLC Associates Program, an affiliate advertising program designed to provide a means for us to earn fees by linking to Amazon.com and affiliated sites.
Video © 2018 SKS Media. Videos produced by SKS Media (House-Improvements.com) are provided for informational purposes only. The information contained in the videos is intended to give general guidance to simplify DIY (do it yourself) projects. Because tools, products, materials, equipment, techniques, building codes and local regulations are constantly changing, SKS Media cannot and does not assume any responsibility or liability for the accuracy of the information contained therein. Further, SKS Media will not accept any claim for liability related to, but not limited to, omissions, errors, injury, damage or the outcome of any project. It is the responsibility of the viewer to ensure compliance with all applicable laws, rules, codes and regulations for a project. The viewer must always take proper safety precautions and exercise caution when taking on any project. If there are any questions or doubt in regards to the element of a project, please consult with a licensed professional. SKS Media conducts all matters in accordance with the laws of Saskatchewan, Canada. - Jak na to + styl


This is the kind of guy you want to apprentice under. Just explains it as it comes to him, has endless knowledge and does an awesome job delivering it.
As carpenter of 45 years I would say this is one of the best ways to do it. Very good for the novice to watch!!!
@tylerpotter4927 Definitely and if he doesn't know that, he is clueless about water behavior. The only thing that saves him is that big overhang of the roof, not the caulk.
Not just for the novice, but also for some corner cutting sloppy home builders!
This is one of the best channels I’ve found and has helped immensely in finishing my first house . This is exactly what I needed when aluminum trim was damaged removing siding to repair rot section.
Shannon, it's the 83 yr.old,carpenter wannabe, from southern On. I persevered with the window cap and now we're doing the windows properly. My son is just like his mother, easily convince differently. Following all your instructions and things are going well. The bunky is looking up. Thanks again. Wyman
I was amazed that at 7:25 he addressed how he attached the pvc to the trim board. Amazed because just a mere few seconds earlier, I was a bit disappointed that he did not demonstrate how he connected those pieces together. Then he indeed did just that. His videos are helpful because they are mostly aimed at the diyer trying to learn and do for himself. I am definitely considering siding my brick ranch by myself, because of his simple yet detailed instructive approach. Only I am looking at Everlast composite siding Thanks much
OMG...same here. LOL!!! That's crazy we had the same thought at the same time while watching the video. And it's like Shannon knew as well!
Im in this situation now. I don't waste time searching other videos for the answers.. I just come straight to Houseimprovements and get the answer first time everytime! Thank You Shannon and your crew!
Thanks Trevor!
Love your videos because they give all the details that leave no room for guessing.It helps you to do things more by yourself than having to get help. I loved the video where you showed how to install a garage door . I did it alone and I was very impressed. Never had any problems. I watched a video and the small details were left out but yous was excellent because it never left any room for guessing. I always look for videos when I go to do something .
thanks for not rushing through and for not using over technical language.
I like your tutorials, I'm starting my siding job tomorrow on my home. Its pretty straight forward ranch with windows and a few fixtures. Its fun work, so smile once in a while man. Cheers.
Thank you for all of your videos.
In the past few years they've been invaluable in my home reno.
Great to hear!
Thanks for sharing your experience Shannon. It's a godsend to us DIY "home owners" on an
interest deductible loan.
thanks for always lowering the volume when using louder tools small things but definitely noticed! keep up the videos been watching your for years! :D
Love watching your videos when I have projects around the house yo do. Keep up the great work. Its greatly appreciated!
Thanks for watching!
This guy really demystifies so many aspects of home building. I love his Build a Deck series!
Also, tooken at 3:49 lol :p
Great to see someone who knows what he's doing!
This is great. We installed new entrance doors last summer. Windows to follow and thinking of new siding too. I knew we could build out the windows so we can add some foam but wondered about the doors. This probably would work.
Looks great, nice job as always...
Super technique for a beautiful job and finish! Many Thanks!
Excellent post. Going to be putting Styrofoam on my house and was scratching head on how I was going to do the windows.. thanks
Thanks, Shannon. Appreciate the info.
Nice work Shannon. Real clean look
Thank you for this video, as I wouldn’t have thought to extend my window frames and door edges with PVC. This makes installing siding J channel so much easier! I still hate my wife for getting me to install siding though 😒
*Great Solution*
*Great Work*
*Looks Great!!!!*
*Really Nice!!!!*
Thanks Shannon
Great idea for finishing windows
I learned something new today !!!
Nice job Shannon, thanks for the tip.
I am going to do it to my double wide mobile next year when replacing the cheap board with good sheating followed by wrap, then insulation, before my final finish
You just saved my life ! Thank u so much ! Beautiful work ! Thank you so much
we are working on a similar situation, covering an existing exterior wall, possibly with additional insulation material to meet Building codes, and I was wondering how best to finish up the window trim. Thanks Shannon for doing all the thinking for me :-)
beautiful solution!! Have the same issue on my house, going to use this method.
Very nicely done, I like the result !
Always great vids, thanks!
Looks great! May end up doing that with mine.
I love your explanation always you do grate job and very hambel about it
Wonderful video! Thanks so much for sharing.
Shannon, butt is my favourite word. 😀 Thanks for the demo. Well done.
awesome work really good craftwork
Nice job! Great tip! 🫡👍👌
Another great video, thanks!
Beautiful work!
Thank you so much 😀
Excellent idea!!!
Thanks for the video , great job it was helpful.
That's an awesome idea!!
Nice work! You also look a lot like Dave Turin from Gold Rush!
Thank YOU!!!!!!!
Nice job! 👍
Nice job !
Great video 👍
Great Video !
Good job
Svaka cast vrlo dobro izgleda
Nice tips and video. 😊
When you put the Vinyl Siding on this project did you just nail to the foam? Did you use longer nails? How did you make it stick?
Thank you
Would suggest using a metal flashing, a Siga breathable membrane, and an air gap, strapping which allows airflow for drying
Is it going the cut the flashing tape or house wrap when cutting through the foam board?
I m installing 1" Foam so i don't need to do this, but the Trimming is awesome so i will do that one to every window on my house.
Nice work
A lifesaver, I'm dealing with a oldish house built in the 40's that has the "sheathing", pine siding and vinyl siding on top of that. Looking for a way to make the trim for some new windows without introducing water leakage or having it look off.
Nice job.....
Great!
Makes a nice looking finish. Would rather see the horizontals run straight through, with an angle on top surface of the bottom one to run water out for when the caulking fails,
Nice video. Please I would like if you made a video explaning about your company,you and all that stuff :)
I added foam to my home & my neighbor said good way to waste money 👍
So then he comes to ask how do you plan on boxing your windows.
I showed him your video 🙏👍🇺🇲🥃♥️🤣
Just like this professional does it.
After I explained that as a veteran I was discounted on the foam then the credit card gave me 24 mo intrest free, with 10% off my purchase also a federal tax break of $1200.⁰⁰ my foam was 40 x $28. For R10 2in. Pretty much free. 😂 just my time.
I love your videos, very informative and well done.
That being said, I disagree with tooling caulk on anything that needs to be water tight.
Caulking is supposed to be convex. When you tool it it becomes concave and creates a valley for water to sit in. I've seen windows leak and not be insured because of the caulking being tooled. They sited improper installation and referred the homeowners back to the install company.
I would change insurance companies in a heartbeat.
Really nice tutorial.
I have a question though. How do you install vinyl siding on top of this styrofoam? Do you use long nails to do that?
My house has similar exterior insulation and vinyl siding on top of it. I want to install camera on top of vinyl siding. How do i fasten the surface mounting block to vinyl siding ? Should i use long screws to reach the wood underneath or can i use small screws to hang the surface mounting block with the vinyl siding. In fact, a professional vinyl installer suggested me to do the latter. What is your suggestion?
I have the same question, Shannon.
Hi shannon!! Great job!!! Just wondering where you got that solid PVC from?? I havent seen it at Rona, HD or elsewhere!! Thanks for your vids!!!
Home depot sells it in the same aisle as 1x4 boards and such.
I was going to this to my house but the question of how to attach the siding to that came up and I'm hesitating.. the finished product looks really good!
I am installing vinyl siding over this 2" foam and am using 3" shingle nails. If you are using a cement siding then I would not go with foam any thicker than 1-1/2".
What kind of caulk did you use. Caulk I’ve used sinks into the holes. I’ve done pvc trim. What do you recommend to fill holes in pvc before painting it? Btw I did pvc trim around doors and window with 3/4” gap behind to fit vinyl siding. That way you don’t have to use j channel around the trim. Looks clean.
Mono exterior caulk. Sometimes it takes a second application.
Shan the man
Enjoy your videos, your work ethic and attention to detail. Only question I have is why didn't you miter the corner? Is it just preference?
You absolutely could , this is just a preferred look for me.
@@HouseImprovements Awesome thanks for the reply. I figured it was a preferred look and preference. Like the videos and your work keep it up, you do a great job and explain everything very good.
If you had notched the outside edge of trim before mounting, it could have served as your J-channel. Great video !!
!!
I could have yes but with this product then I would need to prime and paint those freshly cut channels very well to seal them again to prevent delimitation from water over time.
If you we're replacing a window would you run the foam up to the window opening...then flash and install the widow?
No the window should not be installed onto foam. First you would install solid wood around the opening (with old window removed) that is as thick as the foam you are using and at least 2 " wide. The window can be installed and the foam butts to the wood.
Why didn't you run the rigid foam up past the soffit... doesn't the wall extend up there a bit?
Shannon with the insulation board is there a wider drip edge to compensate for the thickness of the insulation .I figure that you still place it or nail it to the wood .With what I got it doesn't seem to to be wide enough. Or am I missing something from your video..Thanks Ron
The drip edge over windows is installed over the foam not under it. Use my forum please if you have further questions.www.house-improvements.com/forums/
I am watching this with a LOT of interest. I want to pull the vinyl siding off and add 4 inches...2+2...of polyiso. There will be a GIANT extension past the window flange. I dint think a piece of pvc 4 inches wide would be a great idea. It is also going to be reliant on caulking to keep water from getting under the pvc.... and that doesnt seem wise either. You seem to have a good grasp of this....whats the way to add 4 inches of foam AND keep water out FOREVER? Thanks
Love the video it really helps. one question I have is; could I take the parts and build it as an assembly? I would pocket hole the joints. Im not sure if it would be too ungainly to handle? Thank you once again for the videos!
Give it a try, should work.
Thats what I'm thinking of doing, pocket screwing the frame together. But i still haven't figured on a good way to attach it without putting a bunch of holes in it , because i wont be painting the trim. I'm doing the trim now because i am re siding the house now and wont have the money to do new windows for a few months, so i want to make frames that will be fairly easy to remove when the time comes for new windows. Pull the frame, replace and flash in new window, then reinstall frame. This way i won't have to tear into new siding when i replace the windows.
@Hello How are you doing dear
Wouldn't the process of cutting the foam board out slice the flashing tape and basically void the whole point of the tape making a seam for water to penetrate?
Not if you follow his instructions and do it in a series of cuts. Link us to your videos though, show us how it's done.
Just the solution I was looking for! But, I was thinking the bottom piece of PVC should go over the composite, to act as a continuous sill, and be notched on the ends to accept the side trim for water run off ??? Or are you comfortable the joint between your PVC and composite trim won't leak ? Or better yet, just have a piece of metal flash go in with it to cover the joint and make a continuous sill.
If you are concerned you could go either way
really like the video I could not make out what you use on the outside corner
I used 1-1/2" foam covered with 1/2" plywood (this gives me the 2" thickness like the rest of the wall) and then installed my outside corner " LP Smart Trim " over that.
Hi there, I’m going to be replacing my windows and siding in my house has already been covered in Styrofoam on the outside of t1-11. My wall studs are two by fours am I going to have to order custom windows to account for the extra thickness of the foam?
Yes ,that would be the best finish with less messing around. You will be custom ordering them t fit the existing positions likely anyways so adding deeper jambs is not much cost. Please come to the forum and we can discuss this further if you want to know more.www.house-improvements.com/forums/
Hi, will the foam shrink enough in -40 that it would make a problem with those tape or even disturb the siding?
No, you should get no shrinkage with this
Nice details ! Just a little armchair carpentry here....
Curious about the long term water/rot resistance of the composite trim boards? Especially the sill piece. Is it the same material as engineered subfloor sheets or OSB or perhaps it's treated with a resin for water resistance? Maybe a back coat of primer.
Also, I might have tried to completely coverfully the bottom board at the foundation with the red membrane tape so condensation wouldn't rot it out. Or perhaps used treated material.
My wet humid climate in the deep south is much different from yours so it's probably not a problem for the details mentioned above.
Love your videos! Ignore my ramblings because the stuff that I've seen you do is 99% better than most of the crap I've come across in my remodeling career.
Yes our climates are much different . This trim is designed to be used as such and seems to have a good factory primer on all surfaces. Time will tell, as it is relatively new in the last 6 yrs or so up here. You may enjoy commenting in our forum from time to time with your experience? Check it out and see what you think. We can always use experience from other areas . www.house-improvements.com/forums/
I'd be worried about using composite anywhere, but especially where it abuts other wood where moisture can infiltrate. My problem is that the window frames are brick mold-- I could try to plane it so that the boards are flat, but that will be tricky to achieve. I could build the low/ inside with strips of wood and then screw an extension to that...that seems to be the most workable solution. Great teaching, as others have noted as well!
which is exactly how you've done it (short thinner piece attached perpendicular to the trim, to form an L)
I have a follow up video coming out in late October or November of 2023 ( This is a follow up 5 yrs after the install)
Any links on where I can find how to this when windows are being changed/new build? I'm in the southern US, so I don't need 2in foam but I;ve read that there can be issues with the window installation over foam.
The windows are not installed over foam. In this case because the windows were not changed foam was added up to the windows , this is why the extensions where built and installed. If your adding new windows and adding foam you would first build out (with wood) around the openings to match the foam thickness and then install the windows finally the foam would butt against the build outs. For example if using 2" foam I would use 2x4 covered with a strips of 1/2" plywood for the build out.
U are great
Hello Shannon. I'm in NS Canada. I'm on in the spring to put vinyl on a 1974 house. I have color lock on the house, which was used alot back then . Ok now after I stripped it down to the boards, When I prep the house I'm going to place house wrap on first, Then this is where I'm not sure. Do I put the styrofoam on next then wood slats then vinyl siding. Now the wood is for a air barrier. Does this sound right. Now to pump you up but I have watch and learn alot from your videos. Thanks from the great white north. Cheers Ron
Thanks Ron. Yes if you are doing a "rain screen" then you want the wood strips on under the siding. The house wrap can be under or over the foam.
thks what are the demensions of the white pvc
Will the water get in, in between the pvc and trim pieces at the bottom of the window? Water does tend to pool there.
I dont seem to have issues , but if you think you will keep a slight slope on the sill
How do you cut the foam out and also ensure you don't puncture the flashing/wrap with the knife?
I likely did puncture it here and there.
where are you getting the PVC you used in this video and what is it called or identified as? It looked like it was solid (closed on its ends you showed).
"Azek" is one brand. solid PVC
Its composite decking material trex, azek, timbertech, fibron, certainteed, moisture shield, etc. Like what you would replace a wooden deck with.
Is adding a foam layer something I should do the next time I replace a section of my wood siding?
depends on your situation and needs. You can ask more details in my forum.www.house-improvements.com/forums/
Did you use a pocket hole to attach the white and black pieces?
Got it, should have waited until further into the video. Thx
Great job. Please add link for black trim material or name of product
Smart Trim by LP .lpcorp.com/products/siding-trim/products/trim-fascia
Did the bottom sill piece block the water weeping path to the outside?
These windows do not have water weeps and on windows that have that it is not usually in the brick moulding but in the bottom sash of the window.
Are the screws going into the studs or just the sheathing?
Just the sheathing on the bottom piece which in my case is 3/4" thick but the sides will hit the framing and the top will hit the header.
Nice job. One question. Why not pockethole together into one unit?
Why pocket hole it? Why not use velcro? Because he didn't feel like it, or the thought never entered his mind, maybe he doesn't own a pocket hole jig. Maybe pocket holes aren't the answer to all of lifes mysteries. Do it the way you want.
@@mitchdenner9743 I asked the question to see what his thinking was - maybe you could try being less of an asshole in the future
@@mitchdenner9743 Oh easy there mitch! I do agree with you however. This commenter obviously watched a pocket hole video before or owns one. Some people believe pocket hole joinery is the answer to all life's questions. And because Kregg tools are kind of cool. I don't own any but would love to. Just don't want to throw out the kind of cash they want for them. And to answer the commenters question is this man is an installer or builder. He is not a cabinet maker or a DIYer in his basement shop. The cost for that joinery would not be cost effective.
did you glue the pvc and composite together or can you purchase stuff just like this
I used PL adhesive to attach the two together as well as a few brad nails to hold it in place.
@@HouseImprovements thank you sir! I'll be tackling this project. This year!
Is there not a risk to cutting through the flashing and house wrap?
There can be if you are having to cut all the way back
Relying on caulk to seal joints makes for a poor joint. You will have to re-caulk it every year in order to keep the rain out.
You were wrong expert
Was that 2x4?? I'm talking about the dark grey piece.
"Smart Side" trim board in this case but you could use a 2x4 if you wanted