Paving Slabs Repointing Guide - Patio Dry Mix Cement Pointing Jointing Gap Fill between Flags How to

Vložit
- čas přidán 18. 05. 2020
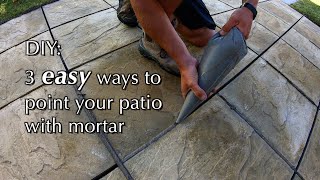
- This How2EveryStep guide shows you how I repointed a Patio with Dry Mix Cement in 10 easy to follow steps:
Step 1: Remove Debris between the Paving Slabs
Step 2: Jet Wash between the Paving Slabs
Step 3: Check all the debris is removed
Step 4: Prepare the Dry Mix Cement
Step 5: Prepare Repointing Tools
Step 6: Repoint between Paving Slabs
Step 7: Sweep the Patio thoroughly
Step 8: Allow the Cement to absorb moisture
Step 9: Fully water the Paving Slab joints
Step 10: Allow Patio to fully dry
Tools/Materials required:
1: Scraper Tool or Kitchen Knife
2: Jet Washer
3: Mixing tray (Oven Tray)
4: Rubber Gloves, Respirator Dust Mask
5: Sand & Cement
6: Soft Bristle Brush
7: Hose or Watering Can
8: Carpet Gripper / Metal Plates / Brick Jointer
9: Brick Layers Trowel
Amazon Links to tools used:
1: Scraper Tool or Kitchen Knife
2: Jet Washer
3: Mixing tray (Oven Tray)
4: Rubber Gloves, Respirator Dust Mask
5: Sand & Cement
6: Soft Bristle Brush
7: Hose or Watering Can
8: Carpet Tucker
www.amazon.co.uk/Silverline-2...
9: Brick Layers Trowel


I followed every step and got great results. Thanks again. Great video. It definitely helped me do a decent job. Cheers.
Really great to hear you followed the video and got a great result. Many thanks! I have just moved house and need to do it again to my patio!
Great video for a novice like me. No excuse not to get my patio sorted now! Thanks
No worries - glad you found it useful! Good luck :)
VERY INFORMATIVE. MANY THANKS.
Very informative video, wish I'd seen this a couple of weeks ago!
Thank you! Shame it came too late for you :)
That reminds me. I must do mine. Good detailed video mate 👍
Thanks Johny!
Great job. If its a job worth doing, its worth doing right!! Cracking.
Thanks Dalvir. Glad you liked the video!
Good video Col.👍
Making a start on mine tomorrow.
Hi Matt. Thanks very much. Hope it goes well on yours...
@@How2EveryStep I’ll let you know...🤞
Thanks mate 👍
You are welcome. Glad you found it useful :)
Thank you, reminds me, mine needs doing... what’s your cost per hour?!
I could probably find out the meaning of life before your finished lol
Ha ha. It's not the quickest method but I find it works...
LOL
Really great video, many thanks. have a whole load to do but the gaps are more like 1"- 1/2 inch btw various sized and shaped paving slabs on 2 very long garden paths, full of weeds and huge gaps atm, can't wait to get stuck in.!
Hi Steve! Really glad you liked the video. If you have 1 to 1/2 inch paving slab gap there will be enough gap to use a wet cement mix which will be stronger and longer lasting. So I would suggest following the video but use a wet cement mix of 3 parts building sand to 1 part cement. You will be able to smooth and compact the wet mix with you finger (wear gloves) or similar tool. Hope this helps. Good luck Colin
Great instructional video. The gaps I have are up to 25mm wide with 3 x 2 flags. Do I need to give the drying process more time before watering?
Thanks very much. No I think 2 to 3 days after pointing should be long enough. If you are doing over the heat wave - i would suggest hosing down the slabs the day before so at least there should be some moisture between the slabs that can be absorbed into the cement mix. Let me know how it goes. cheers Colin
Thanks for the video. I’m following these procedures with a slight twist right now. Using Blue circle Portland white cement and dried kiln buff sand to achieve buff joints. I’ve been adding water with an atomiser sprayer, rather than the trowel. I’ve also been gently spraying the dry mix after filling the gaps between each slab to moisten it very slightly. Since Dry Kiln sand is really dry, and the forecast for the next few days is hot and sunny, any moisture added at the mixing stage just seems to evaporate supper quick. White cement leaves a blanched white dust on the slabs after brushing rather than grey.
Hi Philip. I like the idea of using a sprayer to add moisture to the dry mix - it will be easier to get uniform moisture added than using a trowel.... Yer I have always found the slabs need to be 100% dry to avoid cement staining. Let me know how the end result goes. Regards Col
The final result was very solid evenly cured buff pointing. Unfortunately staining has proved an issue. The customer has not complained to much, but I feel agrevated that every slab has a staining to a certain extent on it. When wet the staining becomes see through so you do not notice it, but in the dry a white shimmer is always visible. I think white cement is more prone to leaving visible staining. I know of no method to remove or lessen staining. Brick acid is a possibility, but some clients are not happy about using such a chemical due to their animals safety. It can also worsen the staining I believe or damage the surface of the slabs in some cases. Any suggestions for getting rid of slight staining, other than just leaving nature to dissolve it?
@@philiphiggs1615 Hi Phil. I'm glad you got a good solid cure. I don't know how to get rid of slab staining i'm afraid. The trick is to thoroughly sweep the slabs to remove all loose cement dust - otherwise you can get this staining... Smooth slabs are easier to sweep completely clean than rough pitted slabs... Regards Col
Can you also point the sides or edges of patio or path adjoining the coping or edging stones so no muck or soil is allowed to build up
Hi Anne. For the edges I would recommend a wet cement mix 3 parts building sand to 1 part cement which will adhere better to the sides of the slabs. Regards Colin
Eventually a step by pet guide on this, for someone who doesn't even own a Trowel, roughly how much cement and sand bags would you need for 25 meters squared? Liked and subscribed, thank you
Hi Paul
I'm glad you found the guide useful. Let me measure my Patio tonight and I will get back to you... Regards Col
Hi again Paul
I just measured my Patio and mine is 12 square meters and I used just under half of 1x 25kg bag of sharp sand and 1/8th x 25kg bag of cement. So you Patio being just over double the size of mine i think you would need 1 x 25kg bag of sharp sand and 1/4 x 25kg bag of cement. Hope this helps. Good luck Col
@@How2EveryStep thank you so much 😊
@@paulmillichamp1684 You are welcome. Regards Col
Think you mean 25 sq Metres, 25 metres squared is a very big area
I used polymeric joint sand but i don't like the results. The sand is still soft which i believe is meant to prevent cracking but i have ants under the patio and when it rains they dig holes through the joints. So im hoping this mortar mix will work and not crack too quickly.
Hi there. I had the same problem with Ants under the paving slabs. I put this mortar mix down in April this year and no cracks what so ever so am confident in the mix. I would recomment using builders sand rather than sharp sand as easier to use (all I had was sharp sand because of covid lockdown). Hope it works well for you - let me know how you get on. Cheers Col
@@How2EveryStep okay, will do.
throw cement onto it mixed with sand brush it in spray it with fine mist, then clean, problem solved.
Can doing this on an hot day cause a skin on top because of it drying out too fast?
I bought some tarmac mortar from b and q - but all the reviews says the mortar is rubbish. Do you think I should still try and use it for repointing Thanks for the video.
Hi there
I have never used tarmac morter so can't comment I am afraid. However I worked out for a 25 square metre patio you would need approximately 1 x 25kg bag of sharp sand = £4.70 and 1/4 x 25kg bag of cement = £3.50 (for whole bag). So for me you get a lot of dry mix cement for £8.20. You just have to mix it up as per the video. Hope this helps. Good luck! Col
@@How2EveryStep thank you for replying
why does he do two cement and 4 sand. 1 cement - 4 sand - 1 more cement.
Hi Mike. I did 4 sand to 1 cement. In the video the 1st trowel of cement was not as much as I was getting on for sand (as the sand was wet and the cement was dry) - so I added a second smaller cement to get the quantities accurate...
took too long time for a single gap.
I agree this method takes longer than just sweeping cement mix between the slabs. But by compacting the cement mix you achieve a much stronger concrete which will be less likely to crumble/crack and will last longer.