Thanks for posting this. I, too, am an MTMWood fan and I think this will be my next project. It's good to see how these can be made in a shop with tools that look more like mine (not as high end).
@@rosenbloom8 Bro, you scared me! Never use the table saw that way, especially with a blade that burns the wood. Clean your blades and practice a little shop safety. :(
Nice work Carter. The illusion at the end is great. Just a small tip, when you do your glue joints, sprinkle a small amount of salt over the glue and it will stop it from slipping under clamp pressure. It does not affect the glue joint at all.
Great job, you make it look so easy.I really like the illusion the patern gives.I hope to try it with the tools I have. Thanks for taking the time to make the video for others.
I love your video and would like to attempt making one. Could you share some dimensions? Carter, What are the L & W dimensions of the boards your starting with in this video, and the finished board. Thank you !
Thanks Carter! I tried one of these using a different method and it didn't turn out great. You method looks like it will result in a better finished product. Also, pay no attention to the negative comments!
Pretty nice piece of work. I also have been inspired by MTM's cutting boards. Your board caught my eye, and at first, thought it was an MTM design. Very nice work. Not sure I'd exactly follow your table saw technique though. It looks a little awkward at times. May I suggest you use a 40 tooth triple chip rip blade rather than the 60 tooth narrow kerf blade that you're using. You're 60 tooth blade is loading up and can't clear the chip fast enough so you're getting a lot of heat, occasionally burning in the kerf, and shorter life on a sharpening caused by excessive heat. The blade you're using would be much better for ripping plywood or crosscutting some hardwoods on a miter saw. Just my opinion and it's worth every penny you paid for it.
Really like the video. But one suggestion. After you plane the face of the wood, put that face on the fence of your jointer to plane the edge. That way the edge and the face are exactly 90 when you square the rest of the piece with a planer.
I see a lot of expert commenters here...your saw this, your technique that, your glue bla bla bla. I've met guys like this in real life. They're the ones that always have something to say but never have something they've made! Here's what I saw: an excellent looking final piece, a guy who has all 10 fingers and his shop is organized and clean. The haters, well they've got their comments...oooh how exciting for them
What's not exciting is when a novice watches how he uses the push stick on the wrong side of the blade and duplicates him eventually resulting in injury from kickback, not to mention his ripped pieces are guaranteed out of square/bowed with saw blade burn marks. If someone drinks alcohol then drives and they make it home it doesn't mean it's fine keep doing that. Kids please, don't use a push stick on the side of the blade away from the fence because this guy still "has all 10 fingers" as his method is unsafe!
Thank you for sharing this. I would like to make one of these for my son and have the finished board be 15x20 x2 . What would the measurments of the "sandwiches " be? I just finished a practice one that started with 8x12 sandwiches of pine and oak and pine and cherry it ended up being 16 inches long and 5 1/2 wide
in my infinite ignorance, I thought these boards were made 1 piece at a time..... Thanks for the video, very entertaining. I am not sure why i watched it, but I enjoyed it.
Omg that was awesome! I was a carpenter for 30 years now I'm trying my hand at woodworking because I miss doing the job and my body is all messed up. I'm watching thinking why is he cutting it again after he just put that 45 on it then it hit me and I thought ohhh I see what he did! Now I know how to make a 3D cutting board!!!
Dear Carter, that is a great job! What wood did you use? In some comment you offer to provide with the plan with dimension, how could I get it? Thank you in advance!
Anyone else notice that he placed the unjointed wide side of the board against the fence when he placed it down to joint the edge at the very beginning of the video?
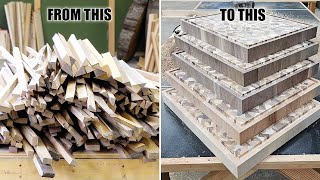
This is so much easier than my attempt that produced a bag of tri-diamond end chunks that don't fit snugly due to trying to clamp 6 sided lengths unsuccessfully. Thank you for another way of doing this design. I do make the prettiest and most expensive firewood in the city though.
I have watched this demo a lot to try to pickup what he was doing. I would have been helpful if he would’ve Tarth us thru what he was doing at each step.
When you are making your 60 degree cuts in the glued up boards, you took a parallelogram piece and marked your cut lines. How did you determine the width of the cuts?
How about voice description on the different steps you took to make that nice board. I would like to know some measurements..etc. I'm a beginner at all this, so I need all the help I can get.
Hi Carter , Dan Neumann from clinton township Could I Get some measurements Length and with of boards that you started with also angle of cut, and the thickness of the boards when you cut on the angle please. love the look of the board, I just got done making the number three from mtm .
Finished product is very nice, but, dude - only the riving knife stood between you and some serious kickback. Might want to rethink how you make that cut safely.
Right before you flip and clamp up the board, when it is still lying there as one glue covered piece, give it a slight dusting of salt, it will help to control them sliding around ;)
? @@rosenbloom8 you told leslie weiss you couldn't speak English, where did you learn so fast? the sentence seems to be grammatically correct, did you use Rosetta Stone?
looks really good. You might check your fence to make sure it is truly square to the blade or maybe a couple of thousands of toe out. that's what's burning your wood.
Or maybe his wood is burning from using his push stick on the wrong side of the blade...by maybe I mean it definitely will cause burning, not to mention risks kickback.


Thanks for taking the time to produce this video. I am about to fall down the cutting board rabbit hole!
Cheers from Nova Scotia
Thanks for posting this. I, too, am an MTMWood fan and I think this will be my next project. It's good to see how these can be made in a shop with tools that look more like mine (not as high end).
@@rosenbloom8 Bro, you scared me! Never use the table saw that way, especially with a blade that burns the wood. Clean your blades and practice a little shop safety. :(
Nice, I just couldn't wrap my head around MTM's video. Now, I'm inspired to try this. Thanks!
Wow dangerous dave with that table saw glad it worked out
Right?!? I can’t believe this is the only comment about that
Noob here could you elaborate on what he did that’s dangerous?
So Escher , Great use of great tools. well done, you deserve this wonderful shop
Nice work Carter. The illusion at the end is great. Just a small tip, when you do your glue joints, sprinkle a small amount of salt over the glue and it will stop it from slipping under clamp pressure. It does not affect the glue joint at all.
Awesome job! Beautiful art.
I've watched your video many times, preparing to make my own. Appreciate the awesome music!!
That's a great job for your 1st 3D board..... Id be proud enough to give that to my mom.
Nice, thanks for sharing. I, too, am a fan of MTMwood. After watching your video, I may give making one of these a try myself.
Beautiful outcome bud👍... Thanx for sharing this with us...
Soundtrack? Medeski, Martin, and Wood? Great job on the board!
Absolutely beautiful. I am definitely going to give this one a try
Great job, you make it look so easy.I really like the illusion the patern gives.I hope to try it with the tools I have. Thanks for taking the time to make the video for others.
Thank you for the video, so much work. The boards look great.
instaBlaster.
Excellent craftmanship, you make it look so easy but it must be really hard to do.
nice clean finish, looks great.
I love your video and would like to attempt making one. Could you share some dimensions? Carter, What are the L & W dimensions of the boards your starting with in this video, and the finished board. Thank you !
When you put the two boards on the out side would you use two different shades of wood to get more distinction.
Thanks Carter! I tried one of these using a different method and it didn't turn out great. You method looks like it will result in a better finished product. Also, pay no attention to the negative comments!
Wow!! You are a master carpenter!! That is beautiful!!
man, that came up awesome..thank you!! something i would like to try....
Excellent video! Love the 3D visual effect, and the great music! Kudos!
Pretty nice piece of work. I also have been inspired by MTM's cutting boards. Your board caught my eye, and at first, thought it was an MTM design. Very nice work. Not sure I'd exactly follow your table saw technique though. It looks a little awkward at times. May I suggest you use a 40 tooth triple chip rip blade rather than the 60 tooth narrow kerf blade that you're using. You're 60 tooth blade is loading up and can't clear the chip fast enough so you're getting a lot of heat, occasionally burning in the kerf, and shorter life on a sharpening caused by excessive heat. The blade you're using would be much better for ripping plywood or crosscutting some hardwoods on a miter saw. Just my opinion and it's worth every penny you paid for it.
Really like the video. But one suggestion. After you plane the face of the wood, put that face on the fence of your jointer to plane the edge. That way the edge and the face are exactly 90 when you square the rest of the piece with a planer.
Wow, that's beautiful!!! How many hours does it take to make one of these?
I see a lot of expert commenters here...your saw this, your technique that, your glue bla bla bla. I've met guys like this in real life. They're the ones that always have something to say but never have something they've made! Here's what I saw: an excellent looking final piece, a guy who has all 10 fingers and his shop is organized and clean. The haters, well they've got their comments...oooh how exciting for them
What's not exciting is when a novice watches how he uses the push stick on the wrong side of the blade and duplicates him eventually resulting in injury from kickback, not to mention his ripped pieces are guaranteed out of square/bowed with saw blade burn marks.
If someone drinks alcohol then drives and they make it home it doesn't mean it's fine keep doing that. Kids please, don't use a push stick on the side of the blade away from the fence because this guy still "has all 10 fingers" as his method is unsafe!
Excelent!. Thanks for sharing... Wich woods are used in this video?... the darks are diferent, isn't it?
Oops, forgot to ask, what were the starting measurements of your initial 3 board blanks?
The two white pieces are half the thickness of the dark walnut. And the pallelelograms have all equal side leghts.
This is awesome job,,,,,,,keep it up brother
Magnificent, splendid, a work of art!
Thank you for sharing this. I would like to make one of these for my son and have the finished board be 15x20 x2 . What would the measurments of the "sandwiches " be? I just finished a practice one that started with 8x12 sandwiches of pine and oak and pine and cherry it ended up being 16 inches long and 5 1/2 wide
hm
Nice build video. Subscribed 👍
Qbert would approve!
at 5:10 in the video what does that measurement have to be or how do we calculate it based on our dimensions.
"No glue joints were starved in the making of this video."
Glue.....my farqen god, that's some glue.
Are you looking for a local glue supplier, if so we can help!
Which woods did you use?
in my infinite ignorance, I thought these boards were made 1 piece at a time..... Thanks for the video, very entertaining. I am not sure why i watched it, but I enjoyed it.
Some are doing it that way but mtmwood found a way to make it in strips to ease the production and reduce the gaps.
Omg that was awesome! I was a carpenter for 30 years now I'm trying my hand at woodworking because I miss doing the job and my body is all messed up. I'm watching thinking why is he cutting it again after he just put that 45 on it then it hit me and I thought ohhh I see what he did! Now I know how to make a 3D cutting board!!!
Excellent work!
Nicely done!
Dear Carter, that is a great job! What wood did you use? In some comment you offer to provide with the plan with dimension, how could I get it? Thank you in advance!
Anyone else notice that he placed the unjointed wide side of the board against the fence when he placed it down to joint the edge at the very beginning of the video?
This is so much easier than my attempt that produced a bag of tri-diamond end chunks that don't fit snugly due to trying to clamp 6 sided lengths unsuccessfully. Thank you for another way of doing this design. I do make the prettiest and most expensive firewood in the city though.
Interesting . . . and the yellow glue lobby thanks you.
Splendid, magnificent !!!
You're so perfect and talented. I like ur work
I have watched this demo a lot to try to pickup what he was doing. I would have been helpful if he would’ve Tarth us thru what he was doing at each step.
Beautifully created.
When you are making your 60 degree cuts in the glued up boards, you took a parallelogram piece and marked your cut lines. How did you determine the width of the cuts?
For when Q-Bert needs to prepare a meal...
Parabens, muito bonito o seu trabalho. è possivel informar as medidas. obrigado
That is amazing! I'm thinking to try it.
I thought the long anti-snipe sticks were a great idea! I learned something useful after being in the biz for over 20 yrs
I like it !!! good video ! but what dimension(s) did the board finish at ?
Nice job! Nice music! Nice workshop! Nicely done!
This is a beautiful cutting board
LOL "This is what happens when you start watching MTMWood"
How about voice description on the different steps you took to make that nice board. I would like to know some measurements..etc. I'm a beginner at all this, so I need all the help I can get.
WOW !!! Amazing work,
Thank you again for unraveling my awkward head.
I would have no problem pushing the boards through the jointer edge up, but for flat I would think a pusher tool would be better.
Mate throw the Gripper in the bin 5 cuts I saw the front piece move away from the fence as you pushed it through
Wow Nice job I will be making a similar one but for a table top
is it possible to have the plan by forming PDF? Thanks in advance.
Awesome board. I have to admit though, my cheeks clenched when you let go of the piece during that first 60 degree rip.
Awesome build, but how many others caught themselves doing the macarena along with the music?
Really awesome thanks so much!!
nice , what type of wood are you using
Please while ripping push the board through that is between the saw blade and the fence with a push stick
Yes. That was very difficult to watch.
Very nice, I like it a lot!
Parabéns! Belo trabalho! Vc pode passar as medidas finais? Largura, comprimento e altura. Por gentileza
Hi Carter , Dan Neumann from clinton township Could I Get some measurements Length and with of boards that you started with also angle of cut, and the thickness of the boards when you cut on the angle please. love the look of the board, I just got done making the number three from mtm .
Это просто шедевр!!! Лайк 100% 👍👍👍
A m a z i n g . . . good job...
this dude’s doors sound like the doors in minecraft
Wow , very nice sir,
It is really amazing
Finished product is very nice, but, dude - only the riving knife stood between you and some serious kickback. Might want to rethink how you make that cut safely.
Right before you flip and clamp up the board, when it is still lying there as one glue covered piece, give it a slight dusting of salt, it will help to control them sliding around ;)
looks absolutely amazing, just too small for me personally (:
I'm sure he has 4 different sizes or perhaps 16 different sizes lol, I'd have one that width but little longer for loins 8)
Ótimo trabalho parabéns 👍👍👍👍👍
Bonjour,
C"est magnifique. Félicitations !!
IMpressive!
Felicitaciones, me gustó mucho tu trabajo 🇵🇪
Fantástico. Hermoso trabajo.
The board turned out great! How does the Rotex do on endgrain?
I have the rotex too . I can't help myself, I go through the grits until it starts to shine without finish.
? @@rosenbloom8 you told leslie weiss you couldn't speak English, where did you learn so fast? the sentence seems to be grammatically correct, did you use Rosetta Stone?
hola desde la cdmx sq pegamento usaste?
looks really good. You might check your fence to make sure it is truly square to the blade or maybe a couple of thousands of toe out. that's what's burning your wood.
Or maybe his wood is burning from using his push stick on the wrong side of the blade...by maybe I mean it definitely will cause burning, not to mention risks kickback.
6:27 sounds like Terminator 1
what angle do you use to cut the diagonals
Espectacular trabajo. Lo voy a intentar.
Muito bom. Você tem uma visão de geometria espacial excelente.
kk
Gracias por mostrar. Un saludo desde España
What kind/type of wood are you using?
Exelente ...siempre se aprende algo nuevo ...lo boy a intentar hacerlo...saludos
Wow great video and awesome sound track, is that original?
what would be the value of such a luxury job
I watching mtmWood! Hi from Ukraine!
Сергей Никитин i9
Такое волшебство! Сделать из таких фрагментов библиотеку...
Its great ! One of the best this a aver see ! Congratulations
O