Steering head bearing replacement GSXR750 Ft. Tool Girl Sarah

Vložit
- čas přidán 4. 05. 2018
- The first in a series of videos covering the repairs needed to Tool Girl Sarah's 1999 Suzuki GSXR750 motorcycle that she imported all the way from Canada.
In this video we show you how to replace the steering head bearings - no easy task to be fair, with many components to remove.
More videos in this series coming soon... - Auta a dopravní prostředky


Great video and Sarah was tired and came in to work.. Very cool!
I like Sarah's accent. Sounds like mine (even though she is from the west coast). Move 4 provinces east if you ever make it home to Canada Sarah. You will like it as much as NZ. Enjoy your trip. Always intrigued by someone who knows how to work a pole. Amazing talent. ;-)
Appreciate the detailed overview Andy. Great Video.
Very nicely detailed and explained video. Excellent camera work, and I love that it is (almost?) in real time with no bits skipped.
I have to comment as follows
1- You can use a rubber mallet to get the outer races into the frame. Then use the old race like you did to drive them home. Less chance of damaging them and / or the frame with a missed hit.
2- Headstock / steering stem adjuster nuts and lock nuts should be adjusted using a special, purpose designed socket and torqued to manufacturer specs. Hitting them with a tap or screw driver is a sure way to get them chipped and dented, not to mention zero accuracy on torque values and therefore bearing load.
You can get away with that on old Japanese bikes with steel nuts This is an aluminum nut on many modern European sport bikes and I couldn’t imagine the damage it would sustain if treated this way.
Also the threads on the steering stem should be free from any grease before the nuts are put back in.
Hope this helps.
Thanks again for sharing.
That was very helpful, thanks Andy ... and Sarah ofc
excellent camera work, well made video , A+ !
Awesome video
great content, you just showed me how to disassemble the entire front end
Sorry to say if it bothers you andy but sarah seems like the kid that keeps talking non stop while you're working and then start screaming "are you listening to me"
Brother u saved my ass! I didint know how I was gonna put those back in! I got a suzuki gsxr 600 keep making these vids! I liked and subbed!!
Worth noting you can freeze the bearing races and gently warm the frame so you don't have to be taking so many hits at it to get it in. Especially if you're nervous about causing damage by giving it a whack.
Name of show should be RAndy Mechanic!
k'day Andy, I personally prefer to use an electrical heat gun to heat up the the head stay of the frame to get the races out and in. Most of the time they just fall out of the frame with the first tap.
The same goes with the race on the stam. A little heat reduces the binding and damage on the bearing seats.
Keep up with the very good video's
I use a brass drift for tapping races in. I also find a bar clamp useful in this endeavor.
Love the videos Andy and obviously the girls are a bonus, do you not have a soft face dead blow or a copper mallet ? As perviously mentioned heat is always a crowd pleaser with bearings. May be I do a bit of over kill but working in the aerospace industry specialising in gas turbines I sometimes cringe when I see you carry out some tasks lol keep up the good work mate. 🛠😎🇦🇺 I'm an ex pat too 👍
A big shifter and 2 pin punches saves you from bruising the head nuts if you don't have a "C" spanner. They lock into the notches perfectly.
the genuine bearings are 45 of the queens pounds each . to get the lower race off. i cut just over half way tho it . get the tig welder and weld a bead on the outer . the weld contracts wen it cools and snaps the race the rest of the way
Just done mine and I don't have a press but found 1¼ solvent weld pipe and a hammer gets it on
This is really helpful. Just bought a gsxr with no advisories on the MOT....first ride knocking noises going over speed bumps. Wonder what that is.....
Haha! Check the steering head bearings....lol
@@AndyMechanic done it plenty of times on bicycles that only weigh 8-10kg and you don't need to spend half a day just getting to a headstock past lights and fairings. Oh well, once it's done it's done.
Must have missed you putting the ignition switch on I was probably distracted by looking at Sarah the whole time.
Scooters must be a nightmare to do these bearings on. Might be time to get those tools. I have 2 bikes I will likely be doing this job on. Should make the job much easier.
Thanks Andy, good Vlog again. Can you ask Sara If she can help me for in the shop for a while? 😉
Haha! Sure thing, where is your shop?
Haha, Awsome. It’s near Amsterdam in Holland. We mostly do engine rebuilding.
What's its mean when your old bearing race just comes right out no tapping and your new one just falls right in.
The machined surface in the head stock is warm this is very bad. You could try using a thin shim (made from a coke can) or bearing retainer. If that fails will need to be welded up & re-machined (expensive & full frame strip)
Cheers Andy
OK Andy I have the stupidest question ever ...did you torque up the bolts that locate the clip ons ? I'm sure you did ..maybe I missed it ...any how great show ...Sarah is like trying to tame a box of frogs !!! You are very patient !! ✌💗
Haha! She sure is! Keeps things interesting! Lol Yep did the clip ons for torque and double checked them all again after I finished the video....just to be safe :-) Cheers Andy
Is this a 01 ? Will the front break disk s fit on an 04 ?
Hi Andy, Just wondering why it is OK to tap the outer bearing shells into place using a hammer, but you have to press fit the inner lower shell using mild steel tube.
Did increasing the preload have any effect at all once the steering damper was connected?
Hi Richard, thanks for your comment. I have never had a bearing race chip or damage due to fitting using a hammer but if a punch is used it is easily damaged. I think the punches must be a harder steel than the hammer head. I use a tube to press the inner bearing on as its not possible to get in with a hammer without risking damage to the stem or bearing cage etc. Plus it's quick and easy.
Hope this helps. Cheers Andy
Thanks. I guess hammer hardness is an art in its own right! I've used a bronze drift for this in the past - but sometimes you need about 4 hands to hold things where you want them. The problem comes when you don't have a press available, or you can't get the parts to the press without a lot more disassembly.
Very true. Cheers Andy
Wheres the link to Sarahs youtube?
I had problem removing it from bottom of fork, just left it sank in wd40 next morning pooped of with no problems.
what size is the "large nut" The head nut ..
If my baby goes in for work, I always tell them, takes as long as you need
andy you know you can use your fish scales to set torque wen you can not get your torque on to a bolt sometimes takes some maths to work out . eg the spanner is 6 inch long and you want 30 ft bl pull on the scales 60bl and that is the blot at 30ft bl
That's a great tip Simon.....thank. I think I should make a video on this as quite often you can't get in with the torque wrench. Cheers Andy
credit to my dad for that tip. 40 years as a ship engineer finding was to limp a ship to the next port were the parts are waiting lol
Sure is....later in the video :-)
This andy mechanic have some sexy ass girls pass me some 😂😂😂
Epic video it was informative and very sexy oh and Sarah was really good too!
As an ex rider, it really GRINDS MY GEARS when I see front tyres that have been fitted in the wrong direction and the owner of the bike doesn't even know. At the point of contact to the road, the grooves should push the water to the outside of the tyre not the middle. Going through puddles on that GSXR 750 would be wobbly at best and dangerous around corners.
Hi, I checked the direction on the tyre & it's installed correctly. If it hadn't been then I'd have swaped it. Good point though. Cheers for now. Andy
Fork oil change while you have em off.
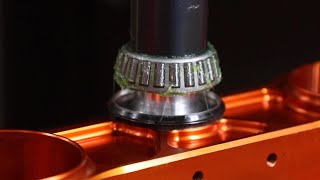
26:00 Sports bikes have and should have ball bearings, Dirt bikes and stunt bikes that jump should have tapered roller bearings.
Tapered roller bearings can take a lot more axial trust and are in general more durable, but the ball bearings give better feedback and steering feel.
35:35 Bottom bearing ... Watch this czcams.com/video/X4JD1ckhBgk/video.htmlm38s
40:10 Never seen it come off that easy before with that method!
I figured out why it was so easy for you, this particular bike was designed to do it this way according to the manual.
www.manualslib.com/manual/813897/Suzuki-Gsx-R750.html?page=357#manual
Deffo should be the randy mechanic. Pre load, big nuts and Sarah laughing at the big shaft (forks). He's even got a tash. All that's missing is some cheesy porn music in the background lol. No clues for how he's getting paid for the job. On the whole tho he has done a good job of the bike as far as I can see. Maybe should be wearing some PPE such as goggles when using the hammer on the ali and steel.