Varavon Motorized Video Camera Slider

Vložit
- čas přidán 12. 09. 2024
- This video demonstrates my implementation of a DIY motorized attachment for your camera slider. Here, I am using a Vanavon Slidecam Lite, but this design is so portable it will easily work with any length and make of slider.
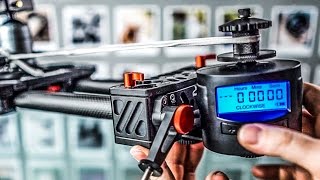
The parts used include 5 volt, continuous rotation servo, with a pulley wheel attached, A Manual Servo Driver to control direction and speed, 4 double A batteries for for the power source. On the free end, I am using an another pulley wheel, attached to a angle bracket. I used a metal framing tie plate metal, cut to fit, to connect to the the slider. And lastly a heavy duty rubber band, is perfect for attaching the motor. Using a rubber band has bonus effect of providing just the right amount of tension between the drive pulley and the nylon line.
The free pulley is attaches to an angle bracket which then mounts to the end of the rail using a 1/4 x 20 bolt. It is then locked in place using with a thumbscrew. On the Slidecam Lite, both pulley s now line up perfectly with the central axis of the rail both horizontally and vertically .
I have used a framing tie start that I got from the hardware store for fifty cents. I cut it to fit the slider plate and then just primed and painted it. The drive line is just nylon cord that I also painted black.
Once the tripod head is screwed on tight, the plate is locked in place.
The free end of the cord is attached to the plate and tensioned using a simple cord cinch off available at most hiking gear to fabric stores.
Since the servo controller is bidirectional, it passes through the stop position before changing directions. As a result, as you start the motor, it is a very smooth transition in speed from stop to full.
To increase the friction between the drive pulley and the cord, I wrapped a rubber band tight around the groove in the pulley.
As there is no special mounting tools or proprietary fittings involved here, this set up should work on any make or model of slider.
Parts list...
Varavon Slidecam Lite
www.varavon.com...
H01429-01T Parallax (Futaba) Continuous Rotation Servo
www.hobbyengine...
Futaba Pulley Wheel, Item #:FUTM2045
www.servocity.c...
AA Battery Tray (4 cell), Item #:57216
www.servocity.c...
Dual Manual Servo Driver, Item #:902MSD
www.servocity.c...
Simpson Strong-Tie Tie Plate
www.homedepot.c...
Nylon Mason Line
www.amazon.com/...
Cord Lock
www.walmart.com...
1/4 in.-20 x 1 in. Zinc-Plated Hex Bolt
1/4 in.-20 Zinc-Plated Steel Wing Nut
1-1/2 in. Zinc Plated Corner Brace
Rubber band
----------------------------
Here is the parts list I used for the version before this one. I was more interested in very slow movement which I need for time-lapse photography. The motor I used was 2RPM
12V 2RPM Electric Mini DC Geared Box Motor
bit.ly/11WtHzO
DC12V PWM DC Motor Speed Controller
bit.ly/15KITH2
DC 12V Rechargeable Li-po Battery
bit.ly/11Gl1QO


You should consider putting the components together and offering it for sale as a kit, you would definitely sell a lot of them! Great demo... thanks!
what a great post/tutorial. i actually am going to try this but with g2 pulley belts and g2 20 tooth gears. thank you so much for taking the time and doing the tutorial.
Effective, simple and resourceful. Great video, very much appreciated thanks.
I tired numerous motors before this one. I had been using 12v gear motors.
To control DC motor speed properly, you just cannot control the voltage, you need a PWM controller. That is, Pulse Width Modulation. Basically, what this does is very quickly send full voltage and then shuts off over and over. This way, you can get the motor slowed down so that you can barely see it moving. This is the advantage of gear motors over a servo motor, like the one in my video. Servos are made to turn fast.
Felicitaciones imaginetMedia es el mejor tutorial que he visto, y el más económico y que hace las mis mas funciones que los más caros, ojalá los pudieras vender, yo sería el primero en comprarlo. saludos desde México
Gracias
You gave me a great idea! Thumbs up for this project!
Great Work, Nice idea!
Hi Great work! I really like the idea and went to build one using the parts you listed for time lapse. I got the slider slow enough to take ~30mins to go across a 5 ft track. I was hoping to make this even slower. What size of pulley wheel did you use? would using a smaller one slow it down more? Would putting more weight on the vehicle? Or are there additional modifications to the PWC that can help slow it down more? I see an interface that is unused. Any help would be great
Hi,
Nice work! I'm about to build a simple time lapse slider. Was the 2 RPM motor good or do you suggest an even slower one? What was the diameter of the pulley used in your previous (time lapse) version?
This is great, is there a way to make it wireless?
Great one. I am trying to source all these parts in the UK. Got almost everything. The hardest one is the Pulley wheels. I cant seem to get them anywhere local on the net. Not sure if there is any other name they are know in UK? Please help if you can. Thanks
Do you have to stand there holding the knob, i can't imagine standing there for 60, 200 mins would be annoying, fine in the demonstration but not what people will actually be doing once they build this. How long will the battery last, could you have it going for 24hrs even 7 days as i would like to do this for that length of time on slow motion...
I have added a parts list to a gear motor version in the video description.
Hi imagineMedia, very nice idea, but I have a question. I'm wondering if your setup would still work with heavier loads, camera and lens. Have you tried to mount a heavier camera and lens, or use the slider at 45 degrees angle? I have the feeling that this motor will not be capable to handle it, or the servo will consider it as a too heavy load and will stop as it stops at the end of the course. Am I right? honestly. Thanks in advance for answering
Titus Tucan these servos are strong but if you need more power, I'm sure you can attach another servo on other side. that controller should support two servos and can make them work in conjunction (I imagine).
Titus Tucan If one servo is strong enough, I say get toothed pulleys and a belt instead of wire.
I have added a parts list to the description.
Does the driver you used allow for continuous movement? Can I set the servo speed to a crawl and allow it to run without attention to the end of the track? Thanks!
Yes, it allows for continuous movement. Just set the speed and leave it. I only kept my hand on it in the video as I was showing speed and direction controls. I have since added a micro switch to the end of the slider at the servo end, that cuts the power as soon as the camera reached the motor end of the rail.
imaginetMedia Thank you! Really appreciate it!
Great motorized slider! Can you let me know where to buy the servo & controller?
Please view the text description of the video. At the bottom of it I provide links to all the components including the servo and controller.
does it have to be 4 cell battery? or can i use 8
+kreeper24 DIY Pc Mods & Tech You can use any pwer source you want. As long as the voltage is correct, you wil be good.
How slow does it go? I want to do time lapse photography (DSLR or GoPro)
can you do a write up and part lists??? pleasesee
Would I be able to do the same thing, but with a digital manual speed controller, instead of the manual controller?
If you use a servo recorder from robotshop.ca, instead of a servo driver, you can record and repeat a move. Alternatively, use a HobbyKing servo tester, instead of a servo driver, and a giant scale sail winch servo.
isnt there any footage with this timelapse slider ?
Ya tu sabe
where did you get the second pulley wheel from? the one you used for the Continuous Rotation Servo
Both wheel are the same. This makes it much easier.
What was the over all cost?
I had some of the parts already in the shop, from previous projects. However, If yo look in the full description of this video, I have a complete list of all the parts with links to each one. If you choose the parts yo need and follow the links, you will get the individual part prices.
Would it be possible to use this vertically standing up?
I have used it vertically several times. This was with a GoPro camera, similar ballhead to what I used in this video, and a 7 inch friction arm to allow the camera to be positioned horizontally. I do not know the weight of this set up, but it worked without any slippage. You could always use either a more powerful servo or a smaller diameter drive pulley, both of which would increase torque. I may try this with my GH4 and see if it will lift a M43 body.