Blend images to create better composites in

Vložit
- čas přidán 21. 07. 2024
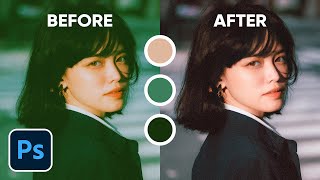
- ➤ LEARN how to blend images to create better composites by matching the hue, saturation, and brightness of an image.
➤ TOOLS and Techniques we'll use include Blend Modes, Curves, Hue/Saturation, grey layers, check layers, Eyedropper sampling rings, and much more!
➤ LIKE, COMMENT, SUBSCRIBE and hit the bell to get notified to be the first to know when the next video is out. Thanks so much for watching.
➤ MASKING TUTORIAL SERIES:
→ Masking simple shapes and blending car into background: • How to remove and repl...
→ Masking out a person: • Remove and replace bac...
→ Masking coloured background: • Remove and replace col...
➤ DOWNLOAD sample pictures:
→ Background: www.pexels.com/photo/sea-near...
→ Model: www.pexels.com/photo/4384774/
➤ TIMESTAMPS
0:00 Intro
0:29 Import the images
3:01 Masking the model
4:05 Understanding Hue, Saturation, Brightness
5:47 Adjust the brightness
15:13 Remove sampling rings
16:19 Adjust the hue
21:59 Adjust the saturation
30:00 Lesson review
30:47 Outro - like, subscribe, and hit the bell icon!


Excellently covered; heartiest kudos and congratulations to you for such great tutorial
Thanks Vivek. I'm glad you found it helpful.
Great video
Ciao, sorry if I use the translator, I would like to thank you for this very interesting tutorial, explained in an excellent way and .... sympathy.
Thanks again, see you next time
Thanks for taking the time to comment Aldo, especially when you have to use a translator. It's much appreciated and I'm glad that you found the video helpful.
Very good tutorial
I see that you’ve watched a number of videos. Thanks for the support across the channel, Edmund.
Really fanstic vedio which made me much clearer about composition and cannot thank you enough. Could you please also give us some information about: 1. how to choose right pictures for blending;2. how to make our picutres have the correct perspective and proportions; 3. after we checked luminosity, hue, satureation, how to add some other effects to composites like color looking up, blurring, etc. Thank you so much in advance and wish you a grate day!
Thanks Eric. Your questions are probably enough to make a video on - something for me to consider. In the meanwhile:
(1) Choosing the right images for composites - this is an important but probably an often overlooked aspect of compositing. Aside from artistic choice, the key things to think about are the lighting of the images (e.g. does one have a bright light, casting harsh shadows and the other picture is overcast with no/soft shadows), the colour (does one have a strong contrast/colour cast, etc), resolution of images should be same/similar, depth of field - how blurred is the background compared to the foreground and vice versa, and perspective - this is important, otherwise the images just doesn't 'gel' together no matter how good our Photoshop skills are (e.g., the front image might appear to be floating on air, or too big/small against the background) .
(2) Perspectives / proportions - The main way to match perspectives of an image is to find out where the horizon is and make sure the background and foreground reference the same horizon level. If the images doesn't have an obvious horizon line, you can work it out if the images have converging lines like road lane markings where eventually the markings will converge at a distance, which is where the horizon would be... but some pictures don't have converging lines so then it's more about getting the proportions right, which you can do by eyeballing sizes of objects in the background and matching it to the foreground and vice versa.
(3) Additional effects to blend the images more - this video was just to match the hue, saturation, and brightness of two images but this is a great idea for the next video!
@@hoitpham hi HTP, thank you so much for the great explanation and I already saved your words, it's definitely worth reviewing many times for me.
I did the exercise yesterday morning with your images following your guides, but ran into other problems compositing one new image into another, so I set the default white, black and gray tones by selecting the relevant areas of the background image and then deploying them to the image I wanted to use for the composition, afther which I used your methods to make it done. Nice journey for me.
Why not just use Harmonize neural filter?
Yes, you could use that filter in a number of instances - and that's the beauty of Photoshop! Though it does depend on how different / extreme the 2 images are and the level of quality you want from your composite (e.g., social media thumbnail vs printed portrait). It's like asking why not use the automated Object Selection option to mask something out instead of using, say, the Pen tool. Of course you could but it depends on the image you're trying to cut out and the level of quality you're going for.
I give up, you cannot click and drag into other picture, I've tried and it does not work?, What am I doing wrong?
@Andrew Soulby When you click and drag on the model image, make sure that you:
(1) have the Move tool selected. You can press V on the keyboard to bring that up or select it from the menu bar on the left-hand side,
(2) left-click on the model image with your mouse and drag the mouse cursor to the name of the background image window. Your screen should now show the background layer.
(3) When your screen shows the background layer, drag your mouse cursor on top of the image and let go of the left-mouse button. This should drop the model image on top of the background.
While doing steps 2 and 3, don't let go of the left-mouse button until you've dropped the model image onto the background.
If that doesn't work for you, don't worry! There are a number of other ways to do the same thing. I'll show you one more:
(1) Open just the background layer by going to File > Open. Locate the background image and press Open
(2) When you have the background layer opened, go to File > Place Embedded. Locate the model image and press Place. This will place the model image on top of the background image.
(3) Press Return on your keyboard if you're using a Mac (or Enter if using a PC) to accept the placement.
Hope this helps.