DIY a Sleek Slatted Bench with Ease

Vložit
- čas přidán 1. 07. 2018
- Learn how to make a Sleek Slatted Bench with Ease! If you can sand, drill holes and screw in screws, you'll totally be able to do this project!
For full how-to and supplies list, visit: www.homejelly.com/diy-sleek-sl...
TOOLS used in this project:
circular saw: amzn.to/2LifuAx
OR
miter saw: amzn.to/2J8tMRt
hand sander: amzn.to/2XVNy6M
HomeRight Super Finish Max paint sprayer: amzn.to/2VFtqs6
cordless drill: amzn.to/2VFtqs6
Video sponsored by www.homeright.com/
For another take and more tips on this fun project, visit my DIY gal pals, Steph & Vicki over at MotherDaughterProjects: • How to Make 2x4 Outdoo...
Follow HomeJelly on Pinterest:
/ homejelly
Follow HomeJelly on Instagram:
/ homejelly
Follow HomeJelly on Facebook:
/ homejelly - Jak na to + styl


Great project! Thanks for taking the time to make and film it. Subscribed!
Good looking bench, the contrasting colors look great together. Thanks for sharing
Thanks, Derek! Happy to hear the kind and encouraging words. Happy DIYing! BTW, I'm working on a super simple and fun project, prefect for Father's Day - feel free to subscribe to see it soon!
Simple yet beautiful design. Definitely I am going to make this. Thank you so much for sharing the video.
Thank you so much Sarvesh! We'd love to see your version! Give us a shoutout once it's done! Cheers!
Love this, thank you!
I have seen this bench before with all 2X4's and I like this a little better with the addition of the 1X4's. It lightens up the whole bench. Nice work.
Thanks so much for the kind words! It's fun to see how many variations there are on this type of bench. Shows how creative people can be.
I love the look of this bench. My sons have purchased forty acres of woods and plan to make a homestead. I am making two of these benches so they will have a place to sit! I plan to use treated wood since they will be out in the elements. I cut the wood for one yesterday, plan to finish sanding and stain today and start on the pilot holes. They close on the 27th and I will have these ready by then! Thanks for the inspiration!
That is awesome! I'm so glad you DIY'd one for your family! Thanks for your kind comment! It made my day! Enjoy!
Very good look!!! Looks simple enough to build, but the finished product looks top notch quality. Nice work!!
Thank you so much, Johnny! This comment made my day! If you look through the comments, there are lots of good tips and updated advice. Thanks again! :D
i like it, going to build it this weekend!
Thanks for the idea, I made one for my wife,she loved it
Awesome, Heraclio! What a great gift! If you'd like to be featured on our "HomeJellies Build-It" section, please send a photo of your bench to: skaie@homejelly.com. Bravo!
Endgrain is where moisture goes in so those ends you have on the floor not sealed will soak water like a sponge. Just thought you should know.
Thank you so much for this helpful information! I've definitely learned a lot more since I built this several years ago...thanks to knowledgeable folks like you! Cheers!
I’m boxing in a MINNIDIP pool to have a place to relax on my wfh days and this bench is perfect to use on the platform for it! So doing this
My first project with a Miter saw and it came out great. thank you!
Wow, Michael! That's fantastic! Feel free to send a photo to skaie@homejelly.com - we'd love to feature it on the blog! Here's to a happy 2021!
Just wow..so simple and stylish
Thank you so much Amit! You just made my day!
Your bench caught my eye right away, great job, I have been looking for a project to do and this one seems perfect, I subscribed and liked..thank you!
Hi Jacoman! Thank you so much for your kind words and support! Check out my channel for more fun DIYs...good luck on your bench!
This bench is gorgeous! We're so glad the Super Finish Max could help you with this project.
Thank you! Yes! The painting part of this project was the FASTEST and makes this bench look so totally pro!
This is great! Thank you for posting this. I am going to make this next week to add to a sitting area by the water. It's simple but looks very good. Living in Mississippi I will probably have to paint the underside as well, carpenter bees a just licking their lips waiting to chew into this.
That's so fantastic, Nathan! Yes! There are lots of great comments and added suggestions on this comment thread. Painting all surfaces is a great and prudent idea! Please feel free to email me a photo of your finished project! I'd love to feature it in our "HomeJellies" Build-It section! Thanks for your kind words! Have a great rest of your TuesDIY!
I finished my bench today. It looks awesome. Only change I made was, I made it a 8 feet bench. My kids love it. Thanks for the tips you provided. It saved a lot of time. You are awesome & thanks for sharing your project.
Wow, Shai! Thank you so much for your kind comment - it absolutely made my day!!! Your bench sounds fantastic and I just LOVE how you made it your own to suit your family's needs. Enjoy and thanks again! :D
I love this project!! And it's so simple. I'm actually going to use this model and adapt it to make a radiator cover this weekend. And also, that little pilot hole template was the most useful thing I've seen in a long time - Thank you
Thanks so much, Leah!!! I'm so glad you enjoyed this how-to! I'd LOVE to see what you do with your radiator! Please email me a photo to skaie@homejelly.com whenever you have a chance! Thanks also for subscribing! Yay!
I love this bench, the design is great and very modern looking, I'm going to have to try my hand at making a bench too
Gee! Thanks so much for the kind words, Native Son Wood Art! I'd LOVE to see your build! Send any photos to: skaie@homejelly.com if you'd like-we might feature in our "HomeJellies" Build-It section!
@@HomeJelly excellent will do
Love that you didn't glue up pre-stained boards, like another video. Thinking however I'll do contrasting stains and, of course, a healthy urethane finish...
That's awesome, Gregg! The contrasting stains sounds so interesting...we'd love to see it when it's done. Please leave the link to where we might find it. A healthy urethane finish is a good idea. How do you make sure it's even and not too thick?
Nice bench well done! I think I' ll put in my summer projects list! Thanks for sharing! 👍
That's great Margaritis! Let us know when you finish - we'd like to possibly add it to our post on HomeJelly! If you run into any questions, feel free to leave them here. Good luck!
@@HomeJelly Ok Thank you very much!
Wow. Great work
Thanks Nelly! I appreciate the kind words! Have a wonderful day - hope to hear from you again! :D
Wow excellent video and such a lovely piece
Why...thank you so much, Ger! You're so kind to stop in and leave such a nice comment. Have a great day!
Beautiful!
Thanks so much Ronaldo! You kind comment made my day!
Great item very Portable and easy to clean.
Thanks @TerrifiedRat! It's a heavy piece, but definitely portable. It's great in all kinds of weather and can handle a stiff breeze and wind.
Nice work!! I have the home pro sprayer and it works great!! Thank you for the content
Thank you so much! I'm so glad you enjoyed this project! Happy DIYing!
Thank you this is very beautiful and I will make it to fit perfectly in the weird niche I have 🙏
❤such a beautiful and unique looking bench.
That's so kind of you to say @patriciaufferman 1533!!! Thanks for taking the time! Have a wonderful weekend!😀
I love it, going to try do one
Oh! I just saw this comment! Sorry for the delay! Thank you SO much for the kind words, bigtalo26! I hope you have so much fun doing this project. One added tip...paint or stain all surfaces for a longer-lasting affect. Cheers!
I made it! Thank you
That is FANTASTIC! I hope you had fun making it!
Beautiful! I’m inspired to make one.
You totally should! It's a great spring/summer project! Thanks for stopping by!
P.S. And, somehow, my alerts didn't see your post, so my apologies for the delayed response! :D
So beautiful
Awww! Thanks so much, Tameka! That's so kind of you to say! I'll smile all day now! :D
Wow! Wow! Wow!......your dog is EXACTLY like our dog Lilly, mirror image honest to god. Loved your bench you did excellent job and it looks expensive too Cheryl from Wales UK xxx🇬🇧🇬🇧
Skaie Knox aww! I love your dogs name its so unusual. Your video’s are really good. Xx
Thank you so much, Cheryl! Love your kind and enthusiastic comments! And as for Krinkles...he's definitely my fur baby and he is the sweetest pup! Have a fantastic day and thanks for the smiles!
loved your idea :)
Why, thank you, Monika! So nice of you to stop by!
Just found my next project. Thank you!
Thanks Dave! Just one tip that was handed over by one of the commenters. I'd definitely paint and/or add a finishing clear coat on all surfaces, even the underside. I'm always looking for cost-cutting ways to do a project, but, after consideration, this bench will last much longer if all surfaces are protected. Good luck and thanks for stopping by!
HomeJelly yes, I put several coats of sealant just to make sure we also have ground termites to contend with.
@@davekaneshiro7745 Awesome! I would love to feature your bench on my blog. If you're interested, please email a photo and any thoughts to: skaie@homejelly.com. Congrats on the build! :D
I followed this video to do the same style bench about a year ago, only I used red accent paint. Great design!
That's fantastic! I'd love to see a photo! Please send to skaie@homejelly.com if you'd like!
@@HomeJelly absolutely...done!
Beautiful
Thanks so much, Linda! You just made my day!!!!
beautiful!
Thank you so much, GR WAKENDREAM! I appreciate the kind word! Happy 2021!
i will make this today :-) Thank you very much for this video
You're so welcome! Hope it goes well!
@@HomeJelly it was perfect I love it 😀
I think I could handle this project. Thanks.
I KNOW you can!!! Be sure to read through the blog (link in comments). It has updated TIPS! and things I've learned from other commenters. Goooood luck and thanks for leaving a comment!
I like that you used 1x4. Looked great
Hi Bjorn Hansen! SO sorry it took me a moment to get back to you!!! I SO appreciate your kind comment and for taking the time to watch my video! This made my day! Cheers!
nice!
Awesome 👌
Hi Macca! Soooo sorry it took me so long to reply to your very concise and KIND comment! THANK YOU!!! It means the world to me that you took the time to watch and reply! Have a wonderful day! :D
Great project. A lot easier than others I have seen of a similar nature. Not sure why you wouldn't paint the under side of the bench black like the rest?
Thanks for sharing this bench project. Made one 40”w for my entry porch in honey stain legs and black spray paint for the 40” boards and looks sharp (tagged you on IG to see a photo). Cheers!
Hi Matt! YES! I saw it on Insta...looks FABULOUS! Well done! Totally flattered you made my bench. Thanks for sharing!
Very good video Easy and quick to perform. Greetings from Chile.
Muchas gracias, Marcos! ¿Vas a probar este proyecto? Greetings from Los Angeles!
@@HomeJelly Yes, I am working on this project.
@@marcospintoortiz546 Very cool. We'd love to see a photo! Feel free to send to us at skaie@homejelly.com if you'd like! Have fun!
Muy bonita banca para el patio... 👍
¡Muchas gracias por sus amables palabras!
Exactly the DIY build plan I was looking for. Not sure why the ends aren’t flush with the top of the bench or maybe 1/8” lower so they’re not sticking up though. Might be a preference thing I guess 😜
I saw a version this bench at a fancy new development. It was on the edge of a pond and super stable although it was set on uneven ground. But I’ll bet they paid $800 for it. Thanks for this well made video.
Aww...thanks Jbelme1! That's such a great visual and I'm so glad you enjoyed this video! I sure learned a lot and have received some great advice from the comments on this video. Have a spectacular day and please, visit again! :D
Thanks for the plans, making these to sell so I can get some money for some tools, a little info is that If cut correctly you can get 3-15in 2x4’s and have 4 spare pieces at 45 inches for other projects or 2 if you make one
Right ON! That is an ambitious endeavor...best of luck and GREAT tip on the overage! We LOVE using every little scrap possible. Thanks for sharing!
I finished my bench this morning, It is not perfect but it is okay. It is a simple design however simple doesn't mean easy!
Right?!? I think the challenge to this project is keeping everything square and even. That's what is deceptive about it. Still, with patience and perseverance, it can be done! Please email me a photo if you'd like! I'd be happy to post it on our website! :D
Congrats on your build and thanks for the kind words!
Excelente
Muchos Gracia, Nelton! Sorry for the late reply (Covid craziness!). I appreciate your kind words...thanks for stopping by to say so! :D
Hi, girl... beautiful bench...congratulations...I will try to make one...👍👍👍👍👍👍👍👍
Thanks so much Luis! Good luck on your build! If you have any questions, post them in these comments and we'll try and help you.
@@HomeJelly thank you...your projects are AMAZING...today I bought some woods but...I will use them for another project.
@@HomeJelly I'm going to follow you on Instagram...this way you can see profile.
@@wagnerluis764 - Aww! That's so nice of you to say! I hope you have subscribed to our channel. We love DIYers like you who express such enthusiasm and support! It really makes our day, week AND year! Cheers to you, Luis!
@@HomeJelly Yes ... I am enrolled in the channel ... and I follow you on Instagram ... in instagram I use the name podeserra17 ... happy new year.
it is really a Great job , like and subscribe ...... Bravo ... go on
Thank you so much! You're so kind to leave such an encouraging message! We're so happy you have subscribed as well! New video coming soon! :D
Thank you for putting this video together. I love it. I was wondering what color and kind of paint, stain, and sealant you used? Thanks!
Hi Jim! My apologies for the delay in responding! Thank YOU for your kind words and watching my video...I really appreciate it! As for paint, stain and sealant, I used (paint) Valspar, interior/exterior Black 600073/Satin, (stain) Varathane, exterior wood stain/sealant Golden Mahogany.
If I made this bench again, I would definitely add an extra wood sealant like Varathane Clear Satin water-based exterior Spar Urethane sealant. In fact, I plan to refinish this one by giving it a light sanding, re-staining, then I'll add a couple coats to ALL the surfaces, including the bottom with this sealant.
I hope this helps! Thanks again for stopping by!
@@HomeJelly Thank you very much!
Ficou muito lindo
Obrigado Marizete! Isso é tão gentil de sua parte dizer. Tenha um dia maravilhoso!
hi. thanks for the great video! what is the name of the protective water proof sprayer that you used? not listed. Thanks!
Goodness! My apologies for the delayed reply! There are many wood protective sprays, but I used Olympic Waterguard Clear Wood Spray (available at most box stores). Cheers!
I’m almost finished building this and it’s looking good. The only problem I’m running into is that it’s twisting a little and so the feet won’t sit flat on the floor. I haven’t put all the 2x4’s in place uet and so maybe it will settle. I think part of the problem is that it’s almost i possible to find perfectly straight 2x4’s and so you always work with a bit of warp.
That's the problem you run into when you make a flat bottom. You want the minimum number of contact points (four). I would recommend cutting four pieces an inch and a half or two inches longer than the others and then make sure they are the outside pieces when you assemble. You could get really fancy and cut sets of four pieces progressively shorter and then assemble them so they form an arch. But, the point of this project was to be simple.
Beautiful bench. I'd love to try to make one, but I live in an urban area. Do you ever worry that someone might steal it, and what could one do to prevent that from happening? Respectfully asking.
Thanks so much toorpat 1! So kind of you to say.
As for the stealing factor? I totally get it. My husband's office is in an industrial/tech biz area, so there's not much foot traffic. But, if there's a way you could attach some heavy-duty eye bolts (amzn.to/3eZJs7c) to the back of the legs, then attach a cable to something secure, that might work. Additionally, this bench is pretty heavy, so, someone would have to have some serious cajones to take it. I hope this helps!
i would keep it indoors at night
@@titi5664 that's a good solution. It is a bit heavy, so that might be a challenge. However, it could also be a good workout - just lift with your knees though! :D Good luck! Please send me a photo when you're done! Send to: skaie@homejelly.com Enjoy!
I am your new subscriber from India 🇮🇳 , well i live in a tropical part of india( north east region) where varieties of timber & wood available what i am saying is that please do highlight tools & name of the timber not in the link coz ordinary people lake me wouldn't understand
#awesome work 👍
Hi Poujai pmei! My apologies for the late reply...wow! India! That's fantastic! I sure hope you are well and happy during this crazy time. My suggestion would be to print or write out the supplies and tools list - see the link in the description above to go to the blog. Take the list to your local tool shop and wood supplier and ask them what you might be able to use in your part of the world. Thank you so much for stopping by...good luck!
Great project, just one question it didn't look like you screwed down each of the long 2x4 the camera angle didn't show it. Was it alternated? Thank you
There's no need to screw down the long 2x4s (EXCEPT for the LAST long 2x4 board - you do need to create pilot holes, then screw to attach to the last 1x4 - minute 3:43) because they are being secured by the short 1x4s and 2x4s - each of those boards are screwed into the long 2x4s (see assembling part of this video @ minute 2:48). The amazing thing about this project is that it's designed to build upon itself. This bench is super sturdy (and heavy!). The KEY is the make sure the drill holes are STRAIGHT. If I were to do this project again, I would use something like the Milescraft Drill Block: amzn.to/2DiJZQc AND I would drill each screw hole down into the next/adjoining board (creating a pilot hole). This would insure that the boards would totally sit tight and gorgeous-looking! I hope this helps!
Thanks for responding
@@clivesyblis2523 Of course! You're so welcome! Thanks for stopping by - have fun DIYing - let us know what you're up to, and please visit again! :D
Hello my friend i Like U job good job my friend 👍👍🤝🤝
Thanks so much! It was fun to make!
I like it , lol going to get my bf to make one 😊
Fun! This would make such a wonderful holiday gift! Have fun and thanks for your kind words!
If this is sitting outside I would stain and paint all side's and sealed it with a deck sealer to protect the wood from weather !!
You are totally right! This was a FIRST for me and I've learned so much from kind and knowledgeable people like you. I added in the video that tip as well as in the blog. Thank you for taking the time to watch and leave your handy tip! Cheers!
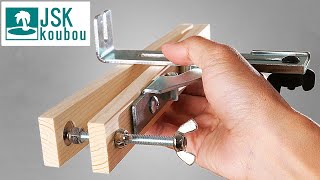
For the pilot holes what was the length uses with the block of wood.
Hi @cwpc2031! That small piece of wood (with the arrow) was (from the END of the board) about 1 1/2 inches in length, and (from the SIDE of the board) about 1". If you meant depth of pilot holes, I only drilled in about 1/4 inch, but you can drill as deep as a 1/2 inch. . I did this to avoid splitting the wood once I started screwing in the screws. I hope this answered your question. Happy DIYing!
How long can i make this without needing to add a center support? Hoping to make a 10ft bench for our dining room (:
Thanks for the question Analeigh! According to my woodworking colleagues, if you build a bench longer than 70"-72", it's recommended to add a center leg. You can also input your dimensions into the "sagulator" (sag calculator :D): woodbin.com/calcs/sagulator/
So...what you could do, is find the center, and create the same leg support as your end legs/pieces. This will keep the integrity and look of your bench strong, cohesive and beautiful. I hope this helps!!!
Any reason this same plan couldn't be used to make a table (just making taller legs, and doing more layers)??
Hi Mick! Sorry for the late reply! Covid craziness 'n stuff! YES! You absolutely can apply this how-to to a table, side table, etc. That's what's so fantastic about DIYing...it's customizable! Thanks for your inquiry!
Could you make this with 1x2s?
Hi Anna. I've never made this bench with 1x2s, but you can certainly try! I think it would be a thinner bench (width-wise) that could carry less of a load (lbs. -wise). Still, you could possibly add or "stack" more 1x2s to create a wider seat. Also, I might shorten the cut lengths by one foot so it's also more sturdy in the middle. Why not give it a try? If you do, PLEASE let me know how it goes! I'd love to add your experience to the post! Cheers and good luck!
What stain did you use for the legs?
Hi! Thanks for asking! I used Rust-Oleum's Varathane light walnut stain: amzn.to/2oi9Q6x . I'll add this to the supplies list. Thanks again - happy DIYing!
What color paint did you use ?
If you're going to stain the wood before you put it together, stain all sides to help protect it. Even though some of those boards are sandwich together water will still get in between if you don't glue them together!
YES! I totally agree, EMCal! Even though I've been DIYing for years, I'm still learning. Your tip to stain all sides is a good one and I continue to reach out to viewers and recommend this added step. Thanks so much for adding to the conversation! :D
I finally added a text card to this video (UPDATE Tip!) to stress the importance of painting or staining ALL surfaces. Thanks again for your handy and helpful comment! Cheers!
@@HomeJelly Keep up the good work, it seems like you have a lot of great ideas!
@@LimonEllie Thank you so much! Your comment gave me a big 'ol smile! :D
Can someone post the board lengths for the legs. I cannot get homejelly on my device. TIA
18 1/2 inches for the 1 x 4's and 15 inches for the short 2x4's.
A good height for a bench is 18 inches. Build off that. A 2x4 is 1.5 inches by 3.5 inches wide, so your thin pieces need to be 3.5 inches longer than your thick pieces.
All plank dimentions are in inches right ??
Yes! All dimensions are in inches.The cut list can be found on HomeJelly.com - the link to the post is provided above. Thanks for stopping in!
Great project! @3:02 you should really emphasize to use EXTERIOR wood glue.
Great tip, Rob! The glue I used and included in the supplies list is an interior/exterior grade glue, but clarifying would also be good. I'll make a note of it in the blog directions post haste! Thanks for your. helpful comment!
My brother made one of these 2 weeks ago but only used stain and sanded, stain and sanded repeatedly and polyurethaned it and it’s like Glass.
Do you mean fragile? thinking about doing one, but concerned about it's resistance (sorry, not english speaker)
I love it! Natural wood is always a good design choice. I bet it looks amazing. Thanks for letting me know, Pacific Northwest360Bear!
@@mairaoliveira116 The key to this bench's resistance to the elements is a good finish. As noted on the video, I learned that ALL surfaces need to be protected. Laying an exterior finish, sanding, then layering again is a good start. If you're really concerned, repeat this last step. It's been 2 years, and, other than needing a good dusting and re-finishing exterior spraying, this bench looks fabulous! Good luck!
@@HomeJelly Thanks for answering. Mine won´t be outside, I´m concerned about the weight it can stand. Do you think the bench can stand 3 adults sitiing on it?
@@mairaoliveira116 Absolutely. This bench, if you follow my instructions, is a very sturdy bench and will easily hold 3 adults. Enjoy!
I am having a hard time seeing the measurement for the screw placement. Help plz
Hi Teresa! You can refer to steps 1- 2 of the PUTTING-IT-ALL-TOGETHER INSTRUCTIONS on HomeJelly. There are also diagrams. The placement was about 3/4" - 1" from the edge of each leg at the bottom and top. Again, the instructions and diagrams will further explain: www.homejelly.com/diy-sleek-slatted-bench-with-ease/ Hope this helps and thanks for stopping by! :D
How much have you sold these for?
I only built this one. I love DIY. Selling my DIY? Not so much. Thanks for the inquiry, though. If you build to sell and you're looking for how much to charge (or would like to know more about this), I would look on sites like Etsy or custommade.com.
I hope this helps! Good luck and thanks for stopping by! :D
Yeah your comment that "you don't need to seal the bottom edge because it doesn't show" is typical of beginners. Just because you can't see it doesn't mean it doesn't need to be sealed. That is the most important part because it is end grain and will wick up moister faster than than any other surface. This is common sense. You should seal all surfaces especially because it is going to be placed outdoors and even if it was indoors I would seal all surfaces.
@Machigane - you are TOTALLY right! Since this project, I've learned how important it is to seal all surfaces of wood , especially since it is an outdoor piece. I will definitely add this UPDATED TIP to the post and description soon.
Beginners...sheesh! (wink) Thanks for your input - I love learning from viewers and will continue to work hard at improving my DIY skills! Cheers!
I agree
AGREED.
Oh settle down
Get over yourself and be a little less snarky.
How much was everything?
Hi Sucy! The supplies, if you buy them all, will run you around $100. If you have leftover wood, paint, screws, wood glue, etc., it could be even less expensive. If you're talking about buying all the tools, that a whole other expense, but I'm assuming you're mostly talking about the supplies? Feel free to ask me any other questions. I hope this helps! Good luck on your project!
why is there a 3.5in difference between the length of 1x4 and 2x4 pieces? Shouldn't it be a 4in difference??
Hi AT! Thank you for your inquiry. This question haunted me when I started getting into more complex wood-working projects. When it comes to American lumber ('cause that's all I know as of now :D), 2x4s are not actually 2 inches by 4 inches. When the board is first rough sawn from the log, it is a true 2x4, but the drying process and planing of the board reduce it to the finished 1.5x3.5 size. Read more here: www.thesprucecrafts.com/understanding-wood-sizes-in-softwood-lumber-3536905 . I hope this helps!
What are the measurements?
There is a complete how-to, including cut list and instructions on my website: www.homejelly.com/diy-sleek-slatted-bench-with-ease/ Have fun!
seal the bottom ok doesnt hurt it helps
s
You're totally right. I'll do that soon. I was initially thinking of saving on supplies, but, the longevity of this piece is more important. Thanks for your input and contribution!
I finally added a text card to this video (UPDATE Tip!) to stress the importance of painting or staining ALL surfaces. Thanks again for your handy and helpful comment! Cheers!
I am confused about measurements. The leg 2 ×4 = 15 inches. The seat 2 × 4s rest on top ....a total of 19 inches. Yet the 1×4s are to be cut at only 18.5 inches. Half inch missing? Or am i being thick?
2x4 and 1x4 are nominal sizes, the actual wood sizes are 1-1/2" x 3-1/2" and 3/4" x 3-1/2".
Thanks for the reply. Will be attempting the bench this weekend.
@@love_peace1996 Thank you so much for clarifying! You are CORRECT! Us DIYers do have to navigate through the wild weird world of nominal sizings...wish it were simpler like the metric system! Thanks again!
👍👍👍👍👍
How is the bench holding up outdoors? That wood is not meant for exterior use.
Hi Rob! Because I used waterproofer spray, it still looks like new (well, maybe a little dusty from time to time). I also painted some of the boards with outdoor paint, so it's been great.
The cost was about 1/3 per board compared to pre-treated wood, so I also saved a little bit of money on this project. If you don't want to deal with spraying or painting, outdoor pre-treated/pressurized wood is a good way to go.
I chose to go this route...almost as a way to see if spraying would work. But, I'm kinda nutty like that to chance it. Still...it's holding up great even after a pretty rainy winter.
Hi Rob! Thought I'd give you an update - it's been about a year. The bench is still looking great! After a quick dusting, it still is beautiful. However, after your comment, I'm going to seal it with another coat or two of outdoor sealant to keep it looking crisp. Thanks again for the tip!
@@HomeJelly Thank you! I've already made 2 of them. One for myself and one as a housewarming gift for my daughter!
@@robira1313 Wow! You've been a busy DIY bee! I bet your daughter loves it. What a wonderful gift. Thanks for letting me know!
Rybobi sells a 4 pack of countersink bits for about $11. Saves a lot of time and trial and error.
Thanks so much for the handy tip, Dylan. Wish I knew you before I started this project. :D Seriously, though, I'll have to look into those and add that to the how-to. Have a great rest of your day! :D
On the topic of saving time, an Impact Driver will take you a long way instead of using one drill for everything.
I like how this bench turned out though, so it just may be my next project.
@@woodensquid560 thank you so much for your added tip (sorry for my late reply-Covid craziness!). If I were to make another, I'd absolutely use an impact driver (my cousin has one I can borrow :D). I'd love to see your bench if you make one! Cheers!
@@HomeJelly You can also by a combo tool for your drill that has a countersink on one end and a driver bit on the other. You can even change the driver bit to fit your screws (torqx vs. phillips vs. square)
Have you ever actually SAT on a bench like this?
Excruciatingly uncomfortable after a very short time.
Designs like this, usually in public spaces, are meant to keep people moving, while seeming to be friendly and accommodating.
You'll be putting a cushion on it if you use it often.
In actuality, the slats on this bench are pretty close together, so it's quite comfy! Of course, a padded cushion would add to it's "sitting score", but then you wouldn't see the beautiful work you put into it. Hmm...clear fabric would be a fabulous thing, now that I think about it! Thanks for stopping by! :D
Parvez Aslam good thanks so much love u miss you so much love u 🇵🇰 very good thanks thanks 🤔 thanks 🤔 thanks
What's that baby weigh??
Hi Chris! Yep! It's a definite weighty bench - about 40lbs. But, it's great as an outdoor bench because it won't be blown over by weather and can handle a lot of weight being sat on it. :D Thanks for the inquiry!
I find it difficult to get all the "legs" perfectly even so there is no wobble.
The real key is to make sure they are cut the exact same length. However, there are a couple things you could do if you're not wanting to re-cut. 1.) If it's just a slight difference in length, you could sand the longer piece(s) a bit at a time to see if that helps with the wobble. 2.) You can place the longer pieces on the outside or stagger them. 3.) You could add some felt pads to the bottoms: amzn.to/3kuyisC
Still, the proper fix is to cut all leg pieces exact and equal to size. I hope this helps! Good luck, Rob!
🎆🎇😜🇻 🇪 🇷🇾
🇳 🇮 🇨 🇪😜 🎆🎇
Hi Jonny! Thanks much! I really like your comment...it's so artistic! Have a great day! :D
Nails? I think you meant screws
Oh, my goodness! I never noticed that!!! You're RIGHT, dilip patel! They are screws! Thanks for the catch! Cheers! 😁
Videos says 3 pieces of 1x4's. The printed instructions say 2 pieces of 1x4's. .....??????
2 boards of 1” x 4” x 10” is sufficient to make the 12 pieces necessary
Thanks Dave - yes, that is correct. Sorry for the confusion, Oscar! Hope this clarifies.
I just spent a few hours cutting all the boards from the cut list you provided, problem is the cut list is not accurate. The amount of 2x4’s shows 6 on your cut list but you need 7, the amount of 1x4’s shown on the cut list is 8 buy you actually need 12. This is a very simple project, not sure how you could miss providing the correct number of boards. Fortunately I bought a few extra but you really need to redo your cut list, and saying you don’t need to stain or paint but three sides is of course very wrong for a bench to me used outside, I did see your added note but honestly I am disappointed with the inaccuracy of your information.
Seems you purchased a shorter length, thus needing more
Hi John! Thank you so much for letting me know. I'm usually quite accurate on my cut lists, so I'll have to definitely go back and assess/make the needed corrections. As char lotte mentions below, the length of your boards may be different than the ones I used. Still, I'll recheck and even make a note as to the length so DIYers will know to add more materials if needed. Cheers!
Jesus John, enough with the criticizing.....get a life!
That sound too complicated.
DIYing certainly can be. If you're interested in more projects, check out my channel for all levels of how-tos. They're really fun! Thanks for stopping by and good luck with your next project! :D
Not really. Just takes patience.
first of all you didnt mentioned the health risks of working without air filter..
First of all, grow up. Consider learning how to communicate in english properly as well. "you didnt mentioned". you miserable ESL.
My adventure with woodworking started with Woodglut.
What is Woodglut?