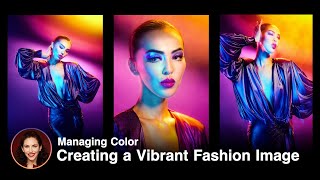
Really awesome, as usual. Thanks for sharing all the details, including the neutral gel on the D1. Thanks also for switching back and forth between the out-of-camera image versus the processed image. That helps so much with seeing what you did.
Look forward to next video. I will check your legacy videos also when I have time. Thanks for the refresher course on Portrait Retouching and tips. Great information. Thanks.
Very good instructor. I like following her advance techniques and I always learning new or refresh my memory on techniques just in case. Thanks for sharing your expertise.
I will use myself as a test model to refresh my memory or research men's fashion. I will look over your book also on posing again for men. I highly recommend Lindsay book. Thanks for the tips.
Your Video is a very nice presentation, if you guys have ever looked at the Centerfold in PB you will also see that some times there is a direct light on the face of the model very similar to process you’re talking about In this video! PB’s trick is to do it in such a way it’s not so obvious !
Dear Lindsay ... i very much appreciate your creativity in creating a wide diversity of photoshoot throughout your career. The point is, you always show how you use your lighting to achieving your amazing portraits, however not every one owns profoto lighting, and on the top of that, the availability of a five degree grids seems too difficult to find on the market. What if you show the same with different lighting modifiers such as the Rogue grids or the 7 inch reflectors with 10 degree grid. Thank you so much.
I understand, however I personally use Profoto, so that is what I show. Many of (if not all) of the techniques I use can be interchanged with the equivalent lighting and modifiers. It's not possible for me to show every variations of every product, so that's why I stick to showing what I use.
Imagine doing what every photographer runs from, hard light in studio, shooting in harsh noon light, photographing dark skin models more than twice in your life and being good at it
Thank you for the informative video Lindsay! I was wondering though why you didn’t use the D1 as the main light? Would you still need to use the ND filter? I would love to know!
Typically my D2s can actually turn down even lower power than my D1s! It was probably because it was a workshop and I was using 12 strobes at the same time and had just distributed them amongst sets.
Be sure to check out all of my lighting guides at learnwithlindsay.com that have lighting ratios for all of them. On this, it was probably 2.5 stops less, but as you can see the chest is a bit lighter than the hands, so it depends on where you were metering.
@@lindsayadlerphoto Lindsay, Thanks for the info. Yes the "fill" is just enough to give some detail. Gives it depth. I've always called it "butterfly lighting" probably similar in concept. All the best!
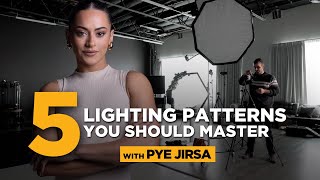
Anyone using artificial lighting needs to understand the inverse-square law. Due to the way light expands from POINT sources the footprint of the light increases 4x each time the distance from the source doubles. An easy way to remember this was a trick my lighting mentor Monte Zucker used back in the 1970s with single power manual flash: f/stop numbers. If the distance from the light changes from 22-16-11-8-5.6-4 feet its intensity will change by one f/stop with each ‘f/stop’ interval or two f/stops each time the distance doubles. So if you want to high contrast highlight-to-shadow gradients from your lighting you need to put the lights close to the face of the subject and if you want buttery smooth fall off you need to to have them further away - why fashion and glamor photographers who understand this have huge studios and Hollywood sound stages are so large. The tool of choice for the high contrast look is the beauty dish which has a metal disk over the flash tube to prevent it from creating more exposure in the center and to eliminate the specular reflection of the flash tube on the skin. In might seem logical to put the fill source opposite the key light but you need to take into account that natural light, key and fill, comes from overhead and when fill is placed below the face it will be effective for controlling the tone of the shadows but the modeling on the face will not be natural. That’s not to say lighting on a face must always look natural but it is what viewers will perceive as “normal”. For example the reason flash in a hot shoe in portrait mode looks “fake” is that the shadow and specular highlights it creates on skin and other 3D objects are ‘unnaturally’ low compared to faces and things illuminated by sun in the southern sky and northern skylight north for the equator with the 45° angle of the sun at mid-morning and mid-afternoon producing the best 3D rendering because the shadow the nose casts covers half of it. Having enough space to move lights far away from subjects a reason why hobbyists struggle getting the same ‘soft’ look in their lighting in their living rooms and instead without realizing wind up bouncing “spill” fill off ceiling and walls which will create the same soft light an overcast day but with very little precise control. Artificial light sources need to get larger as the distance from the subject increases not to spread the light - inverse-square does that - but rather to control how the specular highlights the light creates look. That concept is referred to as the ‘apparent’ size of the light source or how big it looks from the POV of the subject. The sun is huge but so far away its ‘apparent’ size is that of a point source.


Great classes. Glad you are doing well. Take care!! Thanks for the training in Photo editing and photo shoots a while back.
Thanks for the tips in video. May look at sales on fashion jewelry during the fall and spring for next personal project.
"Hard light can look really nice in camera".... that blew my mind🤯. This very true
Really awesome, as usual. Thanks for sharing all the details, including the neutral gel on the D1. Thanks also for switching back and forth between the out-of-camera image versus the processed image. That helps so much with seeing what you did.
Thank you so much Lindsay, as always very helpful and informative tutorial! ND Gel tip is awesome! Good luck and keep creating!
Love the resolution of the camera. Really stand out. Love Canon cameras also. Thanks for giving back to the community.
Love another umbrella class. Good to know other ways to use it. Thanks!!
Great job on men portraits and lighting also. I have to see what my budget in fall or spring to get fashion jewelry. Thanks for the class.
The post processing explanation and your thoughts on "why" is the way to go with CZcams videos.
Great, informative video.
Well done you.
I always walk away with both newly learned skills and photo inspiration from everyone one of your excellent tutorials. Sincere thanks!
Wow, definitely took me back to old age Hollywood visual world. Good job!
Thanks for the sample photos from photo shoot. Always learning. Have to make sure my photos are top quality. Thanks for the creative ideas.
Look forward to next video. I will check your legacy videos also when I have time. Thanks for the refresher course on Portrait Retouching and tips. Great information. Thanks.
I am glad you did a class on a Prophoto Para. Seen it at event awhile back.
Amazing ❤ thank you Lindsay and Adorama!
Thank you for doing behind the scenes video as it educates on the how.
Very good instructor. I like following her advance techniques and I always learning new or refresh my memory on techniques just in case. Thanks for sharing your expertise.
Thank you for your advice, I am new to the world of photography, and I learn a lot from your videos, greetings from Venezuela¡
Thanks for watching!
I will use myself as a test model to refresh my memory or research men's fashion. I will look over your book also on posing again for men. I highly recommend Lindsay book. Thanks for the tips.
I have to see what props on sale in September. Thanks for the video and sample of the R5 mark 2.
Great tips for part time photographers, hobbyist, or work for jeweler that wants to update their website or E Commerce site. Thank You.
I am glad their video on how to be creative. Great tips.
Your Video is a very nice presentation, if you guys have ever looked at the Centerfold in PB you will also see that some times there is a direct light on the face of the model very similar to process you’re talking about In this video! PB’s trick is to do it in such a way it’s not so obvious !
Another excellent video! Lindsay rocks!
Dear Lindsay ... i very much appreciate your creativity in creating a wide diversity of photoshoot throughout your career. The point is, you always show how you use your lighting to achieving your amazing portraits, however not every one owns profoto lighting, and on the top of that, the availability of a five degree grids seems too difficult to find on the market. What if you show the same with different lighting modifiers such as the Rogue grids or the 7 inch reflectors with 10 degree grid. Thank you so much.
I understand, however I personally use Profoto, so that is what I show. Many of (if not all) of the techniques I use can be interchanged with the equivalent lighting and modifiers. It's not possible for me to show every variations of every product, so that's why I stick to showing what I use.
Ooooh, Christmas came early 😊
goooorgeous
Photoshop Elements is good also. Not sure what the new version has.
Your work is beautiful and I would love to attend one of your workshops but $2K+ is just out of reach for my budget!
We had a $299 workshop this past weekend. We also offer our own payment plans, and have options through Affirm, Klarna, etc.
The nonprofit very happy with my work and they want me to do more. It good to give back.
Imagine doing what every photographer runs from, hard light in studio, shooting in harsh noon light, photographing dark skin models more than twice in your life and being good at it
❤❤❤
Quick q: Why did you not opt to use the D1 as the main key and a variable D2 as the bg light?
Using a D2 on the background would've been even tougher than using a D1 because the D2 has double the output of the D1.
Thank you for the informative video Lindsay! I was wondering though why you didn’t use the D1 as the main light? Would you still need to use the ND filter? I would love to know!
Typically my D2s can actually turn down even lower power than my D1s! It was probably because it was a workshop and I was using 12 strobes at the same time and had just distributed them amongst sets.
@@lindsayadlerphoto ohhhh I wouldn't expect that for the D2s to go lower in power! Thanks for the response :)
What are your ratios? thats the real key to this look...And a model w great make-up
Be sure to check out all of my lighting guides at learnwithlindsay.com that have lighting ratios for all of them. On this, it was probably 2.5 stops less, but as you can see the chest is a bit lighter than the hands, so it depends on where you were metering.
@@lindsayadlerphoto Lindsay, Thanks for the info. Yes the "fill" is just enough to give some detail. Gives it depth. I've always called it "butterfly lighting" probably similar in concept. All the best!
Is there any way to use a 5 degree grid on normal Bowens Mount lights that aren't profoto lights? 😭
Hi there! I'm sure Bowens has a small grid, and then you can attach cinefoil around the end to make it smaller if you need.
Anyone using artificial lighting needs to understand the inverse-square law. Due to the way light expands from POINT sources the footprint of the light increases 4x each time the distance from the source doubles. An easy way to remember this was a trick my lighting mentor Monte Zucker used back in the 1970s with single power manual flash: f/stop numbers. If the distance from the light changes from 22-16-11-8-5.6-4 feet its intensity will change by one f/stop with each ‘f/stop’ interval or two f/stops each time the distance doubles.
So if you want to high contrast highlight-to-shadow gradients from your lighting you need to put the lights close to the face of the subject and if you want buttery smooth fall off you need to to have them further away - why fashion and glamor photographers who understand this have huge studios and Hollywood sound stages are so large.
The tool of choice for the high contrast look is the beauty dish which has a metal disk over the flash tube to prevent it from creating more exposure in the center and to eliminate the specular reflection of the flash tube on the skin. In might seem logical to put the fill source opposite the key light but you need to take into account that natural light, key and fill, comes from overhead and when fill is placed below the face it will be effective for controlling the tone of the shadows but the modeling on the face will not be natural.
That’s not to say lighting on a face must always look natural but it is what viewers will perceive as “normal”. For example the reason flash in a hot shoe in portrait mode looks “fake” is that the shadow and specular highlights it creates on skin and other 3D objects are ‘unnaturally’ low compared to faces and things illuminated by sun in the southern sky and northern skylight north for the equator with the 45° angle of the sun at mid-morning and mid-afternoon producing the best 3D rendering because the shadow the nose casts covers half of it.
Having enough space to move lights far away from subjects a reason why hobbyists struggle getting the same ‘soft’ look in their lighting in their living rooms and instead without realizing wind up bouncing “spill” fill off ceiling and walls which will create the same soft light an overcast day but with very little precise control.
Artificial light sources need to get larger as the distance from the subject increases not to spread the light - inverse-square does that - but rather to control how the specular highlights the light creates look. That concept is referred to as the ‘apparent’ size of the light source or how big it looks from the POV of the subject. The sun is huge but so far away its ‘apparent’ size is that of a point source.
ok
Uh thanks for explaining what the inverse square law is lol. Not really the purpose of the video though!
I just love it when the Pros chime in......
🏆🏆🏆🏆🏆🏆🏆🏆🏆🏆🏆👍👍👍👍👍👍👍👍👍👍
you're so beautiful